JeepParts
My Garage
My Account
Cart
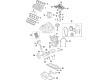
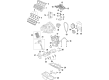
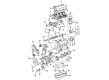
OEM 2009 Dodge Challenger Crankshaft
Crank Shaft- Select Vehicle by Model
- Select Vehicle by VIN
Select Vehicle by Model
orMake
Model
Year
Select Vehicle by VIN
For the most accurate results, select vehicle by your VIN (Vehicle Identification Number).
3 Crankshafts found


2009 Dodge Challenger Crankshaft Part Number: 5037458BD
Product Specifications- Other Name: Crankshft
- Replaces: 5037458AB, 5037458AC, 5037458AA
- Item Weight: 84.20 Pounds
- Item Dimensions: 32.7 x 11.6 x 10.7 inches
- Condition: New
- Fitment Type: Direct Replacement
- SKU: 5037458BD
- Warranty: This genuine part is guaranteed by Mopar's factory warranty.


2009 Dodge Challenger Crankshaft Part Number: 53021302BB
$215.27 MSRP: $317.00You Save: $101.73 (33%)Product Specifications- Other Name: Crankshft; Crankshaft See Note
- Item Weight: 61.10 Pounds
- Condition: New
- Fitment Type: Direct Replacement
- SKU: 53021302BB
- Warranty: This genuine part is guaranteed by Mopar's factory warranty.

2009 Dodge Challenger Crankshaft Part Number: 4792692AB
Product Specifications- Other Name: Crankshft
- Replaces: 4792692AC, 4792177, 4792692AA
- Item Weight: 56.60 Pounds
- Item Dimensions: 22.3 x 8.4 x 7.7 inches
- Condition: New
- Fitment Type: Direct Replacement
- SKU: 4792692AB
- Warranty: This genuine part is guaranteed by Mopar's factory warranty.
2009 Dodge Challenger Crankshaft Parts and Q&A
- Q: How is a Crankshaft Installed in an Engine on 2009 Dodge Challenger?A: You should verify the main bearings are select fit before you install the crankshaft. Place the crankshaft upper main bearings inside the block, ensuring the oil holes are in the same spots. Following that, add the crankshaft into the cylinder block and push it forward as far as you can. Lubricate the thrust washer for the front side and then roll it into the groove found between the No. 2 upper main bulkhead and the crankshaft thrust surface. Slide the crankshaft as far backward as you can, apply lubricant and put on the rear thrust washer in the same way. Put the lower main bearings (3) into the main bearing caps (1) and apply clean oil to them. Cover all of the central bolts of the main bearing cap with oil before attaching them. Attach each main-bearing cap (1) and only tighten each inner bolt (2) with your hands, making sure the #2 main bearing cap is sitting over the inner bolt holes of the block to prevent touching the crankshaft counterweights. Screw the inner bolts to 20 Nm (15 ft. lbs.) and push the crankshaft so the thrust face is in contact with the thrust bearing. Place a 0.25 mm (0.010 inch) shim or feeler gauge between the #2 rear face of the cap and the crankshaft, ensuring it slides in nicely with more than 0.25 mm (0.010 inch) of clearance. Do the same set of steps for the front face of the #2 main cap after moving the crankshaft rearward. If the measurement is less than 0.25 mm (0.010 inch), keep tightening the #2 main bearing cap until the minimum amount is seen. After verifying again, turn the main bearing cap inner bolts an additional 90°. Test for crankshaft end play and secure your connecting rods along with measuring their side clearance. You should tighten the main bearing cap bolts in this sequence: the first set on the inside main cap, the windage tray bolts next and finally the horizontal tie bolts. Set the windage tray (3) in place, grease the bolts, start finger-tightening them and then tighten to 28 Nm and another 90° turn (20 ft. lbs. and another 90° turn) beginning with the bolts in the middle. Place the oil pickup tube (1) and fasten the bolt to 28 Nm (20 ft. lbs.), then tighten the main cap tie bolts to the same torque. After that, attach the rear crankshaft oil seal retainer and oil seal and then install the oil pump assembly. Insert the dowel pin into the crankshaft, then place the crankshaft sprocket next. Fit the timing belt and tensioner, next put on the front timing belt cover and then put on the oil pan. Install the engine assembly and put in exactly the right amount of oil.
Related 2009 Dodge Challenger Parts
 2009 Dodge Challenger Engine Cover
 2009 Dodge Challenger Valve Cover Gasket
 2009 Dodge Challenger Camshaft Seal
 2009 Dodge Challenger Crankshaft Thrust Washer Set
 2009 Dodge Challenger Lash Adjuster
 2009 Dodge Challenger Oil Filler Cap
 2009 Dodge Challenger Oil Pan Gasket
 2009 Dodge Challenger Piston
 2009 Dodge Challenger Rocker Arm Pivot
 2009 Dodge Challenger Spool Valve
 2009 Dodge Challenger Timing Chain Guide
 2009 Dodge Challenger Timing Cover