JeepParts
My Garage
My Account
Cart
OEM 2009 Dodge Journey Evaporator
A/C Evaporator Core- Select Vehicle by Model
- Select Vehicle by VIN
Select Vehicle by Model
orMake
Model
Year
Select Vehicle by VIN
For the most accurate results, select vehicle by your VIN (Vehicle Identification Number).
2 Evaporators found


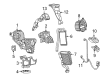
2009 Dodge Journey Control Module, Rear Part Number: 68038191AB
$445.41 MSRP: $649.00You Save: $203.59 (32%)Ships in 1-3 Business DaysProduct Specifications- Other Name: Evaporato - A/C; A/C Evaporator Core, Rear; A/C Evaporator Core Repair Kit; Evaporator Core; Includes: Tubes, O-Rings, Expansion Valve, Screws, Seals.
- Position: Rear
- Replaces: 68038191AA
- Item Weight: 2.30 Pounds
- Item Dimensions: 20.3 x 13.7 x 9.9 inches
- Condition: New
- Fitment Type: Direct Replacement
- SKU: 68038191AB
- Warranty: This genuine part is guaranteed by Mopar's factory warranty.

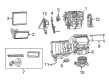
2009 Dodge Journey Evaporator Core, Front Part Number: 68038539AB
$199.41 MSRP: $294.00You Save: $94.59 (33%)Ships in 1-2 Business DaysProduct Specifications- Other Name: Evaporato - A/C; A/C Evaporator Core, Front; Evaporator
- Position: Front
- Replaces: 68038528AA, 68038539AA
- Item Weight: 4.00 Pounds
- Item Dimensions: 16.8 x 12.9 x 8.4 inches
- Condition: New
- Fitment Type: Direct Replacement
- SKU: 68038539AB
- Warranty: This genuine part is guaranteed by Mopar's factory warranty.
2009 Dodge Journey Evaporator Parts and Q&A
- Q: How to Install a Rear A/C Evaporator on 2009 Dodge Journey?A: You must ensure the A/C evaporator is installed after you adjust the refrigerant oil because incorrect levels may result in an A/C system breakdown and could damage the compressor. For only a rear A/C evaporator replacement, inject 30 milliliters (1 fluid ounce) of the suggested refrigerant oil. Every time you separate a refrigerant line or expansion valve, switch out the O-ring seal to ensure no leaks occur. Attach the A/C evaporator at the rear in the heater-A/C housing, direct the evaporator tubes above the rear heater core hoses and check that the seals are in place. Then, place the evaporator cover on the outside edge of the housing and fasten it using one retaining screw tightened to 1.2 Nm (10 in. lbs.) Attach the rear heater-A/C housing to the lower rear heater-A/C housing, making the necessary adjustments and hold it in place with five screws turned to 1.2 Nm (10 in. lbs.). Use the metal retaining clip to hold the lower housing in place, fully engage the evaporator tube retaining bracket and link the wire harness to the lower rear heater-A/C housing. Take off the tape or blockage from the rear evaporator tubes and expansion valve ports, oil the rubber O-rings with clean R-134a oil and put them on the rear evaporator tube outlets with just the correct O-rings for the refrigerant. Attach the rear A/C expansion valve to the tapping plate at the end of the rear evaporator tubes, using two bolts tightened to 11 Nm. With the flange positioned at the lower end of the rear heater-A/C housing, install it using three retaining screws that you tighten to 1.2 Nm (10 in. lbs.) and check that the foam seal is set up correctly over the flange. Then, install the rear heater-A/C housing again, connect the negative battery cable and if you refilled the evaporator with fresh refrigerant, add 30 milliliters of refrigerant oil, following the advice for the A/C compressor.
Related 2009 Dodge Journey Parts
 2009 Dodge Journey Blend Door Actuator
 2009 Dodge Journey Cabin Air Filter
 2009 Dodge Journey Heater Core
 2009 Dodge Journey Blower Motor
 2009 Dodge Journey Blower Motor Resistor
 2009 Dodge Journey A/C Compressor
 2009 Dodge Journey A/C Condenser
 2009 Dodge Journey A/C Expansion Valve
 2009 Dodge Journey A/C Hose
 2009 Dodge Journey A/C Switch
 2009 Dodge Journey Blower Control Switches
 2009 Dodge Journey HVAC Pressure Switch