JeepParts
My Garage
My Account
Cart
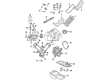
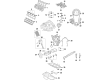
OEM 2009 Dodge Ram 1500 Rod Bearing
Engine Connecting Rod Bearing- Select Vehicle by Model
- Select Vehicle by VIN
Select Vehicle by Model
orMake
Model
Year
Select Vehicle by VIN
For the most accurate results, select vehicle by your VIN (Vehicle Identification Number).
3 Rod Bearings found


2009 Dodge Ram 1500 Bearings Part Number: 68052222AB
$18.13 MSRP: $26.80You Save: $8.67 (33%)Ships in 1-2 Business DaysProduct Specifications- Other Name: Bearing - Connecting Rod; Engine Connecting Rod Bearing Set; Connecting Rod Bearing Set; Rod Bearing; Bearing Kit Connecting Rod Standard See Note
- Replaces: 5019447AA, 68052222AA
- Item Weight: 0.50 Pounds
- Item Dimensions: 3.9 x 2.6 x 2.0 inches
- Condition: New
- Fitment Type: Direct Replacement
- Require Quantity: 6
- SKU: 68052222AB
- Warranty: This genuine part is guaranteed by Mopar's factory warranty.


2009 Dodge Ram 1500 Bearings Part Number: 5012363AE
$16.87 MSRP: $25.00You Save: $8.13 (33%)Ships in 1-2 Business DaysProduct Specifications- Other Name: Bearing - Connecting Rod; Rod Bearing; Bearing Kit Connecting Rod Standard See Note; Bearing Kit Connecting Rod Standard
- Replaces: 5012363AC, 5012363AD, 5018584AB, 5012363AB
- Item Weight: 0.50 Pounds
- Item Dimensions: 4.0 x 2.7 x 2.0 inches
- Condition: New
- Fitment Type: Direct Replacement
- SKU: 5012363AE
- Warranty: This genuine part is guaranteed by Mopar's factory warranty.


2009 Dodge Ram 1500 Connecting Rod Bearing Part Number: 68029429AC
$16.02 MSRP: $23.55You Save: $7.53 (32%)Ships in 1-2 Business DaysProduct Specifications- Other Name: Bearing - Connecting Rod; Rod Bearing; Bearing; Bearings; Bearing Kit Connecting Rod Standard
- Replaces: 68029429AB, 68029429AA, 68029429AI, 68060359AA
- Item Weight: 0.50 Pounds
- Item Dimensions: 3.7 x 2.6 x 1.9 inches
- Condition: New
- Fitment Type: Direct Replacement
- SKU: 68029429AC
- Warranty: This genuine part is guaranteed by Mopar's factory warranty.
2009 Dodge Ram 1500 Rod Bearing Parts and Q&A
- Q: How to Inspect and Replace Rod Bearings to Ensure Proper Alignment and Installation on 2009 Dodge Ram 1500?A: Bearing scoring, typical wear, grooves, signs of fatigue and pitting are some problems to watch for in connecting rod bearings. Always replace any part with abnormal wear. Scan through the connecting rod journals for evidence of scoring, tiny nicks or burrs, because incorrectly aligned or crooked connecting rods may cause abnormal wear to parts like pistons, piston rings, cylinder walls, connecting rod bearings and crankshaft connecting rod journals. If any patterns or damage are an indicator of misalignment, check that the connecting rod is properly in place and replace any bent, twisted or off-track rods. First wipe away any oil on the connecting rod journal, then work the upper bearing insert with oil and insert it properly into the connecting rod. Install the rod and piston assembly with the piston ring compressor and Connecting Rod Guides 8507 so the rod oil slinger slots are up front and the "F" on the pistons points forward. Place the lower bearing insert in the bearing cap, ensuring it's dry, then place a strip of Plastigage along the center of the insert on the cap so it doesn't break apart. Attach the bearing cap and connecting rod to the journal with all bolts tightened to 27 Nm (20 ft. lbs.) and 90-degree turns and do not turn the crankshaft to prevent touching the Plastigage. After you remove the bearing cap, pull the disk out and measure the compressed Plastigage. This lets you check that the bearing-to-journal clearance is as it should be. If everything lines up correctly with Plastigage, go ahead to install the engine components; if not, decide which bearing you'll use and remember that the bolts should not be used again after being tightened to the correct torque. Measure Plastigage a second time on the bearing to ensure it is suitable and after selecting the bearing, install it along with the cap. Tighten the connecting rod bolts to 27 Nm (20 ft. lbs.) plus a 90-degree turn. Then, push a feeler gauge that fits tightly into place between the connecting rod and crankshaft flange. Replace the connecting rod if the resulting side clearance fails to meet the recommended specification.
Related 2009 Dodge Ram 1500 Parts
 2009 Dodge Ram 1500 Oil Pump
 2009 Dodge Ram 1500 Rocker Arm
 2009 Dodge Ram 1500 Cam Gear
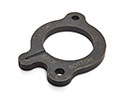 2009 Dodge Ram 1500 Camshaft Thrust Plate
 2009 Dodge Ram 1500 Crankshaft
 2009 Dodge Ram 1500 Crankshaft Pulley
 2009 Dodge Ram 1500 Exhaust Valve
 2009 Dodge Ram 1500 Lash Adjuster
 2009 Dodge Ram 1500 Oil Pan
 2009 Dodge Ram 1500 Piston Ring Set
 2009 Dodge Ram 1500 Timing Cover
 2009 Dodge Ram 1500 Transmission Mount