JeepParts
My Garage
My Account
Cart
OEM Dodge Ram 1500 Rod Bearing
Engine Connecting Rod Bearing- Select Vehicle by Model
- Select Vehicle by VIN
Select Vehicle by Model
orMake
Model
Year
Select Vehicle by VIN
For the most accurate results, select vehicle by your VIN (Vehicle Identification Number).
7 Rod Bearings found


Dodge Ram 1500 Bearings Part Number: 5012363AE
$16.87 MSRP: $25.00You Save: $8.13 (33%)Ships in 1-2 Business Days


Dodge Ram 1500 Bearings Part Number: 68052222AB
$18.13 MSRP: $26.80You Save: $8.67 (33%)Ships in 1-2 Business Days


Dodge Ram 1500 Connecting Rod Bearing Part Number: 68029429AC
$16.02 MSRP: $23.55You Save: $7.53 (32%)Ships in 1-2 Business Days


Dodge Ram 1500 Rod Bearings Part Number: 2421305
$21.97 MSRP: $27.86You Save: $5.89 (22%)Ships in 1-2 Business Days


Dodge Ram 1500 Connecting Rod Bearing Part Number: 68207790AA
$6.32 MSRP: $7.70You Save: $1.38 (18%)
Dodge Ram 1500 Bearing Set, Front Driver Side Part Number: 5102066AA
$306.58 MSRP: $335.00You Save: $28.42 (9%)Ships in 1-2 Business Days
Dodge Ram 1500 Rod Bearings Part Number: 4397658AB
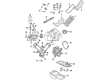
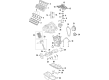
Dodge Ram 1500 Rod Bearing
Choose OEM Rod Bearing that meet Dodge factory standards. Dodge designs and tests every component for precision and durability. Each Rod Bearing follows strict manufacturing steps to lock in quality and fit. If your Dodge Ram 1500 matters to you, OEM parts make the smart choice. You'll get the exact look, feel, and performance you expect. Shop genuine Ram 1500 parts at the highly competitive prices online. Enjoy a manufacturer's warranty, a hassle-free return policy, and rapid delivery. No more guesswork with off brands. Get genuine parts with exact fit and true factory performance. Shop with confidence today at JeepPartsDeal.com.
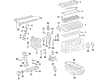
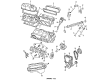
The Dodge Ram 1500 Rod Bearing is one of the most critical parts that reduce the failure rates and increase the effectiveness of the Dodge Ram 1500 models. Primarily intending to bear crucial parts of the engine such as the crankshaft and the camshaft, the Rod Bearing enables a free movement and bears lubricating oil film in pressure for a good performance of the engine. This Dodge Ram 1500 Rod Bearing comes in both the bi-metal and tri-metal options and is designed to handle a great deal of fatigue as it is ideal for use in different models of the Ram 1500. The tri-metal version is enhanced by a special dry film lubrication that enhances the decrease of friction moreover can enhance startup protection essential for high power output engines. The players also seem to pay particular attention in the design of the Dodge Ram 1500 since this goes along a way in offering safety by reducing the incidences of engine failure. The usefulness of the Rod Bearing is further proven by the fact that it could fit into various Ram 1500 models, thus, establishing its reliability in preserving the car's optimal performance. As a great car model which has corresponding features for both daily use and commercial service, the Dodge Ram 1500 Rod Bearing is quite competitive in the car market in terms of strength and technology. Finally, the Dodge Ram 1500 Rod Bearing is a perfect representation of the brand's asses to durability and quality so that car owners can count on their vehicles for the longest time possible alongside availing the raw power of the Dodge Ram 1500.
Dodge Ram 1500 Rod Bearing Parts and Q&A
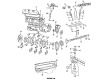
- Q: How to Ensure Proper Alignment and Wear of Rod Bearings on Dodge Ram 1500?A:Look at the connecting rod bearings for signs of normal wear, as well as scoring, grooves, signs of fatigue and pits. Shops that sell bearings will often replace any that show unusual wear. Find and repair any scoring, nicks or burrs on the connecting rod journals, because misaligned or bent rods may cause early wear of Pistons, piston rings, cylinder walls, connecting rod bearings and Crankshaft journal surfaces. If you see damage or unusual wear that might be caused by a misaligned rod, check the rod's position and change any bent, twisted or misaligned connecting rods. Make sure the oil is off the journal of the connecting rod, put lubricant on the top bearing and slide it into place on the connecting rod. Insert pistons and rods with Grabber Pins Special Tool 8507 and the piston ring compressor and ensure the rod won't notch, as the "F" mark at the wrist pin location leads to the front of the engine. Dry the lower bearing insert and put it into the bearing cap, then lay a complete strip of Plastigage across the center of the insert at the very center of the cap without breaking it. Attach the bearing cap and the connecting rod to the journal and fasten them with bolts at 27 Nm (20 ft. lbs.) plus a 90° turn around the crankshaft to avoid touching the Plastigage. After taking off the bearing cover, measure the reduced Plastigage in the bearing to discover how much clearance you have and check that it measures the same everywhere across the insert. Variations in clearance could be the result of a tapered journal, a bent connecting rod or material between the insert and cap or rod. If the proper clearance is confirmed, you do not have to replace the bearing inserts; simply remove the Plastigage, dismantle and continue as usual. Should the clearance between the bearing and the journal be greater than allowed, select the suitable set of bearings and measure Plastigage again before assembly. When the right insert is found, screw in the insert and cap, set the connecting rod bolts to 27 Nm (20 ft. lbs.) plus a 90° turn and put a feeler gauge in place to ensure there is the right clearance between the connecting rod and crankshaft. If the clearance of the side end is outside the allowed range, replace the connecting rod.
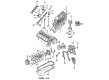
- Q: How to Inspect and Replace Rod Bearings to Ensure Proper Alignment and Clearance on Dodge Ram 1500?A:Check the connecting rod bearings for any scratching, usual wear, grooves, signs of fatigue and pitting and put in new bearings if any of them show abnormality. Inspect the ground surfaces of connecting rod journals for damage and insecure burrs, since abuse of these can result in uneven wear on Pistons, piston rings, cylinder walls, connecting rod bearings and crankshaft connecting rod journals. If the wear or damage shows an alignment problem, examine the connecting rod to confirm it's in the proper location and replace any misaligned, bent or twisted rods. First, wipe away the oil from the connecting rod journal, then put lubricant on the upper bearing insert and set it firmly in the connecting rod. It is important to use the piston ring compressor and Tool 8507 while mounting the rod and piston assemblies, so that the oil slinger slots in the rods are at the front of the engine and the F's on the wrist pin piston point toward the crankshaft. After you center the lower bearing insert in the cap, place Plastigage across its full breadth at the midpoint of the bearing cap, making sure it remains intact. Set the bearing cap and connecting rod on the journal, fastening the bolts up to 27 Nm (20 ft. lbs.) and add a 90° angle without turning the crank or you might smear the Plastigage. The clearance between the bearing and the journal can be found by measuring the compressed Plastigage under the bearing cap. Should the clearance test be successful, discard the Plastigage and fit the parts as explained; if not, decide which bearing is required, since the connecting rod bolts you just removed and the new ones must not be reused. Verify the bearing you chose by repeating the Plastigage measurement at this stage. When you have chosen the best insert, set it and the bearing cap, along with bolting the connecting rod at 27 Nm (20 ft. lbs.) and giving a 90° twist. Slide a suitable feeler gauge between the connecting rod and the crankshaft journal flange to verify the side clearance. If it is outside the seat limits, you should replace the connecting rod.


Related Dodge Ram 1500 Parts
 Dodge Ram 1500 Camshaft
 Dodge Ram 1500 Cam Gear
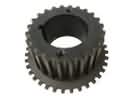 Dodge Ram 1500 Crankshaft Gear
 Dodge Ram 1500 Crankshaft Seal
 Dodge Ram 1500 Cylinder Head
 Dodge Ram 1500 Cylinder Head Gasket
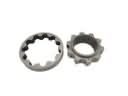 Dodge Ram 1500 Oil Pump Rotor Set
 Dodge Ram 1500 Rocker Arm Pivot
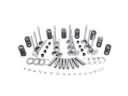 Dodge Ram 1500 Rocker Shaft Spring Kit
 Dodge Ram 1500 Timing Cover
 Dodge Ram 1500 Timing Cover Gasket
 Dodge Ram 1500 Valve Stem Seal