JeepParts
My Garage
My Account
Cart
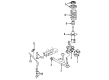
OEM 2010 Chrysler PT Cruiser Coil Springs
Strut Spring- Select Vehicle by Model
- Select Vehicle by VIN
Select Vehicle by Model
orMake
Model
Year
Select Vehicle by VIN
For the most accurate results, select vehicle by your VIN (Vehicle Identification Number).
12 Coil Springs found

2010 Chrysler PT Cruiser Coil Spring, Front Part Number: 4656526AF
$19.54 MSRP: $61.95You Save: $42.41 (69%)Ships in 1-2 Business DaysProduct Specifications- Other Name: Spring - Front Coil; Coil Spring, Front; Coil Springs; Spring
- Position: Front
- Replaces: 4656526AC, 4656526AD, 4656526AE
- Item Weight: 6.40 Pounds
- Item Dimensions: 14.8 x 7.4 x 7.4 inches
- Condition: New
- Fitment Type: Direct Replacement
- SKU: 4656526AF
- Warranty: This genuine part is guaranteed by Mopar's factory warranty.
2010 Chrysler PT Cruiser Coil Spring, Front Part Number: 4656523AD
$11.68 MSRP: $66.95You Save: $55.27 (83%)Ships in 1-2 Business DaysProduct Specifications- Other Name: Spring - Front Suspension Coil; Coil Spring, Front; Coil Springs; Spring; Spring Front Suspension Coil
- Position: Front
- Replaces: 4656523AC, 4656523AE
- Item Weight: 5.90 Pounds
- Condition: New
- Fitment Type: Direct Replacement
- SKU: 4656523AD
- Warranty: This genuine part is guaranteed by Mopar's factory warranty.


2010 Chrysler PT Cruiser Coil Spring, Rear Part Number: 4656543AC
$46.60 MSRP: $66.85You Save: $20.25 (31%)Ships in 1-2 Business DaysProduct Specifications- Other Name: Spring - Rear Coil; Coil Spring, Rear; Coil Springs; Spring; Spring Rear Coil
- Position: Rear
- Replaces: 4656543AB
- Item Weight: 6.70 Pounds
- Condition: New
- Fitment Type: Direct Replacement
- SKU: 4656543AC
- Warranty: This genuine part is guaranteed by Mopar's factory warranty.
2010 Chrysler PT Cruiser Coil Spring, Rear Part Number: 4656542AC
$56.28 MSRP: $89.20You Save: $32.92 (37%)Ships in 1-2 Business DaysProduct Specifications- Other Name: Spring - Rear Coil; Coil Spring, Rear; Coil Springs; Spring; Spring Rear Coil
- Position: Rear
- Replaces: 4656542AB
- Item Weight: 6.60 Pounds
- Item Dimensions: 13.9 x 6.4 x 5.4 inches
- Condition: New
- Fitment Type: Direct Replacement
- SKU: 4656542AC
- Warranty: This genuine part is guaranteed by Mopar's factory warranty.
2010 Chrysler PT Cruiser Coil Spring, Front Part Number: 5272710AB
Product Specifications- Other Name: Spring - Front Suspension Coil; Coil Spring, Front; Coil Spring Kit Front; Coil Spring Set; Coil Springs; Spring; Spring Front Suspension Coil
- Position: Front
- Replaces: 5272710AC
- Item Weight: 7.80 Pounds
- Item Dimensions: 14.6 x 7.4 x 7.1 inches
- Condition: New
- Fitment Type: Direct Replacement
- SKU: 5272710AB
- Warranty: This genuine part is guaranteed by Mopar's factory warranty.
2010 Chrysler PT Cruiser Coil Spring, Rear Part Number: 4656544AC
Product Specifications- Other Name: Spring - Rear Coil; Coil Spring, Rear; Coil Springs; Spring; Spring Rear Coil
- Position: Rear
- Replaces: 4656544AB
- Item Weight: 6.80 Pounds
- Item Dimensions: 21.4 x 16.0 x 8.3 inches
- Condition: New
- Fitment Type: Direct Replacement
- SKU: 4656544AC
- Warranty: This genuine part is guaranteed by Mopar's factory warranty.
2010 Chrysler PT Cruiser Coil Spring, Rear Part Number: 4656545AC
Product Specifications- Other Name: Spring - Rear Coil; Coil Spring, Rear; Coil Springs; Spring; Spring Rear Coil
- Position: Rear
- Replaces: 4656545AB
- Item Weight: 7.50 Pounds
- Item Dimensions: 15.0 x 5.1 x 5.2 inches
- Condition: New
- Fitment Type: Direct Replacement
- SKU: 4656545AC
- Warranty: This genuine part is guaranteed by Mopar's factory warranty.
2010 Chrysler PT Cruiser Coil Spring, Front Part Number: 4656525AE
Product Specifications- Other Name: Spring - Front Coil; Coil Spring, Front; Coil Spring Front; Coil Springs; Spring; Spring Front Coil
- Position: Front
- Replaces: 4656525AC, 4656525AD
- Item Weight: 6.90 Pounds
- Item Dimensions: 14.1 x 7.5 x 7.2 inches
- Condition: New
- Fitment Type: Direct Replacement
- SKU: 4656525AE
- Warranty: This genuine part is guaranteed by Mopar's factory warranty.
2010 Chrysler PT Cruiser Coil Spring, Front Part Number: 4656524AE
Product Specifications- Other Name: Spring - Front Coil; Coil Spring, Front; Coil Springs; Spring; Spring Front Coil
- Position: Front
- Replaces: 4656524AC, 4656524AD
- Item Weight: 6.30 Pounds
- Item Dimensions: 14.6 x 4.1 x 4.1 inches
- Condition: New
- Fitment Type: Direct Replacement
- SKU: 4656524AE
- Warranty: This genuine part is guaranteed by Mopar's factory warranty.
2010 Chrysler PT Cruiser Coil Spring, Rear Part Number: 4656541AC
Product Specifications- Other Name: Spring - Rear Coil; Coil Spring, Rear; Coil Springs; Spring; Spring Rear Coil
- Position: Rear
- Replaces: 4656541AB
- Item Weight: 6.60 Pounds
- Item Dimensions: 14.1 x 5.2 x 5.2 inches
- Condition: New
- Fitment Type: Direct Replacement
- SKU: 4656541AC
- Warranty: This genuine part is guaranteed by Mopar's factory warranty.
2010 Chrysler PT Cruiser Coil Spring, Front Part Number: 4656528AD
Product Specifications- Other Name: Spring - Front Coil; Coil Spring, Front; Coil Springs; Spring; Spring Front Coil
- Position: Front
- Replaces: 4656528AC
- Item Weight: 6.70 Pounds
- Item Dimensions: 15.3 x 7.4 x 7.7 inches
- Condition: New
- Fitment Type: Direct Replacement
- SKU: 4656528AD
- Warranty: This genuine part is guaranteed by Mopar's factory warranty.
2010 Chrysler PT Cruiser Coil Spring, Front Part Number: 4656527AD
Product Specifications- Other Name: Spring - Front Coil; Coil Spring, Front; Coil Spring Kit Front; Coil Spring Set; Coil Springs; Spring; Spring Front Coil
- Position: Front
- Replaces: 4656527AC
- Item Weight: 6.70 Pounds
- Item Dimensions: 15.0 x 7.2 x 7.0 inches
- Condition: New
- Fitment Type: Direct Replacement
- SKU: 4656527AD
- Warranty: This genuine part is guaranteed by Mopar's factory warranty.
2010 Chrysler PT Cruiser Coil Springs Parts and Q&A
- Q: How to Safely Remove Rear Suspension Coil Springs on 2010 Chrysler PT Cruiser?A: Before removing the coil springs, make sure the car is raised and supported. Coming next, take off the wheel mounting nuts (3) and remove the rear tire and wheel assembly from each side. Take out the bolt (7), nut (1) and washer (2) that keep the watts link bell crank (9) attached to the center of the axle (11). When a rear stabilizer bar exists, loosen and take out bolt (3) on either side to release stabilizer bar cushion retainer (1) from the rear axle (2), so the bar hangs without being held. Put a transmission jack or something similar under the middle of the axle and raise it enough that it helps to support the axle. After that, on one side, remove the right nut (7), lower mounting bolt (5) and washer (6) fastening the shock absorber (2) to the axle (4). Lift the car off the transmission jack until you can comfortably remove the coil springs (2) from the axle and follow this by removing the coil springs (2) along with the rubber isolators (1, 3).
Related 2010 Chrysler PT Cruiser Parts
 2010 Chrysler PT Cruiser Wheel Bearing
 2010 Chrysler PT Cruiser Control Arm
 2010 Chrysler PT Cruiser Axle Beam Mount
 2010 Chrysler PT Cruiser Axle Pivot Bushing
 2010 Chrysler PT Cruiser Ball Joint
 2010 Chrysler PT Cruiser Bump Stop
 2010 Chrysler PT Cruiser Coil Spring Insulator
 2010 Chrysler PT Cruiser Shock Absorber
 2010 Chrysler PT Cruiser Spindle
 2010 Chrysler PT Cruiser Sway Bar Bracket
 2010 Chrysler PT Cruiser Sway Bar Bushing
 2010 Chrysler PT Cruiser Sway Bar Kit