JeepParts
My Garage
My Account
Cart
OEM 2010 Chrysler Town & Country Rack And Pinion
Steering Rack And Pinion- Select Vehicle by Model
- Select Vehicle by VIN
Select Vehicle by Model
orMake
Model
Year
Select Vehicle by VIN
For the most accurate results, select vehicle by your VIN (Vehicle Identification Number).
1 Rack And Pinion found

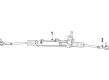
2010 Chrysler Town & Country Steering Gear Part Number: RL006523AD
Product Specifications- Other Name: Gear - Rack And Pinion; Rack and Pinion Assembly; Steering Gearbox; Gear Assembly
- Replaces: 5006523AC, 5006523AD
- Item Weight: 33.90 Pounds
- Item Dimensions: 63.3 x 10.5 x 7.0 inches
- Condition: New
- Fitment Type: Direct Replacement
- SKU: RL006523AD
- Warranty: This genuine part is guaranteed by Mopar's factory warranty.
2010 Chrysler Town & Country Rack And Pinion Parts and Q&A
- Q: How to Install a Rack and Pinion Steering System on 2010 Chrysler Town & Country?A: Before the rack and pinion is installed, if applicable, put on the outer tie rods to the inner tie rods, making the same number of rotations as you did while removing them to approximate the toe before aligning. Tighten the tie rod jam nuts at both ends for now, but leave them loose at this point. Gently slide in the power steering rack and pinion through the opening in the left wheel, then get it ready for mounting. Identify the engineered travel point for the power steering rack and pinion and join the intermediate shaft extension to the rack and pinion shaft, pressing the extension onto the shaft. Attach the intermediate shaft extension with the pinch bolt, so that it is tightened to 42 Nm. Place the dust shield over top of the bolt and rack and pinion shaft. Place the rack and pinion mounting bosses in the center of the crossmember's holes and fit the two rack and pinion mounting bolts, tightening them to 120 Nm. Put each hose into the corresponding port of the power steering rack and pinion and tighten their tube nuts to 31 Nm. Before you install the stabilizer bar, look at the cushions and check the condition of the links to confirm that both aren't damaged and the bar's ends should curve towards where the rack and pinion tie rod connects. Route the stabilizer bar from the wheel side into the driver's seat, keeping it aligned over the suspension crossmember as you move it in. Put each cushion on the stabilizer bar, attach the stabilizer bushing retainers to each cushion and tighten the four screws to 45 Nm. Connect the pressure hose using the routing clamp at the rear of the crossmember and tighten the screw to 8 Nm. After putting in the rear engine mount, slide the heat shield over the rack and pinion and secure it with screws and press-in pins, tightening them to 8 Nm. On the engine side of the vehicle, place in the fore-aft crossmember and then mount it with its bolts, tightening the front bolts to 113 Nm and both rear bolts to 55 Nm. Put in the front engine mount thru-bolt and tighten it to 57 Nm. Hook the outer tie rod onto the knuckle on each side, start a new nut onto the outer tie rod stud and tighten it to 75 Nm and then add an additional 245° turn. Join the stabilizer bar link on both ends and fasten the nuts with a torque of 88 Nm by holding the lower stud in the same place. On every side, attach the tire and wheel and tighten the wheel nuts to 135 Nm using the right order. Lower your vehicle, join the negative bar to the battery, remove the steering wheel support, add fluid to and bleed the power steering unit, inspect for leaks and wheel align the car, adjusting the toe as required by the manufacturer.
Related 2010 Chrysler Town & Country Parts
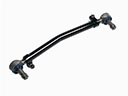 2010 Chrysler Town & Country Drag Link
 2010 Chrysler Town & Country Power Steering Hose
 2010 Chrysler Town & Country Power Steering Pump
 2010 Chrysler Town & Country Power Steering Reservoir
 2010 Chrysler Town & Country Steering Column
 2010 Chrysler Town & Country Steering Column Cover
 2010 Chrysler Town & Country Steering Gear Box
 2010 Chrysler Town & Country Steering Wheel
 2010 Chrysler Town & Country Tie Rod End