JeepParts
My Garage
My Account
Cart
OEM 2010 Dodge Caliber Rack And Pinion
Steering Rack And Pinion- Select Vehicle by Model
- Select Vehicle by VIN
Select Vehicle by Model
orMake
Model
Year
Select Vehicle by VIN
For the most accurate results, select vehicle by your VIN (Vehicle Identification Number).
2 Rack And Pinions found


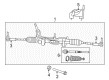
2010 Dodge Caliber Steering Gear Part Number: 5154519AC
$792.76 MSRP: $1220.00You Save: $427.24 (36%)Ships in 1-2 Business DaysProduct Specifications- Other Name: Gear - Rack And Pinion; Rack and Pinion Assembly; Steering Gearbox; Gear Assembly; Gear Rack And Pinion
- Replaces: 5105085AE, 5105085AF, 5105085AD, 5154519AB, 5105085AG, 68060088AB, 68060088AC, 5154519AA, 5105085AC
- Item Weight: 25.80 Pounds
- Item Dimensions: 60.6 x 14.1 x 10.6 inches
- Condition: New
- Fitment Type: Direct Replacement
- SKU: 5154519AC
- Warranty: This genuine part is guaranteed by Mopar's factory warranty.
2010 Dodge Caliber Steering Gear Part Number: 5154514AC
Product Specifications- Other Name: Gear - Rack And Pinion; Rack and Pinion Assembly; Steering Gearbox; Gear Assembly
- Replaces: 5105046AD, 5105046AH, 5154514AA, 5105046AF, 5105046AC, 5105046AG, 5154514AB, 5105046AE, RL105046AG, RL105046AH
- Item Weight: 20.90 Pounds
- Item Dimensions: 61.6 x 11.2 x 6.5 inches
- Condition: New
- Fitment Type: Direct Replacement
- SKU: 5154514AC
- Warranty: This genuine part is guaranteed by Mopar's factory warranty.
2010 Dodge Caliber Rack And Pinion Parts and Q&A
- Q: How to Install a Rack and Pinion System for Optimal Alignment and Functionality on 2010 Dodge Caliber?A: Before installing, turn the stabilizer bar and place the rack and pinion on the crossmember. Link the rack and pinion with two bolts to the crossmember, screwing them in until they require 70 Nm (52 ft. lbs.) of torque. Replace the dash seals and lower the power steering rack to the center of its slot. Match the attachment place of the front suspension crossmember on the vehicle to the site you removed it from, to retain wheel alignment. Set the crossmember into place using the transmission jack, matching the spots you marked on the body. Make sure the seals under the dash are in the proper place. Screw four bolts into the body at the front crossmember, fastening them to 150 Nm (111 ft. lbs.), remove the jack used to lift the transmission and place it to the side. Put the retainers on top of the stabilizer bar cushions and tighten each cushion retainer screw to 30 Nm (22 ft. lbs.). Hold the power steering hose routing clamp in place by bolting it to the crossmember, use a new push clip or screw on the left and twist the screws until they reach 8 Nm (71 in. lbs.). At the rack, tighten the nut on the pressure hose to 32 Nm (24 ft. lbs.) and at the returning hose, tighten its nut to 20 Nm (15 ft. lbs.). Attach the heat shield to the crossmember with three screws and tighten the two in front to 4 Nm (35 in. lbs.) and the one in back to 17 Nm (150 in. lbs.). Screw the front engine through-bolt and install the rear engine mount. If your car has an engine belly pan, put it in place now. Prior to fastening the outer tie rod end to the knuckle, check the tie rod seal boot and change the outer tie rod end if you find any damage. A new tie rod mounting nut should be started onto the stud and tightened to 132 Nm (97 ft. lbs.). Place the tire and wheel assembly on every side, tighten the mounting nuts until they reach 135 Nm (100 ft. lbs.) and after you lower the vehicle, take off the steering wheel holder. Place both front wheels dead ahead, center the intermediate shaft and slide it over the pinion shaft. Rotate the steering wheel to the right about 90° to let you install the intermediate shaft coupling bolt securely. Put the floor carpet back down, straighten the steering wheel, service the power steering, look for any fluid leaks and balance the toe of the front wheels as required.
Related 2010 Dodge Caliber Parts
 2010 Dodge Caliber Power Steering Pump
 2010 Dodge Caliber Steering Wheel
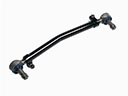 2010 Dodge Caliber Drag Link
 2010 Dodge Caliber Power Steering Hose
 2010 Dodge Caliber Power Steering Reservoir
 2010 Dodge Caliber Steering Column
 2010 Dodge Caliber Steering Column Cover
 2010 Dodge Caliber Steering Gear Box
 2010 Dodge Caliber Tie Rod End