JeepParts
My Garage
My Account
Cart
OEM 2010 Dodge Challenger Brake Pad
Disc Brake Pad Set- Select Vehicle by Model
- Select Vehicle by VIN
Select Vehicle by Model
orMake
Model
Year
Select Vehicle by VIN
For the most accurate results, select vehicle by your VIN (Vehicle Identification Number).
6 Brake Pads found


2010 Dodge Challenger Brake Pads, Rear Part Number: 5174327AC
$86.11 MSRP: $127.00You Save: $40.89 (33%)Ships in 1-2 Business DaysProduct Specifications- Other Name: Pad Kit - Rear Disc Brake; Disc Brake Pad Set, Rear; Disc Brake Hardware Kit; Rear Pads; Pad Kit Rear Disc Brake; Disc Brake Pad Set
- Position: Rear
- Replaces: 5174327AA, 5174327AB
- Item Weight: 3.90 Pounds
- Item Dimensions: 1.9 x 5.5 x 7.4 inches
- Condition: New
- Fitment Type: Direct Replacement
- SKU: 5174327AC
- Warranty: This genuine part is guaranteed by Mopar's factory warranty.


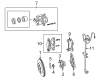
2010 Dodge Challenger Brake Pads, Front Part Number: 5174311AC
$222.07 MSRP: $327.00You Save: $104.93 (33%)Ships in 1-2 Business DaysProduct Specifications- Other Name: Pad Kit - Front Disc Brake; Disc Brake Pad Set, Front; Disc Brake Hardware Kit; Disc Brake Pad Kit; Front Pads; Pad Kit Front Disc Brake Contains 4 Pads; Pad Kit Front Disc Brake
- Position: Front
- Replaces: 5174311AA, 5174311AB
- Item Weight: 6.00 Pounds
- Item Dimensions: 1.9 x 5.9 x 8.8 inches
- Condition: New
- Fitment Type: Direct Replacement
- SKU: 5174311AC
- Warranty: This genuine part is guaranteed by Mopar's factory warranty.

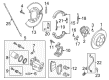
2010 Dodge Challenger Brake Pads, Rear Part Number: 5142560AC
$65.89 MSRP: $102.00You Save: $36.11 (36%)Product Specifications- Other Name: Pad Kit - Rear Disc Brake; Disc Brake Pad Set, Rear; Disc Brake Hardware Kit; Rear Pads
- Position: Rear
- Replaces: 5142560AB, 5142560AA
- Item Weight: 2.90 Pounds
- Item Dimensions: 9.1 x 4.4 x 3.4 inches
- Condition: New
- Fitment Type: Direct Replacement
- SKU: 5142560AC
- Warranty: This genuine part is guaranteed by Mopar's factory warranty.
2010 Dodge Challenger Brake Pads, Rear Part Number: 5142561AC
$58.47 MSRP: $144.00You Save: $85.53 (60%)Ships in 1-3 Business DaysProduct Specifications- Other Name: Pad Kit - Rear Disc Brake; Disc Brake Pad Set, Rear; Rear Pads
- Position: Rear
- Replaces: 5142561AA, 5142561AB
- Item Weight: 3.10 Pounds
- Item Dimensions: 5.3 x 4.3 x 3.4 inches
- Condition: New
- Fitment Type: Direct Replacement
- SKU: 5142561AC
- Warranty: This genuine part is guaranteed by Mopar's factory warranty.

2010 Dodge Challenger Brake Pads, Front Part Number: 5174001AD
$81.02 MSRP: $125.00You Save: $43.98 (36%)Ships in 1-2 Business DaysProduct Specifications- Other Name: Pad Kit - Front Disc Brake; Disc Brake Pad Set, Front; Disc Brake Hardware Kit; Front Pads
- Position: Front
- Replaces: 5174001AA, 5174001AB, 5142555AA, 5174001AC
- Item Weight: 4.60 Pounds
- Item Dimensions: 8.9 x 0.4 x 3.3 inches
- Condition: New
- Fitment Type: Direct Replacement
- SKU: 5174001AD
- Warranty: This genuine part is guaranteed by Mopar's factory warranty.

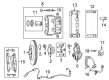
2010 Dodge Challenger Pad Kit - Front Disc Brake Part Number: 68147681AD
$210.74 MSRP: $310.00You Save: $99.26 (33%)Product Specifications- Other Name: PAD KIT-FRONT DISC BRAKE
- SKU: 68147681AD
- Warranty: This genuine part is guaranteed by Mopar's factory warranty.
2010 Dodge Challenger Brake Pad Parts and Q&A
- Q: How to Remove and Replace Front Brake Pads on 2010 Dodge Challenger?A: To replace the front brake pads on vehicles except SRT8, pull the caliper piston(s) fully into the caliper bore(s) by opening the fluid reservoir cap and using hand pressure or press the piston(s) with a C-clamp and a wood block over them to avoid damage. Secure your car by removing them and then install anti-rattle clips (3) to the upper and lower ends of the caliper adapter (4). If the car has them, disconnect the film on both sides of the brake pad double sticky isolator. New brake pads for the caliper adapter (4) should be inboard (2) on the outer side of the adapter and outboard (5) on the inner side, although both kinds are interchangeable. Press the guide pins into the caliper adapter so that they sit between the lower caliper bosses and the mounting bosses, then drop the caliper down so the upper mounting boss is in line with the lower guide pin. Insert and tighten the upper caliper guide pin bolt (1) to 60 Nm (44 ft. lbs.) with a tightening tool while holding the guide pin (3) still. Slide the tire and wheel assembly (1) back into place and use a torque wrench to tighten the wheel mounting nuts (3) to 150 Nm / 110 ft. lbs. for regular vehicles or 190 Nm / 140 ft. lbs. for police models. After the vehicle is lowered, pump the brake pedal several times to secure the pads to the caliper and brake rotor and then examine and adjust the brake fluid in the reservoir (1). After installing brake pads, braking effectiveness might be less and a burnish program should be applied when new brake pads or rotors are placed on Police Package vehicles, preferably organized and completed by the police entity in an appropriate, controlled location. Take the vehicle for a drive, making several stops to help the brakes release any dirt or grease and to accommodate the seating of brake shoes or follow the recommended burnish if called for.
Related 2010 Dodge Challenger Parts
 2010 Dodge Challenger Speed Sensor
 2010 Dodge Challenger ABS Control Module
 2010 Dodge Challenger Brake Caliper
 2010 Dodge Challenger Brake Caliper Bracket
 2010 Dodge Challenger Brake Caliper Piston
 2010 Dodge Challenger Brake Disc
 2010 Dodge Challenger Brake Dust Shield
 2010 Dodge Challenger Brake Line
 2010 Dodge Challenger Hydraulic Hose
 2010 Dodge Challenger Parking Brake Cable
 2010 Dodge Challenger Parking Brake Shoe
 2010 Dodge Challenger Wheel Stud