JeepParts
My Garage
My Account
Cart
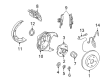
OEM Chrysler LHS ABS Control Module
Anti Lock Brake Control Module- Select Vehicle by Model
- Select Vehicle by VIN
Select Vehicle by Model
orMake
Model
Year
Select Vehicle by VIN
For the most accurate results, select vehicle by your VIN (Vehicle Identification Number).
7 ABS Control Modules found


Chrysler LHS Control Module Part Number: 4602253AB
$622.36 MSRP: $906.00You Save: $283.64 (32%)Ships in 1-3 Business Days


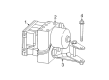
Chrysler LHS Modulator Valve Part Number: 4897781AA
$1049.29 MSRP: $1330.17You Save: $280.88 (22%)Ships in 1-2 Business Days
Chrysler LHS Control Module Part Number: 4759720

Chrysler LHS Control Module Part Number: 4759326
Chrysler LHS Control Module Part Number: 4605701

Chrysler LHS Control Module Part Number: 5072309AA
Chrysler LHS Control Module Part Number: 5080721AA
Chrysler LHS ABS Control Module
Choose OEM ABS Control Module that meet Chrysler factory standards. Chrysler designs and tests every component for precision and durability. Each ABS Control Module follows strict manufacturing steps to lock in quality and fit. If your Chrysler LHS matters to you, OEM parts make the smart choice. You'll get the exact look, feel, and performance you expect. Shop genuine LHS parts at the highly competitive prices online. Enjoy a manufacturer's warranty, a hassle-free return policy, and rapid delivery. No more guesswork with off brands. Get genuine parts with exact fit and true factory performance. Shop with confidence today at JeepPartsDeal.com.
Chrysler LHS ABS Control Module is one of the critical parts associated with the car's anti-locking braking system that delivers high-end performance in Chrysler LHS automobiles. This ABS Control Module was particularly developed to eliminate the occurrence of wheel lock-up when the brakes are vigorously applied, thus increasing the overall safety by reducing chances of soaking or skidding. The Chrysler LHS model graced the market between 1994 and 2001; this accentuates distinct versions of the ABS Control Module with better features such as the ESC and extra sensors for optimal control during suboptimal circumstances. Anti-lock monitoring uses wheel speed sensors, and valves and a pump work to maintain pressure for the brake, providing maximum brake for various terrains. Chrysler LHS ABS Control Module is ideal for various LHS models, and hence, helps to enhance the performance as well as safety of the luxury sedans. However, there is a possibility of longer distance on limited traction surfaces such as loose gravel and snow which basically outlines that it is vital to understand the circumstances under which ABS works. The Chrysler LHS ABS Control Module has specific amenities that make it popular in the markets; they include selective control of the wheels by braking helps to increase safety. The Chrysler LHS ABS Control Module is one of the important components needed for the Chrysler LHS cars as it guarantees the reliability, performance and the use of innovative technologies in the car's systems.
Chrysler LHS ABS Control Module Parts and Q&A
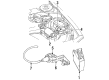
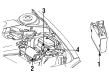
- Q: How to Remove and Install an ABS Control Module on Chrysler LHS?A:January 16, 2023 To isolate the master cylinder reservoir, lean on the brake pedal halfway past its first millimeter of travel using a brake pedal positioning tool. Open the servo bolt and two nuts, unplug the wire harness and move the servo out of the way, while the cable is still attached. After that, remove the screw linking the washer bottle filler neck and put it next to the filler tube without taking the tube off. Take out the transmission controller and bracket bolts, then move the controller out of its place. Clean the surfaces of the HCU and the brake tube connections with Mopar Brake Parts Cleaner or an alternative. With a crow foot wrench, free the primary and secondary brake tubes from the master cylinder at the HCU and then remove the chassis brake tubes. Never use a 12-volt power source on the 25-way HCU connector if it's not attached to the CAB. Get hold of the lock on the 25-way harness connector and pull the connector up to unlock it. Jack up the car, take out the front left wheel and then take all the bolts and clips that are securing the inner fender shield before moving it out of the way. Remove the ICU from its place by pulling the bolts loose from the mounting bracket and sliding it around the left side and through the wheel well. Hold the ICU in the vehicle and fix it to the mounting bracket. Secure the three bolts at 11 Nm (97 inch lbs.). Remove the inner fender panel splash shield and the tire wheel assembly after lowering the car. Lock the seal into place in the 25-way connector before attaching the CAB ribbon to the socket. Apply 17 Nm (145 inch lbs.) torque to all four of the HCU chassis Brake Lines and also tighten the primary and secondary lines from the master cylinder to the same value. Place the transmission controller back into the pump and then reconnect the washer bottle filler neck. Attach the speed control servo at the rear, remove the tool that held the brake pedal and place the remote ground cable onto the left shock tower stud, tightening the nut to 28 Nm (250 inch lbs.). Richardson-Zahn (DRB) scan tool must be used to set up the ICU after installation. Next, bleed the braking systems of the motorcycle and take the bike for a short road test to check that both work well.
- Q: How to Service and Repair an ABS Control Module in the Hydraulic Control Assembly on Chrysler LHS?A:Begin by unhooking the remote ground cable from the strut tower and placing a ground cable insulator and nut on it, so it does not accidentally ground. The brake pedal should be depressed more than one inch by the tool so that only the master cylinder reservoir is activated. Then, unhook the speed control servo with the bolt and two nuts, detach the wire harness and pull the cable aside. Untighten the screw of the filler neck that is nearest the washer bottle, then take out the nut and bolt connecting the controller and bracket to lift the controller away from its mounting spot. Use Mopar6 Brake Parts Cleaner or an equivalent to clean the entire Hcu and both ends of the brake tube connections. With a crow foot wrench, take out the brake tubes from the master cylinder at the Hcu and from the chassis. Find the 25-way wiring harness connector on the Cab and pull it up by grabbing the lock. Bend the hood, loosen and remove the left front wheel and unscrew the fasteners near the inner fender before pulling the Icu free from the bracket through the wheel space. The Cab can be removed after all this, once the wiring, bolts and anything you disconnected before are in place. For assembly, put the Cab onto the Hcu and secure it with the bolts, making them tight by holding to 2 Nm (17 inch lbs.) and then plug in the pump/motor wiring harness. Set the Icu back in the vehicle and connect it to the bracket, secure by tightening the three bolts to 11 Nm (97 inch lbs.). After that, attach the inner fender splash shield and fit the wheel and tire back on and lower the vehicle. Ensure you have installed the seal in the 25-way connector and then put it into the Cab connector and secure it before using the cable. Put the four chassis brake tubes onto the Hcu and secure them so the tightness is 17 Nm (145 inch lbs.) right away. Afterward, do the same with the primary and secondary Brake Lines from the master cylinder. Again put in the transmission controller, replace the washer bottle filler neck and fix the speed control servo. Pull out the brake pedal positioning tool and link the remote ground cable to the ground stud on the left shock tower. Tighten the nut on the cable to 28 Nm (250 inch lbs.). Once installed, the Icu should be initialized with Drbiii(R), the base brakes bled, the Abs hydraulic system bled and a road test run to be sure both systems are working well. To take out the Hcu, you need to remove the Icu, break it down and then to set up the Hcu, you have to attach it to the Cab to make the Icu.


Related Chrysler LHS Parts
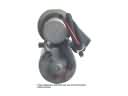 Chrysler LHS ABS Pump And Motor Assembly
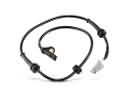 Chrysler LHS ABS Sensor
 Chrysler LHS Brake Caliper
 Chrysler LHS Brake Caliper Bolt
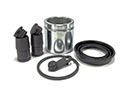 Chrysler LHS Brake Caliper Repair Kit
 Chrysler LHS Brake Controller
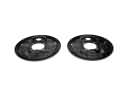 Chrysler LHS Brake Dust Shields
 Chrysler LHS Brake Line
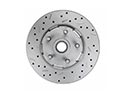 Chrysler LHS Brake Rotor
 Chrysler LHS Hydraulic Hose
 Chrysler LHS Wheel Bearing Dust Cap
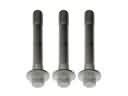 Chrysler LHS Wheel Hub Bolt