JeepParts
My Garage
My Account
Cart
OEM Chrysler LHS Brake Pad
Disc Brake Pad Set- Select Vehicle by Model
- Select Vehicle by VIN
Select Vehicle by Model
orMake
Model
Year
Select Vehicle by VIN
For the most accurate results, select vehicle by your VIN (Vehicle Identification Number).
4 Brake Pads found

Chrysler LHS Brake Pads, Rear Part Number: 5011631AB
$74.74 MSRP: $108.00You Save: $33.26 (31%)Ships in 1-2 Business Days
Chrysler LHS Brake Pads, Front Part Number: 5010034AB

Chrysler LHS Brake Pads, Rear Part Number: 5080896AB
$80.22 MSRP: $118.00You Save: $37.78 (33%)

Chrysler LHS Front Pads Part Number: 4882106
$89.62 MSRP: $132.00You Save: $42.38 (33%)
Chrysler LHS Brake Pad
Choose OEM Brake Pad that meet Chrysler factory standards. Chrysler designs and tests every component for precision and durability. Each Brake Pad follows strict manufacturing steps to lock in quality and fit. If your Chrysler LHS matters to you, OEM parts make the smart choice. You'll get the exact look, feel, and performance you expect. Shop genuine LHS parts at the highly competitive prices online. Enjoy a manufacturer's warranty, a hassle-free return policy, and rapid delivery. No more guesswork with off brands. Get genuine parts with exact fit and true factory performance. Shop with confidence today at JeepPartsDeal.com.
The Brake Pad is one of the significant parts of the car braking system with regards to Chrysler LHS brand that is well-known for its sturdiness and efficiency. Mounted to transform mechanical energy into heat energy through interacting with the brake rotors, brake pads consist of metal and synthetic fibers that can withstand high temperatures; these cans reach temperatures of up to 400 degrees Fahrenheit in use. Brake Pad fits most LHS models leaving it as one of the recommended ways through which the efficiency and safety of these luxurious sedans can be maintained. It is highly recommended that the brake pads are serviced and replaced on a regular basis and certainly no more than 50,000 miles apart. The Brake Pad exhibits flexibility in the market though it varies in type such as the non-metallic type, a semi-metallic type, fully metallic type, and even the ceramic type each offering a unique feature of friction, wearability and noise extravagance. Also, related components like clips and springs which are used in as a Brake Pad should be of good quality and this too needs to be checked. Since the Brake Pad and its surrounding system directly affect the vehicle's safety and driving, it serves as an element that strengthens the Chrysler LHS as a luxury sedan.
Chrysler LHS Brake Pad Parts and Q&A
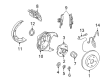
- Q: How to Service and Repair Front Brake Pads on Chrysler LHS?A:Before servicing the brake pads, first take away the caliper and the shoe retractor clips between the shoes. Pull the outboard brake shoe release clip over the raised point on the brakes, then remove the shoe from the caliper. With the brake shoe inboard, pull it backward from the Piston until the retaining clip comes out of the piston's cavity. Check for leaks around the harmonic piston and anywhere on the piston dust boot; if there are any issues, open up the caliper and change the seal and boot and the scored piston if found. Make sure the caliper dust boot and caliper pin bushings are not damaged or brittle. Fix or replace them if they are. If you've installed fresh brake shoes, you should push the piston back completely once the caliper is removed. Put some Mopar Brake Grease for Caliper Slides Lubricant or a similar grease on both steering knuckle abutments. Take off the paper that protects the noise suppression gasket found on both the inside and outer brake shoe assemblies if the vehicle is so equipped. Droid the inboard brake shoe up against the caliper piston's face before you push it into the bore. Slide the recently assembled new brake shoe onto the caliper assembly. Install clips made for the shoe retractor to the space between the outboard and inboard shoes at the ends of the shoe backing plates for all regular cars except those with the performance brake package (BR5). After replacing the caliper, pump the brakes several times to double check they are working well, do a quick road test to scrub off any oil and seat the brake linings and check that your braking is done properly.
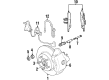
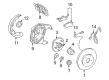
- Q: How to Service and Repair Rear Brake Pads on Chrysler LHS?A:To begin servicing the rear brake pads, you should raise the vehicle on jackstands or a hoist and after that remove the rear wheel and tire assemblies. Following this, take out the two bolts that hold the caliper assembly to the adapter guide pin. Start by rotating the top of the caliper so it clears the adapter and pull it off the bottom resting block. Put the caliper assembly on the trailing end of the strut to stop damaging the brake hose. Pull the rear rotor off the wheel studs and pry the clip at the outboard brake shoe to release it from the caliper. Drag the inboard brake shoe to one side until the metal clip holds none of it. Gaze at the caliper for drips from the Piston seal and any holes in the dust boot; when necessary, remove the caliper to swap out the seal, boot or piston. Recommend clients to inspect caliper dust boots and pin bushings and suggest they replace any that are damaged or break easily. When attaching a caliper after changing the brake shoes, press the piston all the way in and coat both adapter abutments with Mopar Multipurpose Lubricant. Put the rear rotor onto the hub before removing the paper from the brake shoe assemblies if your vehicle comes with the gasket. Press the new inboard brake shoe assembly into the caliper piston and check it stays squarely in place, then slide the outboard brake shoe assembly on the caliper. Carefully lift the Brake Caliper down and guide the brake shoes over the rotor onto the adapter. Pay attention not to damage the caliper guide pin bushings. First, put the guide pin bolts in place, making certain they are not cross-threaded and tighten them to 192 inch lbs., following a 22 Nm torque rating. Example: Then, lower the car, press the brake pedal firmly several times, take a drive to wear off the brake grit and make the brake shoe linings seat properly.


Related Chrysler LHS Parts
 Chrysler LHS ABS Control Module
 Chrysler LHS ABS Relay
 Chrysler LHS Brake Caliper
 Chrysler LHS Brake Caliper Piston
 Chrysler LHS Brake Disc
 Chrysler LHS Brake Drum
 Chrysler LHS Brake Dust Shield
 Chrysler LHS Brake Line
 Chrysler LHS Hydraulic Hose
 Chrysler LHS Speed Sensor
 Chrysler LHS Wheel Bearing Dust Cap
 Chrysler LHS Wheel Stud