JeepParts
My Garage
My Account
Cart
OEM Chrysler Pacifica Evaporator
A/C Evaporator Core- Select Vehicle by Model
- Select Vehicle by VIN
Select Vehicle by Model
orMake
Model
Year
Select Vehicle by VIN
For the most accurate results, select vehicle by your VIN (Vehicle Identification Number).
4 Evaporators found

Chrysler Pacifica Evaporator Core, Front Part Number: 68581303AA
$58.12 MSRP: $86.55You Save: $28.43 (33%)
Chrysler Pacifica Evaporator Core, Rear Part Number: 68313472AB
$310.61 MSRP: $459.00You Save: $148.39 (33%)
Chrysler Pacifica Evaporator Core, Front Part Number: 5019217AG
$244.80 MSRP: $320.00You Save: $75.20 (24%)Ships in 1-2 Business Days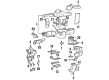
Chrysler Pacifica Evaporator Core, Front Part Number: 4882355AF
Chrysler Pacifica Evaporator
Choose OEM Evaporator that meet Chrysler factory standards. Chrysler designs and tests every component for precision and durability. Each Evaporator follows strict manufacturing steps to lock in quality and fit. If your Chrysler Pacifica matters to you, OEM parts make the smart choice. You'll get the exact look, feel, and performance you expect. Shop genuine Pacifica parts at the highly competitive prices online. Enjoy a manufacturer's warranty, a hassle-free return policy, and rapid delivery. No more guesswork with off brands. Get genuine parts with exact fit and true factory performance. Shop with confidence today at JeepPartsDeal.com.
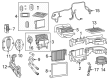
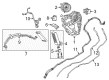
Being an evaporator, this Chrysler Pacifica part plays an important role in augmenting the functionality and durability of the Chrysler Pacifica's climate control system. Merged as a part of the vehicle structure, the evaporator is installed under the dashboard to cool the cabin while removing heat within the passenger's area. Its structure is made of a set of aluminum fins and tubes, through which warm air blows; it is useful for transforming the refrigerant from the liquid phase to the gaseous one. In addition to cooling the air it also dehumidifies or controls the amount of moisture in the air within the Pacifica. The Chrysler Pacifica Evaporator is compatible with different models of the car; thus, different car owners can enjoy the rich performance by the evaporator. Resistant to heat and corrosion, this component is made sturdy so as to avoid replacement due to the challenge of heat conductivity and corrosion which is another major issue. Although the Chrysler Pacifica Evaporator mainly provides comfort, it performs a vital function in ensuring the vehicle's efficiency and safety by regulating the cabin climate. Additional aspects like it facilitating elimination of water accumulation under a vehicle are other aspects that set it out in the automotive industry. Regarding the subject of this article, the Chrysler Pacifica Evaporator is a highly reliable and high-performance part that forms the core of the car's high values thus making the Chrysler Pacifica a perfect family and personal car.
Chrysler Pacifica Evaporator Parts and Q&A
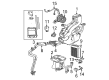
- Q: How to Replace an Evaporator in an A/C System on Chrysler Pacifica?A:When replacing the evaporator, begin by taking the HVAC housing out of the vehicle and unloading the tubes holding the Heater Core. Cut the foam seal out of the HVAC housing seal flange around the points for the fresh air inlet and the expansion valve/evaporator tube under the dashboard. Then, take out the expansion valve from the evaporator inlet and outlet tube fittings, interrupt the HVAC wire harness wire between the Blower Motor and the wire harness on the HVAC housing. After removing the four top screws, move the distribution housing away so you can lift out the hooks holding it to the evaporator housing. Loosen the screws that connect the upper intake air housing to the lower and evaporator housings, placing the screw inside the fresh air intake hole. Lift off the upper intake air housing and you will see the air door and blower wheel assembly; after that, remove the screw and washer from above the recirculation door. Remove the evaporator housing's twelve screws along the rim to uncover the upper section and try not to lose the small rubber plug for the HVAC wire harness evaporator temperature sensor at the same time. Remove the evaporator and its insulation altogether and try to leave the clam shell type seal in place along the edges and bottom. If changing the evaporator, insert 60 milliliters of oil into the refrigerant system when you install the refrigerant. Slide the evaporator and foam wrap down into the lower area of the housing so that the seal sits in place. Put the top part of the housing on the bottom, making sure the rubber grommet and wire harness fit in the groove and hold the two together using twelve 2 Nm screws. Cover the evaporator housing with the upper intake air housing, so the recirculation air door pivot is set correctly and fix it with three screws pulled firmly to 2 Nm. Connect the upper intake air housing to the lower intake air housing with two screws that are then tightened to 2 Nm. Ease the distribution housing hooks into the evaporator housing receivers, put the top of the housing in place and attached it with three 2 Nm screws. Connect the HVAC wire harness into the clips, attach the blower motor connector, add a new expansion valve and put a new foam seal on the HVAC housing flange seal. After that, place the heater core tubes and HVAC unit housing back in the vehicle and calibrate the HVAC Control Actuator using your vehicle's procedures.
- Q: How to Properly Service an Evaporator and Adjust the Refrigerant Oil Level on Chrysler Pacifica?A:Refrigerant oil level must be adjusted by the mechanic before servicing the refrigerant system in order to avoid causing harm or improper function to the A/C compressor. When only replacing the A/C evaporator, put 60 milliliters (2 fluid ounces) of recommended refrigerant oil into the refrigerant system. Whenever a refrigerant line needs work, make sure to replace its O-ring seals and gaskets. The first step is to set the A/C evaporator in the lower housing, while making sure both the drain and insulator are clean and put in place. Wrap the evaporator tubes with the rubber flange seal and secure the top HVAC housing below the bottom housing. Fasten the two halves of the HVAC housing to each other by screwing 13 self-tappers in. Make sure they are tightened to 2 Nm (17 in. lbs.). In the last stage, securely put in the HVAC housing, include the proper amount of refrigerant oil according to the replaced parts and only use the oil suggested for the A/C compressor in the car.

Related Chrysler Pacifica Parts
 Chrysler Pacifica Blend Door Actuator
 Chrysler Pacifica Blower Motor Resistor
 Chrysler Pacifica A/C Compressor
 Chrysler Pacifica A/C Compressor Clutch
 Chrysler Pacifica A/C Condenser
 Chrysler Pacifica A/C Expansion Valve
 Chrysler Pacifica A/C Hose
 Chrysler Pacifica A/C Switch
 Chrysler Pacifica Blower Control Switches
 Chrysler Pacifica Heater Core
 Chrysler Pacifica HVAC Control Module
 Chrysler Pacifica HVAC Pressure Switch