JeepParts
My Garage
My Account
Cart
OEM Chrysler Prowler Piston Ring Set
Piston Ring- Select Vehicle by Model
- Select Vehicle by VIN
Select Vehicle by Model
orMake
Model
Year
Select Vehicle by VIN
For the most accurate results, select vehicle by your VIN (Vehicle Identification Number).
1 Piston Ring Set found


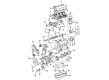
Chrysler Prowler Piston Rings Part Number: 4897035AB
Chrysler Prowler Piston Ring Set
Choose OEM Piston Ring Set that meet Chrysler factory standards. Chrysler designs and tests every component for precision and durability. Each Piston Ring Set follows strict manufacturing steps to lock in quality and fit. If your Chrysler Prowler matters to you, OEM parts make the smart choice. You'll get the exact look, feel, and performance you expect. Shop genuine Prowler parts at the highly competitive prices online. Enjoy a manufacturer's warranty, a hassle-free return policy, and rapid delivery. No more guesswork with off brands. Get genuine parts with exact fit and true factory performance. Shop with confidence today at JeepPartsDeal.com.
Chrysler Prowler Piston Ring Set Parts and Q&A
- Q: How to Service a Piston Ring Set on Chrysler Prowler?A:Begin by removing the Piston and connecting rod, followed by using a ring expander tool to get rid of the No. 1 and No. 2 piston rings from the piston. Then, get rid of the upper and lower oil ring side rails together with the ring expander bolt. Check the distance between the piston rings and the inside of the cylinder and be sure to put the No. 2 ring with its manufacturer dot up towards the top of the piston. Arrange the piston rings in the engine as follows: expand oil ring, upper oil ring side rail, lower oil ring side rail, No. 2 intermediate piston ring and No. 1 upper piston ring. For both the side rails, put the free end between the piston and the expander, press it securely and align them in place smoothly and without using a piston expander. Put in the upper side rail first and then place the lower side rail, so that the No. 2 piston ring has its manufacturer's I.D. mark facing up. Afterwards, install the No. 2 piston ring and next the No. 1 piston ring and arrange the end gaps properly, making sure you space the oil ring expander gap at least 45° from the side rail gaps, not just in the center of the piston or moving in the direction of the piston pin.

Related Chrysler Prowler Parts
 Chrysler Prowler Camshaft Seal
 Chrysler Prowler Camshaft Thrust Plate
 Chrysler Prowler Crankshaft Seal
 Chrysler Prowler Crankshaft Thrust Washer
 Chrysler Prowler Engine Mount Bracket
 Chrysler Prowler Oil Pan
 Chrysler Prowler Oil Pump Gasket
 Chrysler Prowler Rocker Arm
 Chrysler Prowler Rocker Arm Pivot
 Chrysler Prowler Rod Bearing
 Chrysler Prowler Timing Belt
 Chrysler Prowler Timing Cover