JeepParts
My Garage
My Account
Cart
OEM Chrysler PT Cruiser Rack And Pinion
Steering Gear- Select Vehicle by Model
- Select Vehicle by VIN
Select Vehicle by Model
orMake
Model
Year
Select Vehicle by VIN
For the most accurate results, select vehicle by your VIN (Vehicle Identification Number).
16 Rack And Pinions found


Chrysler PT Cruiser Steering Gear Part Number: 5101849AC
$57.54 MSRP: $500.00You Save: $442.46 (89%)Ships in 1-2 Business Days
Chrysler PT Cruiser Steering Gear Part Number: 5093461AA
$335.81 MSRP: $492.00You Save: $156.19 (32%)Ships in 1-3 Business DaysChrysler PT Cruiser Gear Assembly Part Number: 5093460AA
$418.36 MSRP: $607.00You Save: $188.64 (32%)Ships in 1-3 Business Days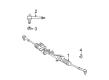
Chrysler PT Cruiser Steering Gear Part Number: 5272722AJ
$668.90 MSRP: $898.00You Save: $229.10 (26%)Ships in 1-2 Business Days
Chrysler PT Cruiser Steering Gear Part Number: 5093437AA
$309.50 MSRP: $444.00You Save: $134.50 (31%)Ships in 1-2 Business Days
Chrysler PT Cruiser Steering Gear Part Number: 5093467AA
Chrysler PT Cruiser Steering Gear Part Number: 5114201AA
Chrysler PT Cruiser Steering Gear Part Number: 4656747AH
Chrysler PT Cruiser Steering Gear Part Number: 5272289AF
Chrysler PT Cruiser Steering Gear Part Number: 5093418AB
Chrysler PT Cruiser Steering Gear Part Number: 4656679AJ
Chrysler PT Cruiser Steering Gear Part Number: 5085520AB
Chrysler PT Cruiser Steering Gear Part Number: 5085317AC
Chrysler PT Cruiser Gear Assembly Part Number: 4656456AJ
Chrysler PT Cruiser Steering Gear Part Number: 4749070AJ

Chrysler PT Cruiser Steering Gear Part Number: 4656458AH
Chrysler PT Cruiser Rack And Pinion
Choose OEM Rack And Pinion that meet Chrysler factory standards. Chrysler designs and tests every component for precision and durability. Each Rack And Pinion follows strict manufacturing steps to lock in quality and fit. If your Chrysler PT Cruiser matters to you, OEM parts make the smart choice. You'll get the exact look, feel, and performance you expect. Shop genuine PT Cruiser parts at the highly competitive prices online. Enjoy a manufacturer's warranty, a hassle-free return policy, and rapid delivery. No more guesswork with off brands. Get genuine parts with exact fit and true factory performance. Shop with confidence today at JeepPartsDeal.com.
In Chrysler PT Cruiser vehicles, the Rack And Pinion is perhaps one of the most vital steering gear design that guides the power of the steering wheel and transform the rotational direction into parallel movements of the front wheels. Steering control of this mechanism is done by a set of gears, this being a rack and pinion system whereby the pinion gear interacts with a rack gear that is enclosed in a metal tube. Most Chrysler PT Cruisers have power-assisted rack and pinion steering systems, whereby steering effort is supplemented by hydraulic means. Such systems use a cylinder containing a hydraulic fluid and a piston that in response to the turning of the steering wheel pumps the hydraulic fluid to help move the rack. In earlier models of cars especially the compact model, the manual racks were used and Pt cruisers now use the power assisted type that offers better performance and control. Possible defects in the Rack And Pinion can be as a result of mechanical damage, may lead to leaks or stiffens steering. Grease checks should be done consistently with the intention of avoiding the destruction of the rack and pinion assembly since the problems affect the car's steering and compromise safety.
Chrysler PT Cruiser Rack And Pinion Parts and Q&A
- Q: How to Install a Rack and Pinion on the Front Suspension Crossmember on Chrysler PT Cruiser?A:Four gear mounting bolts should be used to attach the rack and pinion to the front suspension crossmember and the bolts must be tightened to 61 Nm (45 ft. lbs.). Line up the gear rack center in its travel and attach the dash cover seal over the power steering pinion shaft so that it joins with the gear housing tabs below. Push the bottom end of the steering column lower coupling partway through the panel, matching its flat with the flat on the pinion shaft and slide the coupling onto the shaft. Get the roll pin hole in the coupling to line up with the notch in the pinion shaft and then install the roll pin right in the center. Simply realign the power steering rack when it becomes necessary. Once the transmission jack has raised the front suspension crossmember and the power steering rack to the mounting spot for the crossmember, the steering column lower coupling will be guided lower through the dashboard. Insert the two lower rear mounting bolts through the bushing holes in the control arm and thread them into the tapping plate holes in the body. Next, add the two front and two rear crossmember bolts to the frame rails and attach them, gently tightening all six bolts to 2 Nm or 20 in. lbs. Attach the crossmember in the same area as before so that the wheel alignment stays the same. Place the soft face hammer over the crossmember to adjust it with the existing marks and then tighten the bolts as follows: tighten the first two bolts from the lower control arm rear isolator bushings to 250 Nm (185 ft. lbs.) and the other four to 153 Nm (113 ft. lbs.). Secure the engine torque strut to the crossmember, put the drive-belt splash shield in place and fit the fasteners that attach it to both the body and front suspension crossmember. If these fasteners were earlier removed, fasten the front fascia to the body lower reinforcement. Attach the washer to the other end of the stud connected to the torque strut bolt on the crossmember, fit the pencil strut in the right front area of the crossmember and body and tighten the hold-down nuts to 52 Nm (38 ft. lbs.). Clean all exposed hose ends and the power steering rack ports with a clean, lint-free towel. Then, put on a new pressure hose O-ring coated in power steering fluid. Place the cooler where it should go, connect the cooler tube to the routing clip and tighten the four screws securing the cooler to the crossmember with 10 Nm (90 in. lbs.) of force. On non-turbo engine vehicles, slide the cooler hose onto the fitting for the outlet rack and then secure the clamp past the steel fitting's bead. Make sure to snake the power steering fluid pressure hose between the front suspension crossmember and the driveshaft, giving it 4-10 mm clearance to the crossmember after installing it. Attach the pressure hose tube to the power steering rack by inserting the hose into its port. After that, turn the tube nut with a torque wrench until the flange's teeth touch the tube nut which equals 31 Nm or 23 ft. lbs. On turbo engine vehicles, connect the return hose to the rack outlet port fitting, push the pressure hose into its port and screw its tube nut onto the rack just enough to hold the hose, but don't fully tighten it yet. Attach the routing clip onto the fluid pressure hose tube and use a torque set to tighten the hose tube nut to 31 Nm (23 ft. lbs.). If your steering wheel has a power steering fluid pressure switch, join the wiring harness connector to the switch and fasten the locking tab. On each side, fit the tie-rod heat shield over its location and match the hole in the shield to the tie-rod end mounting hole; then, put the ball stud into the outer knuckle arm, tighten the tie-rod nut onto it by hand and tighten it to 55 Nm (40 ft. lbs.). Make sure the tires and wheels are on the car, then tighten the wheel mounting nuts to 135 Nm (100 ft. lbs.), lower the vehicle and drive the car home. Slide the dash-to-lower coupling seal over the lower coupling's plastic collar, while noticing that grease is applied correctly to the edge of the seal. Ensure that the front wheels are pointing forward and if they are off, move the steering column knob so the upper and lower coupling are lined up. Stick the upper coupling onto the lower coupling and use a 28 Nm (250 in. lbs.) torque to tighten the nut. After that, place the pinch bolt retainer clip on the bolt. Remove the steering wheel holder and check that the lower coupling does not make noise against the seal on the dash when the steering wheel is being turned side to side. Fill up, bleed the power steering, examine the area where fluid is supposed to go and adjust how the front wheels meet.
- Q: How to Remove the Rack and Pinion from a Left-Hand Drive on Chrysler PT Cruiser?A:Before removing the rack and pinion, put the Steering Wheel in center position and fix it straight using a steering wheel holder that will maintain the Clock Spring's alignment. Unclip the coupling retainer at the bottom of the steering column, back off and remove the pinch bolt nut and separate the upper and lower steering column couplings. After getting the vehicle in position, loosen and remove the tire and wheel's nuts and the entire set of assemblies. Each end of the vehicle requires you to take out the outer tie rod's nut while securing the Tie Rod End stud with a wrench. Take off the tie rod end from the knuckle using Remover MB991113, then remove the outer tie rod and the heat shield from the same area. Should the car have a power steering fluid pressure switch, pull out the locking tab at the connector on the wiring harness and disconnect it. On vehicles without turbo engines, take out the power steering fluid pressure hose from the rack and pinion and replace the tube nut, then release the O-ring on the cooler cord and slide the clamp at the rack and pinion's outlet port beyond the tube nut of the fuel line. Open the tube nut that holds the pressure hose to the rack and pinion, release the routing clip, pull the pressure hose off both the rack and pinion and the clip and then remove the return hose and its clamp from the rack and pinion outlet port. Should there be crossmember-mounted power steering fluid coolers, first remove the tube from the rack and pinion at the routing clip on the right and unscrew the two brackets that fix the cooler to the crossmember so that it drops down out of the way. Take out the nuts from the brackets, then unbolt the pencil strut from the crossmember and body and remove the washer on the torque strut bolt behind the strut. Take off the fastener that secures the wheel house splash shield to the drive belt splash shield and if there are other parts in your way, remove them to reach the drive belt splash shield's forward fastener. Unbolt the splash shield from the front suspension crossmember at the bottom and from the body up top, then remove the drive belt splash shield. Take out the bolt holding the engine torque strut to the crossmember and be sure to mark the crossmember's position on the body for later use. Place a transmission jack below the front suspension crossmember center, raise it to hold the bottom and loosen every bolt holding the crossmember to the frame, but do not remove the two mounting bolts through the rear bushings of the lower control arm. Slide down the front suspension crossmember just a little to get to the steering column lower coupling, making sure it stays in place on the transmission jack and does not drop from the lower control arms. Securely remove the small roll pin holding the steering column coupling to the rack and pinion pinion shaft with a roll pin punch, then push down on the column lower coupling until the coupling comes off the shaft. Open the pinion tube cover from the tabs in the rack and pinion housing and remove the seal, next remove the four bolts connecting the rack and pinion to the suspension crossmember and lift the rack and pinion out.


Related Chrysler PT Cruiser Parts
 Chrysler PT Cruiser Power Steering Pump
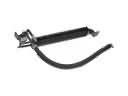 Chrysler PT Cruiser Power Steering Cooler
 Chrysler PT Cruiser Power Steering Hose
 Chrysler PT Cruiser Power Steering Reservoir
 Chrysler PT Cruiser Steering Column
 Chrysler PT Cruiser Steering Column Cover
 Chrysler PT Cruiser Steering Column Seal
 Chrysler PT Cruiser Steering Gear Box
 Chrysler PT Cruiser Steering Shaft
 Chrysler PT Cruiser Steering Wheel
 Chrysler PT Cruiser Tie Rod End