JeepParts
My Garage
My Account
Cart
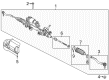
OEM Chrysler Voyager Rack And Pinion
Steering Gear- Select Vehicle by Model
- Select Vehicle by VIN
Select Vehicle by Model
orMake
Model
Year
Select Vehicle by VIN
For the most accurate results, select vehicle by your VIN (Vehicle Identification Number).
7 Rack And Pinions found

Chrysler Voyager Gear - Rack And Pinion Part Number: 68594336AB
$2386.80 MSRP: $3620.00You Save: $1233.20 (35%)Ships in 1-2 Business Days
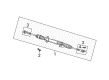
Chrysler Voyager Steering Gear Part Number: 4766321AF
$198.28 MSRP: $292.00You Save: $93.72 (33%)Ships in 1-3 Business Days
Chrysler Voyager Steering Gear Part Number: 4874878AD
$391.59 MSRP: $570.00You Save: $178.41 (32%)Ships in 1-3 Business Days
Chrysler Voyager Boot - Rack And Pinion Part Number: 68594338AB
$1983.48 MSRP: $3020.00You Save: $1036.52 (35%)Chrysler Voyager Boot - Rack And Pinion Part Number: 68594339AB
$1992.30 MSRP: $2920.00You Save: $927.70 (32%)
Chrysler Voyager Steering Gear, Front Part Number: 68525334AA
$2026.65 MSRP: $2950.00You Save: $923.35 (32%)Chrysler Voyager Steering Gear Part Number: 68072214AC
Chrysler Voyager Rack And Pinion
Choose OEM Rack And Pinion that meet Chrysler factory standards. Chrysler designs and tests every component for precision and durability. Each Rack And Pinion follows strict manufacturing steps to lock in quality and fit. If your Chrysler Voyager matters to you, OEM parts make the smart choice. You'll get the exact look, feel, and performance you expect. Shop genuine Voyager parts at the highly competitive prices online. Enjoy a manufacturer's warranty, a hassle-free return policy, and rapid delivery. No more guesswork with off brands. Get genuine parts with exact fit and true factory performance. Shop with confidence today at JeepPartsDeal.com.
The Chrysler Voyager Rack And Pinion is one of the most crucial parts that defines efficiency and durability of the vehicles in Chrysler, including the Voyager series. Because of this steering mechanism, turning of the steering wheel is converted to straight side forces that cause the front wheels to turn in a smooth manner. Chrysler has applied power-assisted rack and pinion systems in the different Voyager models to facilitate the steering ease with the help of hydraulic help which is important in terms of ease orfluid flow (Voyager: Models & Variants). The hiring and design of a cylindrical tube containing a fluid and a piston eradicate any difficulty in maneuvering hence making the Chrysler Voyager Rack And Pinion special among the cars in the market. It supports different Voyager generations of the car thus guaranteeing driver's consistent driving experience from any model of the car. Normal wearing off of the parts of the rack and pinion system must be dealt with as early as possible since they may lead to such problems as leakage or stiffness of the steering. All these give some amount of life to the Chrysler Voyager Rack And Pinion and at the same time improves the overall feel of the vehicle. Being one of Chrysler's most successful models with more than 12 millon units sold, voyager provides tire control and feedback through the power assisted rack and pinion steering. Chrysler Voyager Rack And Pinion is more than an automotive part; it expresses Chrysler's focus on delivering quality products to the market.
Chrysler Voyager Rack And Pinion Parts and Q&A
- Q: How to Service and Repair a Rack and Pinion Steering Gear with RHD on Chrysler Voyager?A:When doing repairs to the rack and pinion on a Japanese car, first open the power steering cap, then use a siphon pump to remove as much fluid from the reservoir as you can. Secure the Steering Wheel after locking the steering column so that the Clock Spring won't extend too far. Before lifting the vehicle, remove the steering column shaft coupler from the rack and pinion intermediate coupler and after the vehicle is up, take away the front wheel and tire assemblies. Equipped or not, hose the fluid out by disconnecting the hose from the power steering cooler. Remove the two bolts holding the cooler to the cradle crossmember reinforcement after. Grab the nut that holds the Tie Rod End to the Steering Knuckle with a socket held on the tie rod end stud. Then, loosen the nut. Take the lower control arm rear bushing retainer bolts off each side, after you have used the Puller, Special Tool C-3894-A, to remove both tie rod ends from the steering knuckles. It's important to note that the cradle crossmember reinforcement bolts use two different thread sizes. Detach the bolts joining the reinforcement to the suspension cradle crossmember front and the two on the crate with the vehicle body and then remove the reinforcement. When you have All-Wheel Drive, lift out the power transfer unit. Disconnect the Power Steering Hoses from the rack and pinion and un-secure the clamp holding them to the rear of the cradle crossmember. Lift the heat shield off the rack and pinion and then remove the two bolts and nuts holding the rack and pinion to the front support plate. Lower the rack and pinion enough so the intermediate coupler roll pin is visible, then use Remover/Installer, Special Tool 6831A, to remove the roll pin. Remove the coupler from the rack and pinion shaft and take out the power steering rack and pinion from the vehicle. Before installing, place the rack and pinion in the place marked by the suspension cradle crossmember, making room for the intermediate coupler. At the start, push the roll pin into the coupler and when ready, use the Remover/Installer to insert it into the coupler on the rack and pinion shaft. Install the rack and pinion onto the front suspension cradle, fix it with the two bolts and nuts, tighten the M-14 bolt to 183 Nm (135 ft. lbs.) and the M-12 one to 95 Nm (70 ft. lbs.). After that, place the heat shield, then join up both power steering fluid pressure hoses with their returns to the rack and pinion and secure the routing clamp. Set the power steering fluid hose tube ends on the rack and pinion with a crowfoot wrench to a torque reading of 31 Nm (275 in. lbs.). Place the tie rod end into the steering knuckle, start the nut onto the stud and hold the stud still as you tighten the nut. Use a special socket and tool to tighten the nut to a torque of 75 Nm (55 ft. lbs.). Should the vehicle have All-Wheel Drive, put in the power transfer unit. Place the reinforcement on the front suspension cradle crossmember and install bolts tightened to 163 Nm (120 ft. lbs.) for M-14 size and 108 Nm (80 ft. lbs.) for M-12 size. First, put in and fasten the six lower control arm rear bushing retainer bolts to 61 Nm (45 ft. lbs.); then install the two bolts together with the bushings between the reinforcement and cradle crossmember on the vehicle body, tightening them to 163 Nm (120 ft. lbs.). If your vehicle includes a power steering cooler, put the previous hose back on and then install the cooler on the cradle crossmember reinforcement using bolts tightened to 11 Nm (100 in. lbs.). Fit back the front tires and complete the wheel assemblies, then snap the lug nuts on tight with at least 135 Nm (100 ft. lbs.) of torque. Lift the vehicle to a position where the interior is within reach and match the intermediate shaft with the steering column coupler. Slide the coupler onto the rack and pinion coupler. Remove the torque wrench to finish tightening the pinch bolt nut, disconnect the steering wheel holding tool, do the power steering pump initial operation, inspect the system for leaks and set the pair of front wheels at zero toe.

Related Chrysler Voyager Parts
 Chrysler Voyager Power Steering Pump
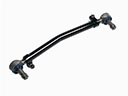 Chrysler Voyager Drag Link
 Chrysler Voyager Power Steering Hose
 Chrysler Voyager Power Steering Reservoir
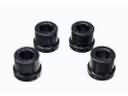 Chrysler Voyager Rack & Pinion Bushing
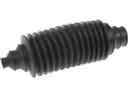 Chrysler Voyager Rack and Pinion Boot
 Chrysler Voyager Steering Column
 Chrysler Voyager Steering Gear Box
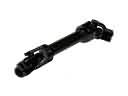 Chrysler Voyager Steering Shaft
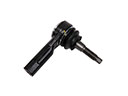 Chrysler Voyager Tie Rod
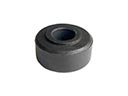 Chrysler Voyager Tie Rod Bushing
 Chrysler Voyager Tie Rod End