JeepParts
My Garage
My Account
Cart
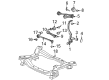
OEM Dodge Charger Front Cross-Member
Front Engine Cross Member- Select Vehicle by Model
- Select Vehicle by VIN
Select Vehicle by Model
orMake
Model
Year
Select Vehicle by VIN
For the most accurate results, select vehicle by your VIN (Vehicle Identification Number).
18 Front Cross-Members found


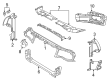
Dodge Charger Radiator Support, Front Part Number: 68200478AC
$311.58 MSRP: $459.00You Save: $147.42 (33%)Ships in 1-3 Business Days


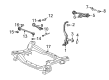
Dodge Charger Engine Cradle, Front Part Number: 68185029AA
$916.00 MSRP: $1350.00You Save: $434.00 (33%)Ships in 1-3 Business Days


Dodge Charger Radiator Support, Front Part Number: 68142202AA
$462.58 MSRP: $676.00You Save: $213.42 (32%)Ships in 1-3 Business Days


Dodge Charger Engine Cradle, Front Part Number: 68204541AB
$1219.43 MSRP: $1790.00You Save: $570.57 (32%)

Dodge Charger Upper Tie Bar, Front Part Number: 4806163AE
$251.53 MSRP: $370.00You Save: $118.47 (33%)
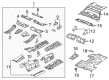
Dodge Charger Floor Crossmember, Front Part Number: 68043502AD
$262.86 MSRP: $387.00You Save: $124.14 (33%)Ships in 1-2 Business Days
Dodge Charger Floor Crossmember, Passenger Side Part Number: 68043498AF
$266.26 MSRP: $393.00You Save: $126.74 (33%)Ships in 1-3 Business Days
Dodge Charger Floor Crossmember, Front Part Number: 68043503AD
$278.72 MSRP: $410.00You Save: $131.28 (33%)Ships in 1-2 Business Days
Dodge Charger Rear Crossmember Part Number: 4780800AA
$338.77 MSRP: $499.00You Save: $160.23 (33%)Ships in 1-3 Business Days

Dodge Charger Reinforcement, Front Part Number: 68044372AB
$451.13 MSRP: $658.00You Save: $206.87 (32%)Ships in 1-3 Business DaysDodge Charger Engine Cradle, Front Part Number: 68212614AA
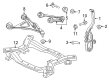
$1043.10 MSRP: $1525.00You Save: $481.90 (32%)Ships in 1-3 Business Days

Dodge Charger Engine Cradle, Front Part Number: 4782700AH
$1028.21 MSRP: $1505.00You Save: $476.79 (32%)
Dodge Charger Floor Crossmember, Driver Side Part Number: 68043499AF
$85.26 MSRP: $127.00You Save: $41.74 (33%)


Dodge Charger Engine Cradle, Front Part Number: 4895030AF
Dodge Charger Front Cross-Member
Choose OEM Front Cross-Member that meet Dodge factory standards. Dodge designs and tests every component for precision and durability. Each Front Cross-Member follows strict manufacturing steps to lock in quality and fit. If your Dodge Charger matters to you, OEM parts make the smart choice. You'll get the exact look, feel, and performance you expect. Shop genuine Charger parts at the highly competitive prices online. Enjoy a manufacturer's warranty, a hassle-free return policy, and rapid delivery. No more guesswork with off brands. Get genuine parts with exact fit and true factory performance. Shop with confidence today at JeepPartsDeal.com.
Reliability and performance standards of Dodge Charger vehicles depend on the critical Front Cross-Member of the Dodge Charger. The Front Cross-Member functions as the main structural support which allows the engine and transmission to operate with enhanced vehicle stability during driving and supports optimal handling capabilities. Its steel framework resists damages from normal time in operation to make it a necessary design feature for Charger vehicles with longitudinal engines across different model types. The unique section of the Front Cross-Member establishes excellent strength because it successfully fights off deflection and twisting motions which could damage the vehicle structure. The Charger's safety and overall road efficiency depend heavily on this reliable design because it ensures alignment stays intact for stability purposes. Performance together with modern safety requirements heavily depend on the Dodge Charger Front Cross-Member design. The Front Cross-Member operates effectively across Charger model sequences which showcases its vital role in the auto industry because performance alongside durability represent essential priorities. Features that simplify both installation and maintenance result from the Front Cross-Member design thus making it a distinctive feature that appeals to all users including casual drivers as well as automobile enthusiasts. The Dodge car Front Cross-Member continues to represent the model's heritage by demonstrating the brand's dedication to automotive industry innovation while ensuring product reliability.
Dodge Charger Front Cross-Member Parts and Q&A
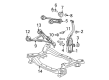
- Q: How to Service and Repair a Front Cross-Member on Dodge Charger?A:Start by separating the battery negative cable from the battery post before doing any repairs or servicing of the front cross-member. Remove the power steering fluid from the reservoir and raise and support the vehicle. Release the left and right front wheels and next remove the outer tie rod end nut at all knuckles. The outer tie rod can be separated from the knuckle by using Special Tool 9360 ball joint remover. From either end, take out the nut that secures the stabilizer link to the bar and pull the link ball joint stem out of the bar. Cap off the nut at the bottom of the shock clevis bracket bolt, tap the bolt gently and when the top of the bolt serrations are above the bolt end, take the bolt out. Uninstall the clevis bracket and Control Arm's bolt and nut and then fit the engine support tool #8534. Remove the forward part of the airbox and put on the engine lift brackets at both side of the cylinder head. Clear the belly pan from the front and pull out both pressure line retainer bolts fastened to the housing cradle. Remove the screws that hold the mount in place and the heat shield over each inner tie rod bellows. First, take out the nuts and bolt from the upper steering gear mounting and move on to the lower mounting bolts. Cut away from the car and support the steering gear on a beam of the exhaust. Loose the nut that holds the lower control arm ball joint stud to the knuckle, going until it is at the same level as the stud, to stop the part from being bent while you use the Puller. Insert Special Tool 9360 into the joint to separate the stud from the knuckle and then remove it. Unscrew and take out the mount nut on each side and the nut on the stud's end. Remove each stabilizer bar isolator retainer's bolts from the left and right sides and then remove the stabilizer bar complete with the isolators from the vehicle. Lift the engine cradle using a suitable device and mark its spot with a grease pencil make it easier to place later. Then, take out the four engine cradle bolts and lift away the cradle and remove the control arms if you are doing so.
- Q: How to install a Front Cross-Member on Dodge Charger?A:Before attaching the front cross-member, you need to install the Control Arms; remember that upper control arms for AWD and RWD engines can't be used together. Place the cradle under the engine where the mark is and install four bolts; be sure to tighten them to 185 Nm (136 ft. lbs.). After putting the stabilizer onto the cradle, add isolators and retainers and connect the bolts of the stabilizer bar isolation retainer to both sides, attaching them to 60 Nm (44 ft. lbs.). Loosen the resources on the engineer mounts to 60 Nm (44 ft. lbs.) and tighten the screws on the left and right ball joints to 122 Nm (90 ft. lbs.) to secure the lower control arm ball joint studs to the knuckles. Connect the steering gear to the car, hang its bracket from the exhaust system, set up the lower mounts and tighten the bolts to the value described. Now, set the upper mounting bolt and nut for the steering gear and install the heat shield with mounting screws on each inner tie rod bellows above it. After the two pressure line retainer bolts are added to the cradle, put on the front belly pan. The shock clevis bracket should be bolted to the lower control arm with a nut, reaching an RPM of 128 ft. lbs. Attach the link to the stabilizer bar through its hole on each side of the vehicle and tighten its link nut to 81 Nm (60 ft. lbs.). Loosely attach the outer tie rod end nuts to the knuckles, tighten them to 86 Nm (63 ft. lbs.) and finally put the wheel and tire into place. Lower the car from the lift and pour power steering fluid into the reservoir in the pump. Last, fasten the negative Battery Cable to the negative battery post and do a vehicle alignment afterwards.


Related Dodge Charger Parts
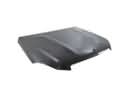 Dodge Charger Hood
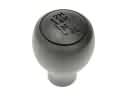 Dodge Charger Shift Knob
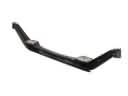 Dodge Charger Axle Beam
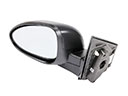 Dodge Charger Car Mirror
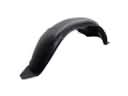 Dodge Charger Fender Splash Shield
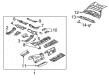
 Dodge Charger Floor Pan
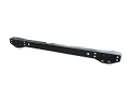 Dodge Charger Rear Crossmember
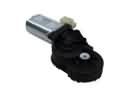 Dodge Charger Seat Motor
 Dodge Charger Windshield Wiper
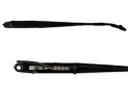 Dodge Charger Wiper Arm
 Dodge Charger Wiper Blade
 Dodge Charger Wiper Motor