JeepParts
My Garage
My Account
Cart
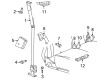
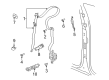
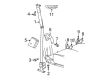
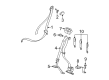
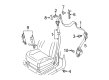
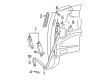
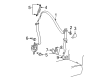
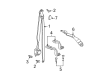
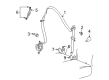
OEM Dodge Dakota Seat Belt
Seat Safety Belt- Select Vehicle by Model
- Select Vehicle by VIN
Select Vehicle by Model
orMake
Model
Year
Select Vehicle by VIN
For the most accurate results, select vehicle by your VIN (Vehicle Identification Number).
141 Seat Belts found


Dodge Dakota Center Buckle Extension, Front Part Number: 5135197AA
$70.02 MSRP: $103.00You Save: $32.98 (33%)


Dodge Dakota Extension, Center Part Number: 5083695AA
$70.02 MSRP: $103.00You Save: $32.98 (33%)


Dodge Dakota Buckle End, Slate Gray, Front Inner Passenger Side Part Number: 5HQ281D5AB
$78.69 MSRP: $116.00You Save: $37.31 (33%)Ships in 1-3 Business Days


Dodge Dakota Buckle End, Front Inner Driver Side Part Number: 5HQ291J3AB
$81.41 MSRP: $121.00You Save: $39.59 (33%)


Dodge Dakota Buckle End, Slate Gray, Front Inner Driver Side Part Number: 5HQ291D5AB
$83.90 MSRP: $125.00You Save: $41.10 (33%)


Dodge Dakota Buckle End, Slate Gray, Front Inner Passenger Side Part Number: 5HQ281DVAB
$83.90 MSRP: $125.00You Save: $41.10 (33%)Ships in 1-3 Business Days


Dodge Dakota Buckle End, Slate Gray, Front Inner Driver Side Part Number: 5HQ291DVAB
$86.90 MSRP: $129.00You Save: $42.10 (33%)Ships in 1-3 Business Days


Dodge Dakota Lap & Shoulder Belt, Rear Center Part Number: 5HQ391J3AB
$143.89 MSRP: $213.00You Save: $69.11 (33%)Ships in 1-2 Business Days

Dodge Dakota Center Buckle, Front Inner Passenger Side Part Number: QP481DVAB
$59.19 MSRP: $76.20You Save: $17.01 (23%)Ships in 1-2 Business Days


Dodge Dakota Buckle End, Front Driver Side Part Number: 5EX27LAZ
$51.61 MSRP: $65.43You Save: $13.82 (22%)Ships in 1-2 Business Days


Dodge Dakota Lap & Shoulder Belt, Slate Gray, Front Outer Passenger Side Part Number: 5HQ261D5AA
$261.66 MSRP: $331.70You Save: $70.04 (22%)Ships in 1-2 Business Days


Dodge Dakota Buckle End, Front Inner Driver Side Part Number: 5HQ291J8AB
$86.90 MSRP: $129.00You Save: $42.10 (33%)
Dodge Dakota Lap & Shoulder Belt, Taupe, Front Outer Passenger Side Part Number: 5GH581L5AE
$67.85 MSRP: $430.00You Save: $362.15 (85%)Ships in 1-2 Business Days
Dodge Dakota Lap & Shoulder Belt, Dark Gray, Rear Part Number: 5GD02XDVAD
$59.96 MSRP: $190.00You Save: $130.04 (69%)Ships in 1-2 Business DaysDodge Dakota Lap & Shoulder Belt, Front Outer Passenger Side Part Number: 5GH58LAZAE
$125.17 MSRP: $397.00You Save: $271.83 (69%)Ships in 1-2 Business Days
Dodge Dakota Lap & Shoulder Belt, Slate Gray, Front Outer Passenger Side Part Number: 5JJ801D5AD
$239.41 MSRP: $442.00You Save: $202.59 (46%)Ships in 1-2 Business Days
Dodge Dakota Lap & Shoulder Belt, Slate Gray, Front Outer Driver Side Part Number: 5HQ271DVAB
$281.06 MSRP: $503.00You Save: $221.94 (45%)Dodge Dakota Lap & Shoulder Belt, Front Outer Driver Side Part Number: 5JA11LAZAD
$170.83 MSRP: $298.00You Save: $127.17 (43%)Ships in 1-2 Business Days
Dodge Dakota Lap & Shoulder Belt, Slate Gray, Front Center Part Number: 5KJ82BD5AB
$10.94 MSRP: $17.95You Save: $7.01 (40%)Ships in 1-2 Business Days

Dodge Dakota Seat Belt Assembly, Front Inner Part Number: F959RAZ
| Page 1 of 8 |Next >
1-20 of 141 Results
Dodge Dakota Seat Belt
Choose OEM Seat Belt that meet Dodge factory standards. Dodge designs and tests every component for precision and durability. Each Seat Belt follows strict manufacturing steps to lock in quality and fit. If your Dodge Dakota matters to you, OEM parts make the smart choice. You'll get the exact look, feel, and performance you expect. Shop genuine Dakota parts at the highly competitive prices online. Enjoy a manufacturer's warranty, a hassle-free return policy, and rapid delivery. No more guesswork with off brands. Get genuine parts with exact fit and true factory performance. Shop with confidence today at JeepPartsDeal.com.
Dodge Dakota Seat Belt Parts and Q&A
- Q: How to Service and Repair a Seat Belt in a Quad Cab Front Outboard on Dodge Dakota?A:Before doing anything on the front outboard seat belt, turn off the Supplemental Restraint System (SRS) by taking out the vehicle's negative battery cable and waiting for two minutes so that the air bag won't deploy by accident during your work. Make sure every seat belt, buckle, screw, retractor, tether strap and anchor is secure and not damaged, while replacing and fixing any spots where the belts have caught or ripped. Pull the front seat forward to reach the area around the lower anchor and B-pillar for easier seat belt replacement. Take out the screw on the lower anchor, pull the trim cover from the front seat belt loop on the front of the seat and remove the tab on the bottom of the cover to free the screw. Open the screw that holds the seat belt turning loop to the height adjuster on the upper B-pillar and pull the loop out of the height adjuster. After that, remove the inner trim from the B-pillar, pull the body wire harness connector off the seat belt tensioner initiator and take out the clips holding the belt web guide to the B-pillar. Remove the screws holding the upper and lower retractor brackets to the B-pillar, push the retractor tab out of the inner B-pillar hole and then take the front seat belt and retractor bracket out at once.
- Q: How to Maintain and Fix the Front Outboard Seat Belt in a Club Cab on Dodge Dakota?A:Before working on the front outboard seat belt in a Club Cab, turn off the supplemental restraint system by disconnecting the negative Battery Cable and letting it sit for two minutes to discharge the system cap. Look at each belt, buckle, hardware, retractor, tether strap and anchor for proper connection, function or damage, changing any cut, frayed or torn belts and tightening any loose fasteners. If you have an issue with the belt or retractor but the tensioner is intact, deal with it by following the steps for handling undeployed supplemental restraints; however, if it is deployed, follow the procedures you would for service once the tensioner has gone off. For removing, change the seat into its furthest front location, remove a screw from a bolt in the lower anchor on the outboard edge of the front seat and pull off the two plastic push-pins securing the cover to the retractor. Higher the trim cover to take the pins out of the locator slots and then pull the lower parts of the trim halves apart to remove the spring clips. Peel off the trim halves, reposition the scuff plates a little, unplug the lead from the seat belt tensioner initiator on the body wire harness and unscrew the retractor bracket from the floor panel. Work the roof trim away from the headliner so that you can free the snaps. Also, take out the screws that connect the seat belt turning loop and height adjuster bracket from the roof rail. Get rid of the front seat belt and its retractor as a unit. Secure the seat belt turning loop and height adjuster bracket into the holes in the roof rail, screw them in until they reach 39 N.m (29 ft. lbs) and push the trim cover in so its clips lock together. Set the retractor mounting bracket into the headrest holes, keeping the seat belt webbing undisturbed, then tighten the screws to 39 N.m (29 ft. lbs). Slot the body wire harness connector into the seat belt tensioner initiator, slide the scuff plates over the seatbelt and place the trim halves so the snaps lock in place. Put the lower trim cover onto the retractor, so the pins go into the holes on the trim cover, put back the plastic push-pin retainers, secure the lower anchor by the mounting hole on the outer side of the front seat cushion frame, then tighten the screw to 39 N.m (29 ft. lbs). The battery negative cable should not be connected again until the supplemental restraint system verification test is done after any additional restraint part is serviced.


Related Dodge Dakota Parts
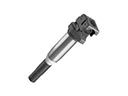 Dodge Dakota Ignition Coil
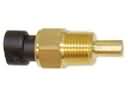 Dodge Dakota Coolant Temperature Sensor
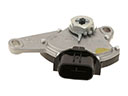 Dodge Dakota Neutral Safety Switch
 Dodge Dakota Turn Signal Switch
 Dodge Dakota Airbag
 Dodge Dakota Engine Control Module
 Dodge Dakota Hazard Warning Switch
 Dodge Dakota Ignition Control Module
 Dodge Dakota Mirror Switch
 Dodge Dakota Seat Heater Switch
 Dodge Dakota Spark Plug
 Dodge Dakota Speedometer Cable