JeepParts
My Garage
My Account
Cart
OEM Dodge Magnum A/C Clutch
Air Conditioning Clutch- Select Vehicle by Model
- Select Vehicle by VIN
Select Vehicle by Model
orMake
Model
Year
Select Vehicle by VIN
For the most accurate results, select vehicle by your VIN (Vehicle Identification Number).
9 A/C Clutches found


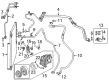
Dodge Magnum Clutch Coil Part Number: 5003681AA
$186.95 MSRP: $279.00You Save: $92.05 (33%)Ships in 1-2 Business Days
Dodge Magnum Hub Assembly Part Number: 5179340AB
$299.82Ships in 1-2 Business Days
Dodge Magnum Clutch Kit Part Number: 5140428AA
$4.56 MSRP: $36.75You Save: $32.19 (88%)Ships in 1-2 Business Days


Dodge Magnum Hub Assembly Part Number: 5140426AA

Dodge Magnum Clutch Coil Part Number: 68000489AC
Dodge Magnum Hub Assembly Part Number: 68018353AA
Dodge Magnum Hub Assembly Part Number: 5179519AA

Dodge Magnum Clutch Part Number: 5140427AA

Dodge Magnum Hub Assembly Part Number: 5140425AA
Dodge Magnum A/C Clutch
Choose OEM A/C Clutch that meet Dodge factory standards. Dodge designs and tests every component for precision and durability. Each A/C Clutch follows strict manufacturing steps to lock in quality and fit. If your Dodge Magnum matters to you, OEM parts make the smart choice. You'll get the exact look, feel, and performance you expect. Shop genuine Magnum parts at the highly competitive prices online. Enjoy a manufacturer's warranty, a hassle-free return policy, and rapid delivery. No more guesswork with off brands. Get genuine parts with exact fit and true factory performance. Shop with confidence today at JeepPartsDeal.com.
The Dodge Magnum A/C Clutch is used in Dodge Magnum vehicles mainly for the air conditioning system, which ranks on the top with regards to its reliability and efficiency. However, this A/C Clutch has the primary function of connecting the compressor electronically, thus clamping the belt drive tightly to reduce the level of drag and increase performance. In this way, its design provides optimal conditions for the A/C system to work properly and this is important for comfortable cabin temperatures and saving fuel. The Dodge Magnum A/C Clutch satisfies many Magnum models, therefore enriching its owners with the stable quality of both old-fashioned and innovative models. For instance, the A/C Clutch features mechanisms that address problems like slipping or sticking which if present can greatly affect A/C functionality and indirectly affect the vehicle's safety. So in ensuring that the right diagnosis is made and proper replacement of the tool is made the Dodge Magnum A/C Clutch ensures that the life of the A/C of the vehicle is increased by preventing the worsening of the system. Speaking more on about the Dodge Magnum A/C Clutch, more attention can be paid to its sturdily construction along with high efficiency of its engagement. In general, it can refer to the simple component; however, the Dodge Magnum A/C Clutch is a significant part of the car that effectively regulates A/C systems and an important factor to provide safer and efficient ride to the Dodge Magnum vehicles.
Dodge Magnum A/C Clutch Parts and Q&A
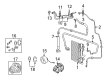
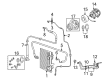
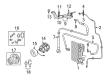
- Q: How to Service the A/C Clutch Assembly on Dodge Magnum?A:First, break the negative link from the battery and isolate the cable before starting to service the compressor clutch assembly. If your car has a 5.7L or 6.1L engine, unhook the air intake hose and the air cleaner housing and afterwards take out the radiator fan and its accompanying shroud. Following that, tear away the engine belt from its accessory accessories and separate the engine wire harness from the compressor clutch field coil connector on top of the A/C compressor. Some designs call for removing the A/C compressor to allow access to the compressor shaft bolt or pulley and field coil snap rings and the refrigerant system is not drained so it can stay charged. Open the connector mounting fingers, take the field coil connector and wire lead off the connector and then loosen the compressor shaft bolt, using a band-type oil filter wrench or strap wrench to fasten the clutch plate during detachment. It's important not to separate the clutch plate from the pulley and bearing assembly to avoid damaging them. Be careful not to drop or remove any clutch shim(s) while taking out the clutch, as you can use them again. Use a plastic mallet to tap the clutch plate carefully, letting it come free from the splines on the compressor shaft and then remove both the clutch plate and the shims. After putting snap ring pliers 9764 or any equivalent to use, take out the external snap ring and lift off the pulley and bearing assembly from the A/C compressor cover. After that, detach the outer lock ring securing the clutch field coil and pull out the coil from beneath the front of the A/C compressor. During installation, fit the dowel pin in the clutch field coil hole in the compressor's front cover and secure it, checking that the wire connection lead does not get caught in the way. After the old snap ring is removed, select a new one and make sure the bevel side is pointed out andits eyelets face out. Make sure the snap ring for the CL field coil grasp is tight in its groove on the spring and clutch drum of the compressor. Position the contact point for the compressor clutch field coil to prevent it from being damaged by the pulley and bearing assembly which should not be put on so that it disturbs the friction surface. In some cases, simply tap the pulley with a wooden block. You should also apply a new snap ring, making sure the bevel part is on the inside, before releasing the lockstrip. Attach the external snap ring onto the pulley and bearing, so that both are firmly fitted. For a remanufactured clutch plate and pulley, replace the original shims; but for a brand new clutch plate, use a trial stack of two floating shims that are each 2.54 mm thick. Put on the clutch plate and fasten the front shaft bolt to tighten it to 19 Nm. Once tightened, double-check the air gap in more than one position, all the while holding the pulley and spinning it slowly, just before checking the final fit. For bikes that have a recessed clutch plate, check using 0.35 - 0.60mm wire gap gauge, while for others you can try different blade type feeler gauge still keeping the air gap between 0.35 - 0.60 mm. Guide the wire from the compressor clutch field coil behind the connector bracket, put the compressor clutch field coil connector on the bracket and link up the engine wire harness again. Reinstall the accessory Drive Belt, radiator fan and shroud, air cleaner housing and air intake hose for 5.7L and 6.1L engine vehicles and reattach the negative Battery Cable.
- Q: How to Remove and Replace an A/C Clutch on Dodge Magnum?A:You must first take the negative Battery Cable off before you work on the compressor clutch assembly. Air intake hoses and the air cleaner housing should be removed from vehicles with 5.7L and 6.1L engines. After that, remove the radiator fan and shroud assembly from the engine compartment, then remove the accessory Drive Belt. Remove the engine wire harness from the compressor clutch field coil connector placed on the top of the A/C compressor. Many models call for taking out the A/C compressor to reach the compressor shaft bolt or pulley and field coil snap rings, yet the refrigerant system can stay fully topped off. Separate the compressor clutch field coil connector and its wire lead from the bracket. Take out the compressor shaft bolt and use an oil filter wrench to prevent the clutch plate from rotating. Be careful not to separate the clutch plate from the group of bearings and pulleys or else you may damage the plate and don't lose the clutch shims, because you will need them to reinstall the clutch plate. Gently hit the clutch plate with a plastic mallet which will release it from the splines attached to the compressor and then remove both the clutch and the shim(s). Use Snap Ring Pliers 9764 or similar to take out the snap ring holding the pulley and bearing assembly to the compressor and then remove the assembly. Then, use a similar tool to Snap Ring Pliers 9764 to take out the snap ring securing the compressor clutch field coil to the front of the A/C compressor and remove the field coil.


Related Dodge Magnum Parts
 Dodge Magnum Cabin Air Filter
 Dodge Magnum A/C Accumulator
 Dodge Magnum A/C Compressor
 Dodge Magnum A/C Condenser
 Dodge Magnum A/C Expansion Valve
 Dodge Magnum A/C Hose
 Dodge Magnum A/C Service Cap
 Dodge Magnum A/C System Valve Core
 Dodge Magnum Blower Control Switches
 Dodge Magnum Blower Motor
 Dodge Magnum Evaporator
 Dodge Magnum HVAC Pressure Switch