JeepParts
My Garage
My Account
Cart
OEM Dodge Neon A/C Clutch
Air Conditioning Clutch- Select Vehicle by Model
- Select Vehicle by VIN
Select Vehicle by Model
orMake
Model
Year
Select Vehicle by VIN
For the most accurate results, select vehicle by your VIN (Vehicle Identification Number).
4 A/C Clutches found


Dodge Neon Clutch Coil Part Number: 5003681AA
$185.30 MSRP: $279.00You Save: $93.70 (34%)Ships in 1-2 Business Days
Dodge Neon Compressor Clutch Part Number: 4723014
$122.41 MSRP: $155.18You Save: $32.77 (22%)Ships in 1-2 Business Days
Dodge Neon Repair Kit Part Number: 5014572AA
$21.09 MSRP: $32.95You Save: $11.86 (36%)Ships in 1-2 Business Days
Dodge Neon Clutch & Pulley Part Number: 5014573AA
Dodge Neon A/C Clutch
Choose OEM A/C Clutch that meet Dodge factory standards. Dodge designs and tests every component for precision and durability. Each A/C Clutch follows strict manufacturing steps to lock in quality and fit. If your Dodge Neon matters to you, OEM parts make the smart choice. You'll get the exact look, feel, and performance you expect. Shop genuine Neon parts at the highly competitive prices online. Enjoy a manufacturer's warranty, a hassle-free return policy, and rapid delivery. No more guesswork with off brands. Get genuine parts with exact fit and true factory performance. Shop with confidence today at JeepPartsDeal.com.
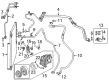
Dodge Neon A/C clutch is a component within the car HVAC system that is famous for its efficiency, and durability across different car models of Neon. As can be seen, this A/C Clutch is responsible for engaging the A/C compressor as well as improving the A/C cooling consistency and thus improving the texture of driving. When the A/C switch is turned on, several changes happen in the Dodge Neon A/C Clutch; a magnet on the Clutch grabs the drum inside the belt pulley causing it to lock; this locks the belt drive to engage the compressor. This fine coordinated operation enhances the temperature control of the car interior plus contributes to the economy and safety by eliminating overheating. The Dodge Neon A/C Clutch fits many Neon generations which is why this product offers a lot to the owners of these cars to ensure their automobiles work as smoothly as possible. Its design tends to reduce problem such as slipping or sticking which can make the A/C performance to drop and in the process damaging the compressor. Moreover, the Dodge Neon A/C Clutch is made for long-lasting use that specifically caters to the comfort of the driver and consumers when it comes to the type of driving environment they are into. Innovative items like the Noise, Vibration, and Harshness (NVH) management gives the Dodge Neon A/C Clutch a special niche in the auto market and good news for those who desire comfort in addendum to power. All in all, the Dodge Neon A/C Clutch reflects the company's values of performance and advanced technology that once again proves the fact that this clutch is highly efficient and durable to be used in the compact car category.
Dodge Neon A/C Clutch Parts and Q&A
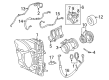
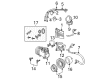
- Q: How to Service and Repair an A/C Clutch on Dodge Neon?A:The very first step in clutch service or repair is to take off the compressor assembly from its mounting without allowing the refrigerant to escape. First, use a band type oil filter removal tool to access around the clutch plate and remove the compressor shaft bolt. To remove the clutch plate and any shim(s) by hand, simply tap it with a plastic hammer after the clutch pack is separated. Don't insert screwdrivers in the gap between the clutch plate assembly and pulley to preserve the equipment. After that, take off the snap ring securing the pulley with the Snap Ring Pliers and pull the pulley assembly straight off the compressor. Lift up on the coil wire bracket/ground clip screw and wire harness to release them from the side. After removing the snap ring that holds the field coil, move the field coil to remove it from the compressor housing. Make sure to check the frictional surfaces of the clutch pulley and front plate; if there is too much wear or scoring, change them. If the felts get wet because the shaft nose is oily, open the front cover and remove the felt; then, apply a suitable seal. If the bearing is rough or if grease is coming out in excessive amounts, you should replace it. After aligning the pin in the back of the field coil with the hole on the compressor end housing, put the field coil in place, guide the wires correctly and attach the field coil bracket/ground holding screw. Use a snap ring with the notch side outward, seat it with pliers and push it all the way in to avoid the clutch failing. Attach the pulley assembly to the compressor by gently striking the top with a block of wood and secure it using the retaining snap ring (the bevel should be outward). Should you reuse the front plate and pulley assembly, place the old shims where they were, but for a different job you'll have to stack trial shims of 2.54 mm (0.10 in.); install the shims on the shaft against the shoulder, then mount the front plate assembly. If the front plate and pulley assembly are replaced, measure the gap between the front plate and pulley with a dial indicator while the clutch is energized and change the shims as needed to get a reading of 0.35 to 0.65 mm (0.014 to 0.026 in.). After that, fit the compressor shaft bolt, tighten it to 17.5 ± 2 Nm (155 ± 20 in. lbs.), verify the air gap in various spots and rotate the pulley once more for accuracy. Run an A/C clutch cycle 20 times (5 ON for 5 OFF) in A/C mode, with about 1500 - 2000 RPM and with high fan speed to help the clutch function at its best.

Related Dodge Neon Parts
 Dodge Neon Heater Core
 Dodge Neon A/C Accumulator
 Dodge Neon A/C Compressor
 Dodge Neon A/C Compressor Cut-Out Switches
 Dodge Neon A/C Condenser
 Dodge Neon A/C Expansion Valve
 Dodge Neon A/C Hose
 Dodge Neon A/C System Valve Core
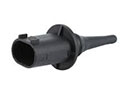 Dodge Neon Ambient Temperature Sensor
 Dodge Neon Blend Door Actuator
 Dodge Neon Evaporator
 Dodge Neon HVAC Pressure Switch