JeepParts
My Garage
My Account
Cart
OEM Dodge Neon A/C Condenser
Air Conditioning Condenser- Select Vehicle by Model
- Select Vehicle by VIN
Select Vehicle by Model
orMake
Model
Year
Select Vehicle by VIN
For the most accurate results, select vehicle by your VIN (Vehicle Identification Number).
3 A/C Condensers found

Dodge Neon Condenser Part Number: 5103023AA

Dodge Neon Condenser Part Number: 4740109
Dodge Neon Condenser Part Number: 5014582AE
Dodge Neon A/C Condenser
Choose OEM A/C Condenser that meet Dodge factory standards. Dodge designs and tests every component for precision and durability. Each A/C Condenser follows strict manufacturing steps to lock in quality and fit. If your Dodge Neon matters to you, OEM parts make the smart choice. You'll get the exact look, feel, and performance you expect. Shop genuine Neon parts at the highly competitive prices online. Enjoy a manufacturer's warranty, a hassle-free return policy, and rapid delivery. No more guesswork with off brands. Get genuine parts with exact fit and true factory performance. Shop with confidence today at JeepPartsDeal.com.
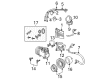
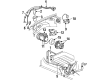
The A/C Condenser used in Dodge Neon is a style of heat exchanger utilized to cool the gaseous refrigerant and change it into a liquid form for circulation. Located in front of the radiator, it's an important part of vehicle and comprises a set of tubes connecting the refrigerant units to achieve the needed conversion. Although it is possible that different types or styles of the A/C Condenser may have been used in different Neon models, as is the case with most car models, the objective does not change with model changes and is to cool the refrigerant efficiently to guarantee the smooth running of the car's air conditioning system.
Dodge Neon A/C Condenser Parts and Q&A
- Q: How to Replace a Damaged A/C Condenser on Dodge Neon?A:You can't service the condenser, as it must be changed if it leaks or becomes damaged. Prior to removal, a recovery machine designed for R-134a is used to take the refrigerant out of the A/C system. The first step is to get rid of the battery support strut, then come off the refrigerant lines from the condenser, then get rid of the upper radiator mounts and condenser to radiator mounting screws. Set the radiator back slightly to allow the condenser to be removed. Working from the opposite side, tilt the radiator and put the fresh condenser in your vehicle, then connect it to the mounting screws and upper radiator supports. Place the refrigerant lines into the condenser and put the battery strut back properly making sure they are tightened at 5 Nm (45 in lbs). Finished, evacuate the refrigerant from the system and then recharge the AC.
- Q: How to Remove and Install an A/C Condenser on Dodge Neon?A:Start by separating the negative Battery Cable and next, recover the amount of refrigerant in the system. After that, get rid of the battery support strut. Unscrew the bolt holding the condenser and liquid lines together, take out the fitting and get rid of the seal. Plug or cover over the unfastened liquid line fitting and condenser outlet port. Also, do this on the discharge line fitting on the condenser's inlet port, by unscrewing the bolt, removing the fitting, removing the seal and plugging or taping up the openings. When finished, remove the upper radiator mounts and the screws on the condenser, tilt the radiator back and slowly take out the condenser. When installing and replacing the condenser, add 30 milliliters (1 fluid ounce) of the right refrigerant oil to the system. Set up the new condenser in the vehicle, slowly tipping the radiator backwards as you go. Once done, screw the condenser to the radiator and tighten the upper radiator mounts, each to 2 Nm (17 in. lbs.) Remove the dust cover or tape and take off the O-ring seal from the connector on the condenser as well as on the discharge line. After oiling the new seal with the proper refrigerant, slide it over the discharge line connector and connect it to the condenser again. Hold on the discharge line with a hook and make sure the connection is tightened to 12 Nm (108 in. lbs.). Take out the tape or plug from the condenser outlet and liquid line connection, clean a rubber O-ring seal, grease it with clean oil and install it on the liquid line fitting before you attach it to the condenser outlet port. After attaching the liquid line at the condenser's outlet port, fasten the bolt to 12 Nm (108 in. lbs.). Then fit the battery support strut. Next, remove all the refrigerant, recharge the A/C system and reconnect the car's negative battery cable.

Related Dodge Neon Parts
 Dodge Neon Heater Core
 Dodge Neon A/C Accumulator
 Dodge Neon A/C Compressor
 Dodge Neon A/C Compressor Clutch
 Dodge Neon A/C Compressor Cut-Out Switches
 Dodge Neon A/C Expansion Valve
 Dodge Neon A/C Hose
 Dodge Neon A/C System Valve Core
 Dodge Neon Ambient Temperature Sensor
 Dodge Neon Blend Door Actuator
 Dodge Neon Evaporator
 Dodge Neon HVAC Pressure Switch