JeepParts
My Garage
My Account
Cart
OEM Dodge Neon Sway Bar Kit
Stabilizer Sway Bar Set- Select Vehicle by Model
- Select Vehicle by VIN
Select Vehicle by Model
orMake
Model
Year
Select Vehicle by VIN
For the most accurate results, select vehicle by your VIN (Vehicle Identification Number).
5 Sway Bar Kits found

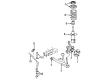
Dodge Neon Stabilizer Bar, Front Part Number: 5272327

Dodge Neon Stabilizer Bar, Rear Part Number: 5272258AB

Dodge Neon Stabilizer Bar, Front Part Number: 4656856AA
Dodge Neon Stabilizer Bar, Rear Part Number: 4656855AA
Dodge Neon Stabilizer Bar, Rear Part Number: 4656511AB
Dodge Neon Sway Bar Kit
Choose OEM Sway Bar Kit that meet Dodge factory standards. Dodge designs and tests every component for precision and durability. Each Sway Bar Kit follows strict manufacturing steps to lock in quality and fit. If your Dodge Neon matters to you, OEM parts make the smart choice. You'll get the exact look, feel, and performance you expect. Shop genuine Neon parts at the highly competitive prices online. Enjoy a manufacturer's warranty, a hassle-free return policy, and rapid delivery. No more guesswork with off brands. Get genuine parts with exact fit and true factory performance. Shop with confidence today at JeepPartsDeal.com.
The Sway Bar Kit in Dodge Neon cars is quite important since it is responsible for reducing the degree of bounce on car's body during cornering as well as over bumps in roads. This anti-roll bar links opposite wheels, and use a torsion spring to enhance roll stiffness while the vertical spring rate does not change. They cause the Sway Bar Kit to oppose torsion which in turn enables the wheels of the vehicle to move upward to different heights in a bid to reduce the lateral tilt and hence gain better grip on the road surface. There has been a number of Sway Bar Kit types introduced through the years in the Dodge Neon models which include the adjustable and the active types. These advanced systems can offer power-stretch that can vary the stiffness requirements and therefore optimize the handling and the ride quality. The Sway Bar Kit greatly improves its performance, however, the bar transmits shocks between wheels, thus, the car develops what is known as a 'waddling' motion over bumpy surfaces. In general, the Sway Bar Kit is critical to the Dodge Neon as it affects the handling balance and dynamics of the car.
Dodge Neon Sway Bar Kit Parts and Q&A
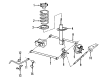
- Q: How to Service and Repair a Rear Sway Bar Kit on Dodge Neon?A:First, hold the vehicle up and remove both wheels and tires from the back before repairing the rear sway bar kit. Remove the nut from the rear sway bar link bolts and pull the bolts out through the top of the link to take out the link on each end of the sway bar. Remove the bolts on each cushion retainer, then take the retainers, cushions, and sway bar as a single assembly off the frame rails. Take off the retainers from the cushions and push each cushion out through the trial slit in the foam. To install, pull open the slit in the cushion and wrap it around the sway bar, making certain the slit is matching the ends of the bar. The flat side on top is for your comfort. Cover the cushions with retainers, then place the bar, cushions, and retainers as a group assembly in the car, making sure the dipped end of the bar faces downward. Position both bolts into the sway bar cushions on the frame and don't fully tighten them. Attach the link center sleeve and its bushings to the sway bar end and to the bracket from the strut, securing the first sway bar link bolt through the sleeve, inner bushing, the link rod, bushings from the strut, and bolt. Then install the lower bushing and a nut without tightening it. After the assemblies are back in place, start tightening the wheel stud nuts with lock nuts, first in the beginning sequence to half torque and follow the process again to reach the full torque specification of 135 Nm (100 ft. lbs.). Place the vehicle at the same height as the ground or curb and install the rear sway bar cushion retainer bolts to 34 Nm and the sway bar link nuts to 300 inch lbs. If it is needed, complete the process by setting the rear toe on the vehicle to the right measure.
- Q: How to Remove and Install a Sway Bar Kit on Dodge Neon?A:Raise the vehicle first and then take off both the rear wheels and the tires. Then, undo the nut from the end of every rear sway bar link bolt and remove the bolt through the top of the link to separate the link from both ends of the bar. Then, unbolt each of the two cushion retainers from the frame rails, take out the cushion retainers, cushions, and sway bar all together. Slide the cushion retainers off the seats and then take out the cushions through the slits in each cushion. To install, lay the cushions over the sway bar by stretching the slit and making sure both ends are toward the direction of the ends on the sway bar. Secure the retainers onto the cushions, fitted to their shapes and set up the sway bar with the cushions and retainers all joined, so the central dipped section is underneath. Put two bolts in the cushion retainers along the sway bar's length, but do not completely tighten them yet. Install a sway bar link by fitting the center sleeve and both bushings between the sway bar end and the strut mounting bracket, put the bolt through from above, adding the lower bushings and nut at the bottom. Install and tighten both tire and wheel assemblies, putting in the nuts in the right order up to 67.5 Nm (50 ft. lbs.), then repeating this order up to 135 Nm (100 ft. lbs.). First, adjust the vehicle so it is at ground or curb height, then gently tighten the rear sway bar cushion retainer bolts to 34 Nm (300 inch lbs.) and the sway bar link nuts to 23 Nm (200 inch lbs.). If it is needed, set the rear toe on the car according to its specifications.

Related Dodge Neon Parts
 Dodge Neon Control Arm
 Dodge Neon Wheel Bearing
 Dodge Neon Wheel Hub
 Dodge Neon Axle Beam Mount
 Dodge Neon Axle Pivot Bushing
 Dodge Neon Bump Stop
 Dodge Neon Coil Spring Insulator
 Dodge Neon Control Arm Bolt
 Dodge Neon Control Arm Bushing
 Dodge Neon Shock Absorber
 Dodge Neon Steering Knuckle
 Dodge Neon Sway Bar Bushing