JeepParts
My Garage
My Account
Cart
OEM Dodge Neon Water Pump
H2O Pump- Select Vehicle by Model
- Select Vehicle by VIN
Select Vehicle by Model
orMake
Model
Year
Select Vehicle by VIN
For the most accurate results, select vehicle by your VIN (Vehicle Identification Number).
2 Water Pumps found


Dodge Neon Water Pump Part Number: 68382490AA
$133.80 MSRP: $200.00You Save: $66.20 (34%)Ships in 1-2 Business Days
Dodge Neon Water Pump Part Number: 4884159AE
$121.54 MSRP: $185.00You Save: $63.46 (35%)Ships in 1-2 Business Days
Dodge Neon Water Pump
Choose OEM Water Pump that meet Dodge factory standards. Dodge designs and tests every component for precision and durability. Each Water Pump follows strict manufacturing steps to lock in quality and fit. If your Dodge Neon matters to you, OEM parts make the smart choice. You'll get the exact look, feel, and performance you expect. Shop genuine Neon parts at the highly competitive prices online. Enjoy a manufacturer's warranty, a hassle-free return policy, and rapid delivery. No more guesswork with off brands. Get genuine parts with exact fit and true factory performance. Shop with confidence today at JeepPartsDeal.com.
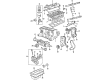
The Water Pump in Dodge Neon vehicles aids in the circulation of coolant through the water jacket to extract heat produced by combustion and for regulating engine temperature. Contemporary versions of water pumps are metallic, more specifically, aluminum; the moving part included in the construction is the rotating shaft with an impeller to take the coolant along for the ride. Probable symptoms of a failing water pump include leaks which are common especially if the pump is not well sealed, noise from the bearings especially if they are worn out and overheating. There are high performance water pumps for high-revving engines that provide a higher flow rate for the coolant and less power demand. Electric water pumps must also be considered, which include advantages such as the coolant circulation and post shutdown cooling. Keeping a proper schedule of maintenance, and timely repair of parts that are worn out also needs to be put into consideration so as to avoid having to deal with a very expensive engine.
Dodge Neon Water Pump Parts and Q&A
- Q: What Issues Require Replacing the Water Pump Body Assembly on Dodge Neon?A:If water pump body cylinder shows any of these issues, cracks, damage, trails of coolant leak, rough or loose bearing turning, impeller rubbing against either the pump body or engine block, a loose or damaged impeller or a loose or damaged sprocket or sprocket flange, it should be replaced.
- Q: How to Effectively Service and Repair a Water Pump on Dodge Neon?A:Before beginning water pump service and repair, lift the car with a hoist and get rid of the right inner splash shield. After that, take off the accessory Drive Belts and empty the cooling system. Take off the holding bolts of the Power Steering Pump, set it aside and make sure not to unhook the power steering lines. Take out the top and bottom torque isolator struts, raise the engine by the bottom for support and get rid of the right engine mount attaching bolt along with the right engine mount bracket. After that, remove the Timing Belt, Timing Belt Tensioner, camshaft sprocket and the rear timing belt cover. When you've done that, remove the water pump by taking out its screws. Check the water pump body assembly for any splits, harm, seepage of cart at the shaft seal, uneven bearing movement, impeller rubbing against the pump body or block, plus any damage to the impeller or sprocket flange. If anything's wrong, replace the whole assembly. Place some Mopar Dielectric Grease on the O-ring and put it in the water pump's O-ring groove so it is securely located and won't leak coolant. Install the water pump body to the thermostat block and screw it in steadily until you get up to 12 Nm (105 in. lbs.), then use a pressure tester to check the cooling system at 15 psi to see if there are any leaks around the water pump shaft and O-ring. With your hand, turn the pump to allow it to move freely and once that's done, install the rear cover for the timing belt, the camshaft sprocket, the timing belt tensioner and the timing belt. Set in place the engine right mount bracket and both torque isolator struts, top off the cooling liquid and put in the accessory drive belts. Finish by turning the ignition switch on, linking the DRB 1116 scan tool to the data link connector in the passenger compartment, entering diagnostics mode, going to "Engine," and selecting "Miscellaneous" before finally following the "ReLearn Cam Crank" prompts.


Related Dodge Neon Parts
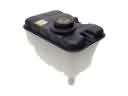 Dodge Neon Coolant Reservoir
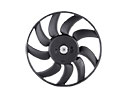 Dodge Neon Radiator fan
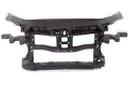 Dodge Neon Radiator Support
 Dodge Neon Serpentine Belt
 Dodge Neon Thermostat
 Dodge Neon Drive Belt
 Dodge Neon Coolant Pipe
 Dodge Neon Coolant Reservoir Cap
 Dodge Neon Coolant Reservoir Hose
 Dodge Neon Cooling Hose
 Dodge Neon V-Belt
 Dodge Neon Water Hose