JeepParts
My Garage
My Account
Cart
OEM Dodge Ram 1500 Piston
Engine Pistons- Select Vehicle by Model
- Select Vehicle by VIN
Select Vehicle by Model
orMake
Model
Year
Select Vehicle by VIN
For the most accurate results, select vehicle by your VIN (Vehicle Identification Number).
26 Pistons found


Dodge Ram 1500 Connecting Rod Part Number: 53022257AE
$221.23 MSRP: $328.00You Save: $106.77 (33%)
Dodge Ram 1500 Piston Part Number: 68067503AA
$32.19 MSRP: $185.00You Save: $152.81 (83%)Ships in 1-2 Business DaysDodge Ram 1500 Connecting Rod Part Number: 53022258AE
$243.53 MSRP: $318.00You Save: $74.47 (24%)Ships in 1-2 Business Days
Dodge Ram 1500 Piston Part Number: 4778876AB
$199.41 MSRP: $228.00You Save: $28.59 (13%)Ships in 1-2 Business Days
Dodge Ram 1500 Piston Part Number: 68067507AA
$206.24 MSRP: $237.00You Save: $30.76 (13%)Ships in 1-2 Business Days
Dodge Ram 1500 Piston Part Number: 4778875AC
$178.11 MSRP: $262.00You Save: $83.89 (33%)Ships in 1-2 Business DaysDodge Ram 1500 Piston Part Number: 4778873AB
$178.11 MSRP: $262.00You Save: $83.89 (33%)Ships in 1-2 Business Days

Dodge Ram 1500 Piston Part Number: 5189426AA


Dodge Ram 1500 Piston Part Number: 5086011AB

Dodge Ram 1500 Piston Part Number: 5086010AB


Dodge Ram 1500 Piston Part Number: 53021539AD


Dodge Ram 1500 Piston Part Number: 53021538AD


Dodge Ram 1500 Piston Part Number: 5189427AA


Dodge Ram 1500 Piston Part Number: 68233351AA

Dodge Ram 1500 Piston Part Number: 68031605AD
$173.35 MSRP: $255.00You Save: $81.65 (33%)
Dodge Ram 1500 Piston Part Number: 5086011AC

Dodge Ram 1500 Piston Part Number: 53022257AC
Dodge Ram 1500 Piston Part Number: 53022258AC
Dodge Ram 1500 Piston Part Number: 68067504AA


Dodge Ram 1500 Piston Part Number: 5019316AC
| Page 1 of 2 |Next >
1-20 of 26 Results
Dodge Ram 1500 Piston
Choose OEM Piston that meet Dodge factory standards. Dodge designs and tests every component for precision and durability. Each Piston follows strict manufacturing steps to lock in quality and fit. If your Dodge Ram 1500 matters to you, OEM parts make the smart choice. You'll get the exact look, feel, and performance you expect. Shop genuine Ram 1500 parts at the highly competitive prices online. Enjoy a manufacturer's warranty, a hassle-free return policy, and rapid delivery. No more guesswork with off brands. Get genuine parts with exact fit and true factory performance. Shop with confidence today at JeepPartsDeal.com.
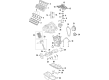
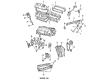
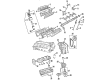
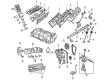
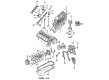
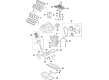
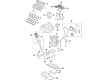
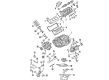
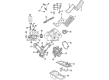
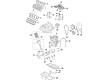
The Piston applied in Dodge Ram 1500 vehicles has the primary role of internal combustion engine that transforms power developed by the combustion of fuel into energy required for the movement of the vehicle. It works through converting the pressure from the expanding gases onto the crankshaft thus improving the performance of the engine. Rod material for Dodge Ram 1500 pistons is commonly aluminium alloy for light weight and high strength and use of forged or billet type in high performance models. In recent years, different kinds of pistons have been used in Dodge Ram 1500 automobiles and among them are trunk pistons that are for petrol and diesel engines as they provide lateral support and contain oil rings for purposes of lubrication. Also, racing pistons have to be light and strong due to the high RPM at the racing events. These pistons elaborate cooling cavities, and extremely gas-tight piston rings add to the durability and performance of the Dodge Ram 1500.
Dodge Ram 1500 Piston Parts and Q&A
- Q: How to Install Piston and Connecting Rod Assemblies into the Bore on Dodge Ram 1500?A:First, you should fit the piston rings into place before you start fitting the piston and connecting rod assemblies into the bore. Cover the piston and the rings in clean engine oil, then use a ring compressor to fit over them and tighten sufficiently so the position of the rings is not affected. Put the bearing over the connecting rod, making sure the bearings hole lines up with the rod's hole and add a small amount of clean engine oil. Attach Special Tool 8507 Connecting Rod Guides onto the bolts in the connecting rods. An "F" is raised on the piston pin bore on each piston and the "F" should be facing forward on the front side of the engine, with the connecting rod oil slinger facing the same way. Wash the inside of the cylinder and coat it with engine oil. Turn the Crankshaft until the center of the cylinder is at the connecting rod journal and once there, push the rod and piston into the bore, lining up the connecting rod guides on the crankshaft with the journal. While pressing the hammer handle, guide the connecting rod into the proper place on the rod journal. The Connecting Rod Bolts in your engine are Torque to Yield which means they must be replaced whenever you remove or loosen them from the rods. After that, insert engine oil onto the rod bolts and the bearing surfaces and use a torque wrench to tighten the bolts to 27 Nm (20 ft. lbs.) plus 90°. Add the cylinder head(s), Timing Chain and cover, cylinder head covers and Oil Pan with included gasket/windage tray. Put the proper type of oil into the crankcase and attach the negative battery cable.
- Q: How to Remove and Replace a Piston in an Engine on Dodge Ram 1500?A:Before removing and changing the piston, first unhook the negative cable from the battery. After that, take off the Oil Pan and gasket/windage tray, the cylinder head covers, timing chain cover and the cylinder head(s). If it's required, use a good ridge reamer to eliminate the ridge on the top of each cylinder, covering the piston heads. Lift each dead piston and set it aside before spinning the Crankshaft to put each connecting rod in the center of the cylinder bore. Don't put a number stamp or punch on the connecting rods or caps because it may damage them and mark their positions with a permanent ink marker or scribe tool to avoid hurting the cracked joint surfaces. Take the top off the connecting rod with Special Tool 8507, fit the connecting rod guides into the connecting rod and remove that piston, then continue for each piston that needs service. As soon as you take out the bearing, put the connecting rod cap in place to prevent harm. Prefer solvent cleaning on your pistons and use a wood or plastic scraper in the grooves around your pistons, without removing the pins, rather than utilizing abrasive tools. Examine the connecting rod journal for any extra wear, taper or scratches and inspect the connecting rod for any twist or slight bend. Check the piston for a smooth taper or elliptical shape, look for any scoring or scraping on the skirts and check the ring lands for any cracks or decay. Put the piston rings in first, after that immerse the piston head and rings in clean engine oil, place a ring compressor over them and turn it until the rings are well covered and do not move. Apply clean engine oil to the surface of the bearing and slide it onto the connecting rod so its hole lines up with the rod's hole. Installing Special Tool 8507 Connecting Rod Guides in the threads of the connecting rod bolts is necessary. Both piston pins have a raised F inside the piston pin bore which shows you where to install the piston so that its F is toward the engine's front and the connecting rod location is also toward the front. Clean and spray the cylinder bore with engine oil, keeping the oil off the piston, then turn the crankshaft until the connecting rod journal is centered in the cylinder bore. Guide the rod and piston into the bore, fit the connecting rod on the journal and hold the piston down while tapping it with the end of a hammer handle. Torque to Yield Bolts used for the connecting rod should only ever be used once, so replace them whenever you remove them. Mist engine oil on the rod bolts and bearing surfaces, fit the cap and bearing on the rod and tighten the bolts to 27 Nm (20 ft. lbs.) plus 90°. Then, fit on the reinstalled cylinder head(s), timing chain and cover as well as the cylinder head cover and oil pan and gasket or windage tray, add the required engine oil to the crankcase and link up the negative cable with the battery once again.


Related Dodge Ram 1500 Parts
 Dodge Ram 1500 Camshaft
 Dodge Ram 1500 Rocker Arm
 Dodge Ram 1500 Camshaft Plug
 Dodge Ram 1500 Crankshaft Thrust Washer
 Dodge Ram 1500 Engine Mount Bracket
 Dodge Ram 1500 Exhaust Valve
 Dodge Ram 1500 Piston Ring Set
 Dodge Ram 1500 Rocker Arm Pivot
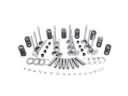 Dodge Ram 1500 Rocker Shaft Spring Kit
 Dodge Ram 1500 Timing Cover
 Dodge Ram 1500 Timing Cover Gasket
 Dodge Ram 1500 Variable Timing Solenoid