JeepParts
My Garage
My Account
Cart
OEM Dodge Ram 1500 Van Pitman Arm
Steering Pitman Arm- Select Vehicle by Model
- Select Vehicle by VIN
Select Vehicle by Model
orMake
Model
Year
Select Vehicle by VIN
For the most accurate results, select vehicle by your VIN (Vehicle Identification Number).
1 Pitman Arm found


Dodge Ram 1500 Van Pitman Arm Part Number: 52037992
$65.43 MSRP: $96.50You Save: $31.07 (33%)
Dodge Ram 1500 Van Pitman Arm
Choose OEM Pitman Arm that meet Dodge factory standards. Dodge designs and tests every component for precision and durability. Each Pitman Arm follows strict manufacturing steps to lock in quality and fit. If your Dodge Ram 1500 Van matters to you, OEM parts make the smart choice. You'll get the exact look, feel, and performance you expect. Shop genuine Ram 1500 Van parts at the highly competitive prices online. Enjoy a manufacturer's warranty, a hassle-free return policy, and rapid delivery. No more guesswork with off brands. Get genuine parts with exact fit and true factory performance. Shop with confidence today at JeepPartsDeal.com.
Dodge Ram 1500 Van Pitman Arm Parts and Q&A
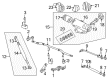
- Q: How to service and repair the Pitman Arm on Dodge Ram 1500 Van?A:Raise and support the vehicle and after that, remove the cotter pins and retaining nuts from the tie-rod end, idler arm and pitman arm. First, remove the outer tie-rod end from the steering knuckle arm, next take off the inner tie-rod end from the center link and finally, get rid of the idler arm from the center link. Following that, take out the idler arm bolts from where they are attached in the frame brackets and then take out the idler arms. Uninstall the ball studs from the joint behind the drag link, center link and pitman arm nut from the steering gear using the Remover C-4150A and then uninstall the pitman arm from the gear. The first part of installation is to put the idler arms in place and fix them with retaining nuts and bolts, making the nuts tight to 155 Nm (115 ft. lbs.). Set up the center link by attaching it to the ball studs of the idler arms, pulling them together with the ball stud nuts (torqued to 64 Nm or 47 ft. lbs.) and adding new cotter pins. Screw the ball stud nuts on each ball stud to 75 Nm for LD 9/16 nuts and 102 Nm for HD 518 nuts, then put new cotter pins in place. At the steering gear, fit the pitman arm in place and tighten the nut to 251 Nm (185 ft. lbs.). Attach the drag link to both the pitman arm and the center link and fasten the nuts to 75 Nm or 55 ft. lbs. Don't forget to fit new cotter pins. After that, take off the supports and lower the car and adjust the wheel toe afterward.

Related Dodge Ram 1500 Van Parts
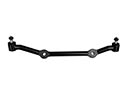 Dodge Ram 1500 Van Center Link
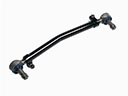 Dodge Ram 1500 Van Drag Link
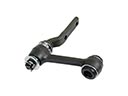 Dodge Ram 1500 Van Idler Arm
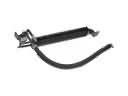 Dodge Ram 1500 Van Power Steering Cooler
 Dodge Ram 1500 Van Power Steering Gear Seal
 Dodge Ram 1500 Van Power Steering Hose
 Dodge Ram 1500 Van Power Steering Pump
 Dodge Ram 1500 Van Rack And Pinion
 Dodge Ram 1500 Van Steering Column Cover
 Dodge Ram 1500 Van Steering Gear Box
 Dodge Ram 1500 Van Tie Rod
 Dodge Ram 1500 Van Tie Rod End