JeepParts
My Garage
My Account
Cart
OEM Dodge Sprinter 2500 A/C Condenser
Air Conditioning Condenser- Select Vehicle by Model
- Select Vehicle by VIN
Select Vehicle by Model
orMake
Model
Year
Select Vehicle by VIN
For the most accurate results, select vehicle by your VIN (Vehicle Identification Number).
4 A/C Condensers found

Dodge Sprinter 2500 Condenser Part Number: 5104114AA
$371.01 MSRP: $500.00You Save: $128.99 (26%)Ships in 1-2 Business DaysDodge Sprinter 2500 Condenser Part Number: 5132357AA

Dodge Sprinter 2500 Condenser, Front Part Number: 68013633AA

Dodge Sprinter 2500 Condenser, Rear Part Number: 68012610AA
Dodge Sprinter 2500 A/C Condenser
Choose OEM A/C Condenser that meet Dodge factory standards. Dodge designs and tests every component for precision and durability. Each A/C Condenser follows strict manufacturing steps to lock in quality and fit. If your Dodge Sprinter 2500 matters to you, OEM parts make the smart choice. You'll get the exact look, feel, and performance you expect. Shop genuine Sprinter 2500 parts at the highly competitive prices online. Enjoy a manufacturer's warranty, a hassle-free return policy, and rapid delivery. No more guesswork with off brands. Get genuine parts with exact fit and true factory performance. Shop with confidence today at JeepPartsDeal.com.
The product known as Dodge Sprinter 2500 A/C Condenser is a genuine part that is critical, dependable and efficient in its function for the car's air conditioning system. Located right in front of the radiator to enhance cooling, the A/C Condenser cools gaseous refrigerant in order to change it to liquid state before being taken to the accumulator. This process is essential for achieving and maintaining slight temperature differences of the cabins for passenger and driver convenience as well as safety. The Dodge Sprinter 2500 A/C Condenser suits different models of the Sprinter 2500, be it a van, chassis cab, or minibus so that the consumers realize the same level of competence. A/C Condenser is another component unique in the automotive market as its design optimizes tubes for the optimal flow of air and cooling. Being a major part of the Dodge Sprinter 2500 and due to the powerful engine and the provided body types, the A/C Condenser helps the car to work without problems in any circumstances. The Dodge Sprinter 2500 is particularly praised for its improved fuel efficiency and mobility; and the A/C Condenser augments its virtues by guaranteeing that the car's temperature-regulating system is in its driest optimal. All in all, the products such as the Dodge Sprinter 2500 A/C Condenser are very effective to represent the car's quality and well-functioning in the business and everyday use.
Dodge Sprinter 2500 A/C Condenser Parts and Q&A
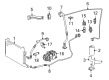
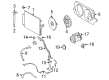
- Q: How to Safely Remove an A/C Condenser on Dodge Sprinter 2500?A:To remove the A/C condenser, first unhook and separate the negative Battery Cable. Then, take out the weather seal and air cleaner housing from the vehicle's engine space. Pull out the refrigerant from the refrigeration system and drain some of the engine cooling liquid. Remove the upper Radiator hose from the radiator and put it somewhere clear. Take off the engine cooling system reservoir and remove the engine cooling fan together with the fan shroud. Remove the cooler lines attached to the passenger side of the radiator; then take out the Grille. Pull the A/C condenser fan assembly away from the front of the A/C condenser. Loosen the nuts holding the A/C discharge and A/C liquid line to the left of the A/C condenser, cut these lines apart and throw away the O-ring seals. You should tape or install a plug on the openings of the refrigerant lines and the condenser ports. Remove the wire harness connector from the A/C pressure transducer. With diesel engines, take off the hose connections from the charge air cooler and remove both front air seals. Remove the tabs near the top that hold the radiator in place, gently push the radiator back to get enough space for the A/C condenser removal. Unhook the holding brackets on the radiator from the condenser, then lift it upward and turn or tilt it while moving it up. Should you need to, detach the transducer from the A/C condenser and throw out the O-ring seal. If you need to, take out the receiver/drier from the A/C condenser.
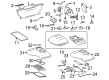
- Q: How Can Proper Servicing of an A/C Condenser Prevent Compressor Damage and Ensure Optimal Installation on Dodge Sprinter 2500?A:Make sure the refrigerant oil is at the correct level during A/C refrigerant servicing to help avoid damage to the A/C compressor. In case you have to replace numerous parts where oil is needed, check the Refrigerant Oil Capacities chart for the proper amount. During a rear A/C Evaporator replacement, pour 60 milliliters (2 fluid ounces) of the right refrigerant oil as directed. Always put on new refrigerant line O-ring seals after a refrigerant expansion valve is replaced to prevent leaks. To begin, remove the tape or plug from the receiver/drier and condenser ports and add clean refrigerant oil to a fresh O-ring seal; then set the seal onto the condenser outlet fitting using the appropriate part for R-134a systems. Tie the A/C receiver/drier (4) to the back end of the condenser (2) and slide on the retaining bolt (1) for a temporary fit. Place the A/C receiver/drier at the back of the condenser unit (5) and screw it in using two firm fasteners (3). Secure the rear condenser outlet line to the rear A/C receiver/drier with a tightening force of 6 Nm (53 in. lbs.). Set the rear A/C condenser onto the support brackets on the vehicle's roof, place the fan mounting tabs in their openings and bolt the condenser into the brackets so they are secured tightly. Take the tape or plugs out of the refrigerant fittings, rub clean oil onto the O-rings and put them on the ends of the lines. Attach the rear A/C line (11) to the rear A/C receiver/drier (9) and put the retaining bolt (10) in tight at 6 Nm (53 in. lbs.). Link the wire harness and connector (12) to the rear A/C pressure transducer and make certain each rear condenser air seal is in place for the best results. When installing a new rear A/C condenser, apply new seals around the edge near the rear condenser fan unit. Attach the two brackets (8) to hold the condenser fan on each side. Then, fasten the rear condenser fan unit (3) onto the mounts using six washers and nuts (4). Bring the rear A/C discharge line (2) over to the rear A/C condenser and secure with a retaining bolt (1), tightening it to 6 Nm (53 in. lbs.). Join the two wire harness connectors on the left side rear condenser mounting bracket. Mount the rear condenser cover bracket 2 onto the rear condenser bracket 5 with the help of four retaining bolts 3 and then fit the rear A/C suction line 1 onto the bracket with help of a nut and bolt 4. Cover the rear condenser on top of the vehicle and tighten the plastic retaining screws to 2 Nm (17 in. lbs.). Connect the negative Battery Cable back, release the gas from the rear refrigerant system and if a new rear A/C evaporator is put in, add 60 ml of refrigerant oil using the chart for multiple replacements. Then, charge up the rear refrigerant system.


Related Dodge Sprinter 2500 Parts
 Dodge Sprinter 2500 A/C Accumulator
 Dodge Sprinter 2500 A/C Compressor
 Dodge Sprinter 2500 A/C Compressor Clutch
 Dodge Sprinter 2500 A/C Expansion Valve
 Dodge Sprinter 2500 A/C Hose
 Dodge Sprinter 2500 A/C Service Cap
 Dodge Sprinter 2500 Blower Control Switches
 Dodge Sprinter 2500 Blower Motor
 Dodge Sprinter 2500 Blower Motor Resistor
 Dodge Sprinter 2500 Cabin Air Filter
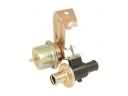 Dodge Sprinter 2500 Heater Control Valve
 Dodge Sprinter 2500 Heater Core