JeepParts
My Garage
My Account
Cart
OEM Dodge Sprinter 2500 Blend Door Actuator
Air Blend Door Actuator- Select Vehicle by Model
- Select Vehicle by VIN
Select Vehicle by Model
orMake
Model
Year
Select Vehicle by VIN
For the most accurate results, select vehicle by your VIN (Vehicle Identification Number).
5 Blend Door Actuators found


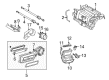
Dodge Sprinter 2500 Actuator Part Number: 5133441AA
$88.42 MSRP: $112.09You Save: $23.67 (22%)Ships in 1-2 Business Days


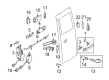
Dodge Sprinter 2500 Lock Actuator, Rear Part Number: 5133998AA


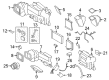
Dodge Sprinter 2500 Motor Part Number: 68012669AA

Dodge Sprinter 2500 Drain Hose Part Number: 68012668AA

Dodge Sprinter 2500 Actuator Part Number: 68012678AA
Dodge Sprinter 2500 Blend Door Actuator
Choose OEM Blend Door Actuator that meet Dodge factory standards. Dodge designs and tests every component for precision and durability. Each Blend Door Actuator follows strict manufacturing steps to lock in quality and fit. If your Dodge Sprinter 2500 matters to you, OEM parts make the smart choice. You'll get the exact look, feel, and performance you expect. Shop genuine Sprinter 2500 parts at the highly competitive prices online. Enjoy a manufacturer's warranty, a hassle-free return policy, and rapid delivery. No more guesswork with off brands. Get genuine parts with exact fit and true factory performance. Shop with confidence today at JeepPartsDeal.com.
Dodge Sprinter 2500 Blend Door Actuator Parts and Q&A
- Q: How to Safely Remove and Repair a Blend Door Actuator on Dodge Sprinter 2500?A:Also Air Door Actuator/Motor should be serviced and repaired, it is necessary to disable the air bag system by disconnecting and isolating the negative Battery Cable as well as wait two minutes to discharge the air bag system capacitor. Start by taking out the steering column opening cover at the instrument panel then the driver side front floor distribution duct. Next, take off the three screws which hold the blend door actuator in the driver side of the HVAC housing. Subsequently, remove the blend door actuator in the HVAC housing, de-plug the HVAC wire harness connector and de-install the actuator out of the car.
- Q: How to Install a Blend Door Actuator for Rear Recirculation on Dodge Sprinter 2500?A:Set the actuator to the left of the rear evaporator housing and join the wire harness to the actuator, being sure not to break the plastic pin on the housing. Fit the actuator onto the housing, twisting it a little to bring the spline into line with the recirculation-air door and the actuator onto the plastic pin. With two screws, connect the actuator by tightening each to 2 Nm (17 in. lbs.). Then, put the rear evaporator insulator in place, adding the cover and fastening both with retaining screws to 2 Nm (17 in. lbs.). Place the rear condenser cover bracket onto the rear condenser bracket and tighten it with four retaining bolts. Install the nut and bolt that anchor the rear A/C suction line under the condenser cover bracket and be sure to tighten the nut. Then, put on the rear condenser cover and tighten the retaining screws to 2 Nm (17 in. lbs.), connect the negative Battery Cable and start the Actuator Calibration function by using a scan tool.


Related Dodge Sprinter 2500 Parts
 Dodge Sprinter 2500 A/C Accumulator
 Dodge Sprinter 2500 A/C Compressor
 Dodge Sprinter 2500 A/C Compressor Cut-Out Switches
 Dodge Sprinter 2500 A/C Expansion Valve
 Dodge Sprinter 2500 A/C Hose
 Dodge Sprinter 2500 A/C Service Cap
 Dodge Sprinter 2500 Blower Control Switches
 Dodge Sprinter 2500 Blower Motor
 Dodge Sprinter 2500 Blower Motor Resistor
 Dodge Sprinter 2500 Cabin Air Filter
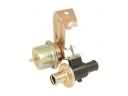 Dodge Sprinter 2500 Heater Control Valve
 Dodge Sprinter 2500 Heater Core