JeepParts
My Garage
My Account
Cart
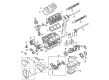
OEM Dodge Stratus Crankshaft
Crank Shaft- Select Vehicle by Model
- Select Vehicle by VIN
Select Vehicle by Model
orMake
Model
Year
Select Vehicle by VIN
For the most accurate results, select vehicle by your VIN (Vehicle Identification Number).
4 Crankshafts found


Dodge Stratus Crankshaft Part Number: 4781643AA
$539.13 MSRP: $818.00You Save: $278.87 (35%)Ships in 1-2 Business Days

Dodge Stratus Crankshaft Part Number: 4663638
$1000.64 MSRP: $1485.00You Save: $484.36 (33%)Ships in 1-2 Business Days

Dodge Stratus Crankshaft Part Number: 4621917

Dodge Stratus Crankshaft Part Number: MD357487
Dodge Stratus Crankshaft
Choose OEM Crankshaft that meet Dodge factory standards. Dodge designs and tests every component for precision and durability. Each Crankshaft follows strict manufacturing steps to lock in quality and fit. If your Dodge Stratus matters to you, OEM parts make the smart choice. You'll get the exact look, feel, and performance you expect. Shop genuine Stratus parts at the highly competitive prices online. Enjoy a manufacturer's warranty, a hassle-free return policy, and rapid delivery. No more guesswork with off brands. Get genuine parts with exact fit and true factory performance. Shop with confidence today at JeepPartsDeal.com.
Dodge Stratus Crankshaft Parts and Q&A
- Q: How to Remove and Install a Crankshaft in an Engine on Dodge Stratus?A:Since the crankshaft is fixed to the engine when it's in place, first separate the engine assembly from the vehicle and free the transaxle from the engine. Then, take out the drive plate, eliminating the crankshaft rear oil seal after that and secure the engine on a proper repair stand. Next, remove the engine oil, take out the Oil Filter, drain the crankshaft vibration damper, disconnect the engine mount support bracket, remove all the Timing Belt covers, timing belt, rear timing belt cover, Oil Pan, oil pump pick-up tube, crankshaft sprocket and oil pump. Get rid of the balance shafts and housing and also any balance shaft components. Once piston/connecting rod replacement is needed, first remove the cylinder head. Type the cylinder number onto the top of every connecting rod cap with a permanent marker, never using a stamp or punch on them to keep the connecting rod safe. Taking care not to damage the fracture rod and cap surfaces, remove the connecting rod bolts and caps; after that, avoid reusing these bolts. Unscrew the bed plate bolts and carefully tap the bed plate off the engine block in order to preserve the dowel pins. Gently take the crankshaft from the cylinder block so as not to harm the main bearings or journals and remove and toss out the target ring mounting screws. See if any of the crankshaft journals have too much wear, show signs of taper or are scored and check that limits of taper and out of roundness are 0.007 mm (0.0001 inch) and 0.0035 mm (0.0003 inch) respectively. It is important not to grind the thrust surfaces of No. 3 main bearing or nick the crank pin and, after grinding, ensure all cast iron crankshaft parts are smooth, all rough edges are removed, all oil holes are cleaned and crankshaft surfaces are polished in the direction of normal rotation. Five main bearings support the crankshaft and all upper bearing shells within the crankcase have oil grooves and holes, as do all the lower bearing shells apart from the thrust bearing half. Attach the upper bearing shells to the engine block, so that the oil hole and lubrication groove are in the right position and are aligned. Any machine work done to the crankshaft should also have the target ring balances as an assembly. Apply Mopar brake parts cleaner to the crankshaft and target ring, dry them with compressed air and then set in new mounting screws starting with #1, all while making sure engagement happens first. Turn all mounting screws with a T30 torx tool to 13 Nm (110 inch lbs.), following the order in the torque sequence and ensuring oil does not reach the bed plate mating area. Apply oil to both the bearings and journals and use only Bed Plate Sealant from Mopar to attach the crankshaft to the engine block. Put the lower main bearings into the main bearing cap/bed plate so the bearing tabs are in place and add oil. Put a 1.5 to 2.0 mm bead (0.059 to 0.078 inch) of Bed Plate Sealant on the bed plate and press in the main bearing/bed plate into the engine block. First, oil the threads of each bolt using clean engine oil and wipe any extra oil off. Put the main bearing bed plate onto the engine block bolts and tighten them fingers first and afterwards tighten them until the bed plate contacts the cylinder block. To align the thrust bearings, rotate the crankshaft, so that the number 4 piston is at Tdc, move the crankshaft to its end on the opposite side, move it forward to its limit and insert a suitable tool between the rear of the block and the rear counterweight to secure it in the forward position. Place the bolts in order and tighten them to 41 Nm (30 ft. lbs.), remove the wedge tool and then tighten them again in order to 41 Nm (30 ft. lbs.). Secure the main bearing bed plate to engine block bolts and tighten them to 28 Nm (250 inch lbs.). After that, tighten them all to 75 Nm (55 ft. lbs.), loosen them to 28 Nm (250 inch lbs.) and fasten them again to 75 Nm (55 ft. lbs.). After fitting the main bearing bed plate, measure the crankshaft turning torque and make sure it does not go beyond 5.6 Nm (50 inch lbs.). Install the connecting Rod Bearings and caps, using new connecting rod bolts and tightening them each to 27 Nm (20 ft. lbs.) plus a 1/4 turn, but, don't reuse old connecting rod bolts. Installing everything in this step requires inserting the balance shafts and housing assembly, oil pump and oil pump pickup tube and then torquing the fastener to 23 Nm (200 inch lbs.). First, install the oil pan, crankshaft position sensor, cylinder head if taken off and the timing belt rear cover, then mount the crankshaft sprocket, the timing belt, the front timing belt covers, the engine mount support bracket, crankshaft vibration damper, put a new oil filter on and install the crankshaft rear oil seal and the flex plate, applying Mopar Lock & Seal Adhesive to threaded fasteners and tightening to 95 Nm (70 ft lbs.). After that, secure the transaxle to the engine, tighten all attaching bolts to 101 Nm (75 ft. lbs.) and mount the engine in the vehicle.

Related Dodge Stratus Parts
 Dodge Stratus Timing Chain
 Dodge Stratus Engine Mount
 Dodge Stratus Camshaft Seal
 Dodge Stratus Crankshaft Seal
 Dodge Stratus Oil Pan Gasket
 Dodge Stratus Oil Pump Rotor Set
 Dodge Stratus Piston
 Dodge Stratus Rocker Arm
 Dodge Stratus Timing Belt Tensioner
 Dodge Stratus Timing Cover
 Dodge Stratus Timing Cover Gasket
 Dodge Stratus Valve Stem Seal