JeepParts
My Garage
My Account
Cart
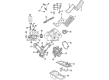
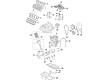
OEM Jeep Commander Piston
Engine Pistons- Select Vehicle by Model
- Select Vehicle by VIN
Select Vehicle by Model
orMake
Model
Year
Select Vehicle by VIN
For the most accurate results, select vehicle by your VIN (Vehicle Identification Number).
11 Pistons found


Jeep Commander Connecting Rod Part Number: 53022257AE
$221.23 MSRP: $328.00You Save: $106.77 (33%)Jeep Commander Connecting Rod Part Number: 53022258AE
$243.53 MSRP: $318.00You Save: $74.47 (24%)Ships in 1-2 Business Days


Jeep Commander Piston Part Number: 5086011AB

Jeep Commander Piston Part Number: 5086010AB


Jeep Commander Piston Part Number: 53021539AD


Jeep Commander Piston Part Number: 53021538AD


Jeep Commander Piston Part Number: 68233351AA

Jeep Commander Piston Part Number: 68031605AD
$173.35 MSRP: $255.00You Save: $81.65 (33%)
Jeep Commander Piston Part Number: 53022257AC
Jeep Commander Piston Part Number: 53022258AC


Jeep Commander Piston Part Number: 5019316AC
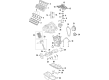
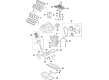
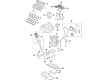
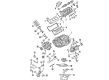
Jeep Commander Piston
Choose OEM Piston that meet Jeep factory standards. Jeep designs and tests every component for precision and durability. Each Piston follows strict manufacturing steps to lock in quality and fit. If your Jeep Commander matters to you, OEM parts make the smart choice. You'll get the exact look, feel, and performance you expect. Shop genuine Commander parts at the highly competitive prices online. Enjoy a manufacturer's warranty, a hassle-free return policy, and rapid delivery. No more guesswork with off brands. Get genuine parts with exact fit and true factory performance. Shop with confidence today at JeepPartsDeal.com.
Piston belongs to the internal combustion engine part and it has huge importance in the power created from the combustion and the energy needed for the Jeep Commander to move. Unique in its design, the Piston is famous for its ability to deliver power by transferring force from expanding gases to the crankshaft, to optimally control the functionality of the engine. These pistons can be made from light weight aluminum alloys and can offer enhanced types like forged or billet kind for strength use. Some of these are the trunk pistons whereby the engines in Jeep Commander assist in enduring side forces and the slipper pistons that help in balance and efficacy for high-speed use making them valuable for Jeep Commander. The options and the types of the entitled parts, such as the Piston, play an important role in enhancing the car's performance and viability, thus adding to the sturdiness of the Commander. Suited for various Jeep Commander models, the XK as well as the 2022 Meridian, the Piston improves not just the engine's performance but also the car's safety to give the driver the optimal and safest driving experience on the road. Specifically, Piston is unique in the automotive market because of its strength and heat and pressure resistance that increases the performance of the engines. This set of parameters not only underlines the Jeep Commander as a reliable model of mid-size SUV but also emphasizes the role of the Piston for creating high-performing and energy-efficient vehicle.
Jeep Commander Piston Parts and Q&A
- Q: How to Remove and Replace a Piston in an Engine on Jeep Commander?A:Before removing and replacing the piston, take off the negative battery cable, the Oil Pan and the gasket/windage tray, then the cylinder head(s). Should your cylinders require smoothing, use a quality ridge reamer to remove the top ridge and cover the pistons at the cylinder heads. You need to remove pistons and connecting rods from the top of the cylinder block to make the Crankshaft rotate and center the connecting rods in the brass clamps. It is important not to number-stamp or punch the connecting rods or caps, because this could damage them, so use a permanent ink marker or scribe to label the places of each part, not damaging the area where the rod and cap were broken. With the connecting rod cap removed, use Special Tool 8507 to insert Connecting Rod Guides into the rod, pull out each piston from the cylinder bore and repeat. As soon as the bearing has been taken out, fit the bearing cap to the mating connecting rod to stop any possible damage. Never use a wire-laden wheel or other abrasive cleaner on the pistons or connecting rods since the Moly coating is present; always clean the pistons with warm solvent and towel dry before using a wood or plastic scraper to remove minor dirt from the grooves in the ring land mount. Observe whether the connecting rod journal is worn thin, damaged by taper or marked by scratches and see if the connecting rod appears bent or twisted. The piston should not be taper, elliptical or broken down, with no signs of scratching or scrapes and the ring lands must not be cracked or damaged. After you put the piston rings in place, cover the piston head and ring with clean engine oil and place the ring compressor over them, screwing it shut to hold the rings tightly into position. Ensure both the bearing and connecting rod holes align, then coate both the surface and bearing with clean engine oil. Screw each Special Tool 8507 Connecting Rod Guide into the thread of the connecting rod bolt. There is an F mark raised on the piston pin bore surface, showing where the piston should be placed. Make sure it's at the front of the engine, aligned with the connecting rod oil slinger direction. Put engine oil inside the cylinder bore, rotate the crankshaft and as the connecting rod center is near, slide in the rod and piston while leading the rod into the journal at the same time. Put the piston pin in the cylinder then use a hammer handle to tap it down, matching the mark on the piston and bore. Because they are Torque to Yield Bolts, never reuse Connecting Rod Bolts; always replace them if they become loose or have been taken off. Dab a small amount of engine oil onto the bearing and rod bolt area, fit the hook bearing and bolt it with 27 Nm (20 ft. lbs.) tightness. After that, put back the cylinder head(s), Timing Chain and cover, cylinder head covers and oil pan and gasket/windage tray, fill the crankcase with the proper engine oil to the correct level and link the negative cable to the battery.
- Q: How to Install Piston and Connecting Rod Assemblies into the Bore on Jeep Commander?A:Set the piston rings in the bore before you set in the piston and connecting rod. Dip the piston head and its rings into clean oil and place a ring compressor 3 inches above them, tightened to lock the rings in position. Put the bearing onto the connecting rod, in line with the holes of both parts and apply clean engine oil to the bearing surface. Place Special Tool 8507 Connecting Rod Guides 4 into the connecting rod bolt threads. The pistons have a raised "F" 1 marking on the piston pin bore to help you place them; it should point to the head of the engine block and have the connecting rod oil slinger facing frontwards. Thoroughly clean the bore of the cylinder and apply engine oil to it. Roll the Crankshaft so the journal matches the center of the cylinder bore, place the rod and piston inside and make sure the connecting rod guides are over the journal on the crankshaft. Lower the hammer handle on the piston while you steer the connecting rod towards the journal so that both fit together. Because Connecting Rod Bolts are Torque to Yield Bolts, they must not be reused after removal; just replace them whenever needed. Put oil on the rod bolts and bearing surfaces, fit the cap and bearing onto the rod and fasten the bolts to 27 Nm (20 ft. lbs.) plus 90°. Insert the cylinder head(s), Timing Chain and cover, cylinder head covers and Oil Pan with gasket/windage tray in the combustion chamber assembly. Fill the crankcase fully with the right engine oil and link the negative cable to the battery.


Related Jeep Commander Parts
 Jeep Commander Oil Pan
 Jeep Commander Oil Pan Gasket
 Jeep Commander Valve Cover Gasket
 Jeep Commander Cam Gear
 Jeep Commander Crankshaft Timing Gear
 Jeep Commander Cylinder Head
 Jeep Commander Cylinder Head Gasket
 Jeep Commander Piston Ring Set
 Jeep Commander Rocker Arm
 Jeep Commander Transmission Mount
 Jeep Commander Valve Stem Seal
 Jeep Commander Variable Timing Sprocket