JeepParts
My Garage
My Account
Cart
OEM Jeep CV Boot
Axle Boot- Select Vehicle by Model
- Select Vehicle by VIN
Select Vehicle by Model
orMake
Model
Year
Select Vehicle by VIN
For the most accurate results, select vehicle by your VIN (Vehicle Identification Number).
19 CV Boots found


Jeep Outer Boot Part Number: 5066025AB
$51.44 MSRP: $112.00You Save: $60.56 (55%)Ships in 1-2 Business DaysProduct Specifications- Other Name: Boot Package - Half Shaft; CV Boot; Outer Boot Kit; Boots; Boot Kit Half Shaft Outer


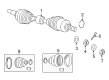
Jeep Inner Boot Part Number: 68127818AA
$53.11 MSRP: $117.00You Save: $63.89 (55%)Ships in 1-2 Business DaysProduct Specifications- Other Name: Bootpkg - Halfshaft; CV Boot; Boot Kit Half Shaft Inner


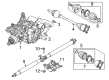
Jeep Outer CV Joint Boot, Rear Part Number: 68267183AA
$56.68 MSRP: $124.00You Save: $67.32 (55%)Ships in 1-3 Business DaysProduct Specifications- Other Name: Boot Kit - Half Shaft; CV Joint Boot Kit, Rear Outer; CV Boot; Outer Boot; Boot; Boot Kit Half Shaft
- Position: Rear Outer


Jeep Inner Boot Part Number: 68263280AA
$62.74 MSRP: $138.00You Save: $75.26 (55%)Ships in 1-2 Business DaysProduct Specifications- Other Name: Boot Kit - Half Shaft; Boot Kit Half Shaft Part Included With Stub Shaft Kit


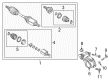
Jeep Outer Boot Part Number: 68173891AA
$83.96 MSRP: $128.00You Save: $44.04 (35%)Ships in 1-2 Business DaysProduct Specifications- Other Name: Boot Kit - Half Shaft; Boot Kit Half Shaft Part Included With Outer CV Joint; Does Not Include Grease.
- Replaces: 68119359AA


Jeep Boot Kit, Front Outer Passenger Side Part Number: 4796233AB
$66.51 MSRP: $99.65You Save: $33.14 (34%)Ships in 1-2 Business DaysProduct Specifications- Other Name: Boot - Halfshaft; CV Joint Boot Kit, Front Left Outer, Front Right Outer; CV Boot; Boots; Boot Kit Half Shaft
- Position: Front Outer Passenger Side


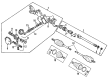
Jeep Inner Boot Part Number: 68127817AA
$129.15 MSRP: $194.00You Save: $64.85 (34%)Ships in 1-2 Business DaysProduct Specifications- Other Name: Bootpkg - Halfshaft; CV Boot; Boot Kit Half Shaft Inner


Jeep Inner CV Joint Boot, Rear Part Number: 68267180AA
$39.15 MSRP: $58.30You Save: $19.15 (33%)Ships in 1-2 Business DaysProduct Specifications- Other Name: Boot Kit - Half Shaft; CV Joint Boot Kit, Rear Inner; CV Boot; Inner Boot; Inner Joint Assembly; Boot Kit Half Shaft
- Position: Rear Inner


Jeep Inner Boot Part Number: 68127822AA
$79.44 MSRP: $92.50You Save: $13.06 (15%)Ships in 1-2 Business DaysProduct Specifications- Other Name: Bootpkg - Halfshaft; CV Boot; Boots; Boot Kit Half Shaft Inner

Jeep Outer Boot Part Number: 68127813AA
$51.79 MSRP: $114.00You Save: $62.21 (55%)Ships in 1-2 Business DaysProduct Specifications- Other Name: Bootpkg - Halfshaft; CV Boot; Boot Kit Half Shaft Outer

Jeep Outer Boot Part Number: 68127815AA
$81.21 MSRP: $180.00You Save: $98.79 (55%)Ships in 1-2 Business DaysProduct Specifications- Other Name: Bootpkg - Halfshaft; CV Boot; Boots; Boot Kit Half Shaft Outer

Jeep Outer Boot Part Number: 5140759AA
$75.32 MSRP: $115.00You Save: $39.68 (35%)Ships in 1-2 Business DaysProduct Specifications- Other Name: Boot Package - Half Shaft; CV Boot; Boots; Boot Kit Half Shaft Outer

Jeep Inner Boot Part Number: 5140758AA
$75.32 MSRP: $115.00You Save: $39.68 (35%)Ships in 1-2 Business DaysProduct Specifications- Other Name: Boot Package - Half Shaft; CV Boot; Boots; Boot Kit Half Shaft Inner
Jeep Outer Boot Part Number: 68275257AA
$98.23 MSRP: $150.00You Save: $51.77 (35%)Ships in 1-2 Business DaysProduct Specifications- Other Name: Boot Kit - Half Shaft; Boot Kit Half Shaft Part Included With Outer CV Joint
Jeep Inner Boot Part Number: 68275258AA
$110.78 MSRP: $168.00You Save: $57.22 (35%)Ships in 1-2 Business DaysProduct Specifications- Other Name: Boot Kit - Half Shaft; CV Boot; Boot Kit Half Shaft Part Included With Stub Shaft Kit

Jeep Inner Boot Part Number: 5066024AA
$109.72 MSRP: $117.00You Save: $7.28 (7%)Ships in 1-2 Business DaysProduct Specifications- Other Name: Boot Package - Half Shaft; CV Boot; Inner Boot Kit; Boot Kit Half Shaft Inner

Jeep Inner Boot, Front Part Number: 68275021AA
$125.76 MSRP: $187.00You Save: $61.24 (33%)Product Specifications- Other Name: Boot Kit - Half Shaft; CV Joint Boot, Front Inner; Boot Kit Half Shaft Part Included With Stub Shaft Kit
- Position: Front Inner
Jeep Outer Joint Part Number: 68463284AA
$86.22 MSRP: $129.00You Save: $42.78 (34%)Product Specifications- Other Name: Shaft - Half Shaft; CV Joint Boot Kit, Front Outer, Outer; CV Joint; CV Boot; Outer Boot
- Position: Outer
- Replaces: 68263498AA, 68326909AA, 68263495AA

Jeep Outer Boot, Front Part Number: 68275232AA
$92.28 MSRP: $139.00You Save: $46.72 (34%)Product Specifications- Other Name: Boot Kit - Half Shaft; CV Joint Boot, Front Outer; Boot Kit Half Shaft Part Included With Outer CV Joint; Boot Kit Half Shaft
- Position: Front Outer
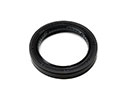
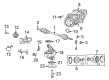
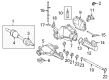
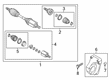
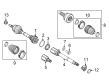
Jeep CV Boot
OEM parts sourced directly from Jeep deliver superior quality, long lasting strength, and a precise fit you can trust. Each item goes through strict quality checks to ensure safety, toughness, and performance that matches your factory equipment. At JeepPartsDeal online shop, you'll get top-quality, budget-friendly OEM Jeep CV Boot for your vehicle. We focus on giving you a high standard without pushing up the price. Our full selection of genuine factory products comes backed by the original manufacturer's warranty. You'll love our fast delivery, seamless shopping experience, and convenient return policy, saving you all the hassle.
Jeep CV Boot is applied to the constant velocity joint keeping the grease in and the grit out. Jeep has created its legend by mere brute power, open cabs, the go anywhere spirit, and decades of hard earned battlefield DNA reused in everyday life. Drivers turn the Selec-Terrain dial to one of snow, mud or sand and experience the adjustment of the rig in an instant and the lack of wear on momentum. The dashboard voice commands appear in pop-up, the over-air updates are received when you are asleep and the boxed steel frame scowls at potholes. The Jeep community is strong; users exchange trail maps, avoid loose parts and pursue sunrise rides rather than worry about shiny parking lots. Open skies collide with solid axles and Jeep road trips become merging side-track trips without even thinking. Even the least model is big on ground clearance, clever cargo hooks, and stout tow points which are not ready to give up. This CV Boot is tightly wrapped around the joint and flexes with every suspension arc and keeps sand, salt and stones, which would have worn metal to flakes, out. With a tear torn, grease spurts, joints crack, and even ground-tested Jeep begins to shiver in all directions. Making a change to a new CV Boot restores silent rotation and axle lubrication seals and cuts down on the risk of expensive axle repairs. Hard synthetic rubber also allows the CV Boot to shake off heat and remain flexible during the trail mornings under zero degrees. Well adjusted CV Boot creates power flow, straight tracked wheels and adventures continue on.
Jeep CV Boot Parts and Q&A
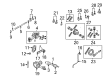
- Q: How to inspect the CV Boot, suspension components, and shock absorbers on Jeep Grand Cherokee?A:To begin with, you can regularly check your vehicle's steering linkage and suspension components to stop excessive tire wear, bad handling, and poor fuel economy. Park on level ground and check tire pressures. Test the shock absorbers.