JeepParts
My Garage
My Account
Cart
OEM 2000 Dodge Durango Intake Manifold
Engine Intake Manifold- Select Vehicle by Model
- Select Vehicle by VIN
Select Vehicle by Model
orMake
Model
Year
Select Vehicle by VIN
For the most accurate results, select vehicle by your VIN (Vehicle Identification Number).
1 Intake Manifold found

2000 Dodge Durango Intake Manifold Part Number: 4897490AC
Product Specifications- Other Name: Manifold - Intake; Engine Intake Manifold; Manifold Intake
- Condition: New
- Fitment Type: Direct Replacement
- SKU: 4897490AC
- Warranty: This genuine part is guaranteed by Mopar's factory warranty.
2000 Dodge Durango Intake Manifold Parts and Q&A
- Q: How to Remove and Install an Intake Manifold on 2000 Dodge Durango?A: Before replacing the intake manifold, disconnect the battery negative cable and release the coolant. After that, take out the compressor, generator and accessory drive bracket and then the air cleaner assembly and air inlet hose. Run the fuel pressure release and remove the fuel supply line from the fuel rail. If your engine uses an accelerator linkage, speed control and transmission kickdown, first remove them. Then remove the distributor cap, connections to the distributor, coil wires, sending unit for coolant temperature, heater hoses and bypass hose. Next, unbolt the closed crankcase ventilation and delete the evaporation control systems, then pull the assembly containing the intake manifold and throttle body out of the car as one unit. Get rid of the flange side's gaskets and the front and rear cross-over ones, as well as the bolts on the throttle body, before picking up the throttle body, discarding its gasket as you lift it from the intake manifold. For installation after removing the plenum pan, put in the pan gasket and pan, secure the plenum pan retaining bolts to 5.4 Nm (24 in. lbs.), then tighten them to 9.5 Nm (84 in. lbs.) and make sure all bolts are at 9.5 Nm (84 in. lbs.). Place a fresh gasket over the intake manifold and set the throttle body in place. Use a torque wrench to tighten the bolts to 23 Nm (200 in. lbs.) while installing the throttle body. Stick Mopar Silicone Rubber Adhesive Sealant to all four corner joints and make sure the bead sits slightly higher than the cross-over gaskets, at about 5 mm (0.2 inch). Next, affix the front and rear cross-over gaskets on the engine's sides, placing the flange gaskets on top, so they fit properly with the engine's horizontal and vertical tabs. Set the manifold over the hole in the block and heads, aligning it with long studs as needed and check the seals are there before removing any studs. Use the recommended sequence, tighten bolts 1 through 4 to 8 Nm (72 in. lbs.) one after another and follow with bolts 5 through 12 also to 8 Nm (72 in. lbs.). Then check all bolts once again and tighten every bolt to 16 Nm (12 ft. lbs.). Put in the closed crankcase ventilation and evaporation control systems, the wires, sending unit wire, coolant hoses, bypass hose, cap and wires and then hook up the accelerator linkage, speed control and transmission kickdown cables. Start with the fuel supply line to the fuel rail and next, attach the accessory drive bracket and A/C compressor. Add the generator and tighten the generator's mounting bolt to 41 Nm (30 ft. lbs.) torque. Afterward, set up the air cleaner assembly and air inlet hose, fill the cooling system and plug back in the battery negative cable.
Related 2000 Dodge Durango Parts
 2000 Dodge Durango Air Filter
 2000 Dodge Durango Gas Cap
 2000 Dodge Durango Throttle Body
 2000 Dodge Durango Fuel Filler Neck
 2000 Dodge Durango Fuel Injector
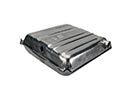 2000 Dodge Durango Fuel Tank
 2000 Dodge Durango Intake Manifold Gasket
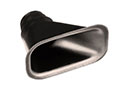 2000 Dodge Durango Air Duct
 2000 Dodge Durango Air Filter Box
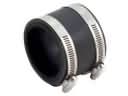 2000 Dodge Durango Air Intake Coupling
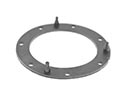 2000 Dodge Durango Fuel Pump Gasket
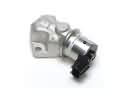 2000 Dodge Durango Idle Control Valve