JeepParts
My Garage
My Account
Cart
OEM 2000 Dodge Neon Brake Booster
Brake Power Booster- Select Vehicle by Model
- Select Vehicle by VIN
Select Vehicle by Model
orMake
Model
Year
Select Vehicle by VIN
For the most accurate results, select vehicle by your VIN (Vehicle Identification Number).
2 Brake Boosters found

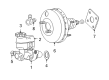
2000 Dodge Neon Brake Booster Part Number: 5015158AA
Product Specifications- Other Name: Booster - Power Brake; Power Brake Booster; Booster Power Brake
- Item Weight: 9.30 Pounds
- Condition: New
- Fitment Type: Direct Replacement
- SKU: 5015158AA
- Warranty: This genuine part is guaranteed by Mopar's factory warranty.

2000 Dodge Neon Brake Booster Part Number: 5015157AA
Product Specifications- Other Name: Booster - Power Brake; Power Brake Booster; Power Booster; Booster Power Brake
- Item Weight: 9.50 Pounds
- Condition: New
- Fitment Type: Direct Replacement
- SKU: 5015157AA
- Warranty: This genuine part is guaranteed by Mopar's factory warranty.
2000 Dodge Neon Brake Booster Parts and Q&A
- Q: What Preparations Are Necessary Before Removing and Reinstalling a Brake Booster on 2000 Dodge Neon?A: It is important to look at the Service Precautions before you start the equipment. To begin, unhook the negative cable, then isolate it, remove the positive cable and get rid of the battery by loosening the nut on the backside that secures it in place. Next, undo the nut and bolt that holds the air cleaner box together and take out the connector at the air inlet sensor. Reach under the air cleaner and remove the box, taking care to clear the rear post alignment grommet, before moving it to allow access to the bolts at the battery tray mounting. Open the battery tray by removing both of its bolts and nuts. You should press and release the brake pedal 4-5 times with the engine off to get a strong brake pedal, then you can remove the master cylinder. Should the vehicle have ABS, take out the integrated control unit (ICU) and remove the three bolts joining the ICU mounting bracket to the frame rail. Take off the vacuum hoses from the power brake booster's check valve without pulling out the check valve. Below the instrument panel, find the spot where the brake pedal-to-power brake booster input rod is joined, use a small screwdriver to turn the retaining clip tang and remove the clip, replacing it with a new one during reassembly. Lift the four nuts on the edges of the brake booster attaching it to the instrument panel, then glide the booster forward until the mounting studs come free of the panel and remove it by turning it to the side. With the power brake booster turned on its side, mount it into the engine compartment past both heater hoses and the strut tower so the mounting studs and input rod are aimed toward the instrument panel. Slide the input rod and studs into the panel, set them into place and install the four mounting nuts, tightening them to a torque of 34 Nm (300 inch lbs.). Lubriplate or a different lubricant should be used to cover the brake pedal pin. Connect the input rod to the newly installed retaining clip on the brake pedal pin. Attach all vacuum hoses that have been taken off back to the vacuum check valve. Should your vehicle have ABS, bolt the ICU mounting bracket to the frame rail, adjusting the bolts till they reach a torque of 23 Nm (200 inch lbs.) and attach the ICU (rather than attaching it directly to the frame rail). Position the master cylinder, put the battery tray back into its place and fasten it with two bolts and two nuts, so that the tightening force is 34 Nm (25 ft. lbs.). Click the air cleaner box into its special slot along the grommeted alignment post, then use the nut and bolt to secure it. Ensure you also repair the wiring harness at the air inlet sensor. Fit the battery into place, resecured it and attach the positive and negative wires to their postings. Move the switch for the stop lamp whenever necessary, change the brake fluid at the base of the brake system and carry out a test drive to check the brakes.
Related 2000 Dodge Neon Parts
 2000 Dodge Neon Brake Caliper
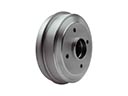 2000 Dodge Neon Brake Drum
 2000 Dodge Neon Wheel Cylinder
 2000 Dodge Neon ABS Control Module
 2000 Dodge Neon Brake Caliper Bolt
 2000 Dodge Neon Brake Caliper Bracket
 2000 Dodge Neon Brake Caliper Piston
 2000 Dodge Neon Brake Dust Shield
 2000 Dodge Neon Brake Line
 2000 Dodge Neon Brake Master Cylinder
 2000 Dodge Neon Brake Proportioning Valve
 2000 Dodge Neon Wheel Bearing Dust Cap