JeepParts
My Garage
My Account
Cart
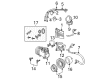
OEM 2001 Chrysler PT Cruiser A/C Clutch
Air Conditioning Clutch- Select Vehicle by Model
- Select Vehicle by VIN
Select Vehicle by Model
orMake
Model
Year
Select Vehicle by VIN
For the most accurate results, select vehicle by your VIN (Vehicle Identification Number).
2 A/C Clutches found

2001 Chrysler PT Cruiser Repair Kit Part Number: 5014572AA
$21.09 MSRP: $32.95You Save: $11.86 (36%)Ships in 1-2 Business DaysProduct Specifications- Other Name: Clutch - A/C Compressor; Shaft Seals; Overhaul Kit; Clutch Overhaul Kit A/C Compressor
- Item Weight: 1.30 Pounds
- Item Dimensions: 2.9 x 2.6 x 0.6 inches
- Condition: New
- Fitment Type: Direct Replacement
- SKU: 5014572AA
- Warranty: This genuine part is guaranteed by Mopar's factory warranty.

2001 Chrysler PT Cruiser Clutch & Pulley Part Number: 5014573AA
Product Specifications- Other Name: Pulley Kit - A/C Compressor; A/C Compressor Clutch; Clutch; Pulley; Pulley Hub Kit A/C Compressor
- Item Weight: 3.80 Pounds
- Item Dimensions: 7.7 x 6.6 x 3.5 inches
- Condition: New
- Fitment Type: Direct Replacement
- SKU: 5014573AA
- Warranty: This genuine part is guaranteed by Mopar's factory warranty.
2001 Chrysler PT Cruiser A/C Clutch Parts and Q&A
- Q: How Does the A/C Clutch Replacement Affect the Refrigerant System's Charge on 2001 Chrysler PT Cruiser?A: The compressor system stays charged when you replace the clutch, pulley or coil since the compressor assembly is removed from the side mounts, but it can also be replaced while still mounted. First, remove and isolate the battery's negative lead, before you can lift and stabilize the vehicle. Take out the serpentine drive belt, break the wire connector from the compressor clutch coil to the engine wire harness, unlatch the wire harness for the high-pressure cut-out switch and remove the four screws that keep the compressor attached to the lower front strut-to-engine bracket. Undo all screws on the compressor holder except the one on the upper left, tilting the compressor front so the clutch can be taken out with the upper left screw just loosed for support. Run a band-type oil filter wrench or strap wrench around the clutch plate to remove the compressor shaft bolt and lightly tap the clutch plate with a plastic hammer to get it out along with any shim(s). Pry the pulley loose from the front cover of the compressor using snap ring pliers and take it off. Subsequently, unscrew the clutch coil pigtail wire connector bracket and ground clip from the compressor housing and slide off the external snap ring that holds the clutch coil to the front cover. Look at the friction part of the clutch pulley and clutch plate for any wear or oil smudges and exchange them if needed, then check the roughness and excessive lack of grease in the clutch pulley bearing. Installation involves putting the dowel pin of the clutch coil in the hole in the compressor front cover, setting the pigtail wires correctly and using a new snap ring to make sure the clutch coil is correctly secured in the groove. Secure the clutch coil pigtail wire connector bracket and ground clip initially, fit the pulley on the front cover of the compressor, tap if required and finish by attaching an external snap ring. When you use the old clutch parts, put back the originals shims; if you have new parts, first install a 2.54 mm thick trial stack of shims against the compressor shaft, before adding the clutch plate. Set the compressor shaft bolt to 17.5 Nm, look at the air gap between the clutch plate and pulley using a dial indicator and adjust the shims so the measurement is between 0.35 and 0.65 mm. Now, screw the four backplate-to-engine bracket screws into the Tower front strut bracket, turn them to 28.3 Nm, reinstall the harness connectors and serpentine drive belt, lower the vehicle and link the battery's negative cable. After you plug in the new clutch, switch the system to A/C mode on the heater-A/C control, keep the blower switch at full speed and run the engine at about 1500 - 2000 rpm while you cycle it twenty times (five seconds on, a five-second break).
Related 2001 Chrysler PT Cruiser Parts
 2001 Chrysler PT Cruiser Heater Core
 2001 Chrysler PT Cruiser A/C Accumulator
 2001 Chrysler PT Cruiser A/C Compressor
 2001 Chrysler PT Cruiser A/C Compressor Cut-Out Switches
 2001 Chrysler PT Cruiser A/C Condenser
 2001 Chrysler PT Cruiser A/C Hose
 2001 Chrysler PT Cruiser A/C Switch
 2001 Chrysler PT Cruiser A/C System Valve Core
 2001 Chrysler PT Cruiser Blower Motor
 2001 Chrysler PT Cruiser Blower Motor Resistor
 2001 Chrysler PT Cruiser Evaporator
 2001 Chrysler PT Cruiser HVAC Pressure Switch