JeepParts
My Garage
My Account
Cart
OEM 2001 Jeep Grand Cherokee A/C Clutch
Air Conditioning Clutch- Select Vehicle by Model
- Select Vehicle by VIN
Select Vehicle by Model
orMake
Model
Year
Select Vehicle by VIN
For the most accurate results, select vehicle by your VIN (Vehicle Identification Number).
2 A/C Clutches found


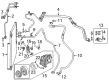
2001 Jeep Grand Cherokee Clutch Coil Part Number: 5003681AA
$186.95 MSRP: $279.00You Save: $92.05 (33%)Ships in 1-2 Business DaysProduct Specifications- Other Name: Coil - A/C Clutch; A/C Compressor Clutch Coil; Clutch; Coil; Coil A/C Clutch; A/C Compressor Clutch
- Replaces: 5072863AA
- Item Weight: 2.10 Pounds
- Item Dimensions: 5.1 x 4.7 x 2.3 inches
- Condition: New
- Fitment Type: Direct Replacement
- SKU: 5003681AA
- Warranty: This genuine part is guaranteed by Mopar's factory warranty.

2001 Jeep Grand Cherokee Clutch Part Number: 5014416AA
Product Specifications- Other Name: Clutch - A/C Compressor; A/C Compressor Clutch; Clutch Overhaul Kit A/C Compressor
- Item Weight: 0.50 Pounds
- Condition: New
- Fitment Type: Direct Replacement
- SKU: 5014416AA
- Warranty: This genuine part is guaranteed by Mopar's factory warranty.
2001 Jeep Grand Cherokee A/C Clutch Parts and Q&A
- Q: How to Install an A/C Clutch and Ensure It Functions Properly on 2001 Jeep Grand Cherokee?A: When the new compressor clutch is fitted, switch on Recirculation Mode, the A/C button should be in the ON position, the blower motor switch should be on high speed, the engine should be running at a rate between 1500 and 2000 rpm for about twenty cycles to help seat the surfaces and increase clutch strength. While replacing any of the refrigerant system's essential parts, the system can stay fully charged and won't need an additional charge. Disconnect the negative battery cable and take away the serpentine drive belt first. Following this, get rid of the bolt that joins the compressor clutch to the shaft, securing the clutch using a band-type oil filter wrench during the process. Whack the plate against the splined shaft with your plastic mallet so it comes off and then take out the clutch plate and the shim. Don't lift the clutch plate assembly apart from the pulley to prevent any damage. Take off the external ring holding the compressor clutch pulley to the front housing with snap ring pliers and pull the whole assembly away. Take the screw and retainer out of the clutch coil lead wire harness on the compressor front housing, undo the external snap ring holding the assembly on the clutch coil with a set of snap ring pliers and slide the clutch coil off. For putting the clutch in place, fit the dowel pin on the clutch field coil into the hole in the compressor front housing and press the field coil home. Join the clutch coil lead wire harness retaining clip and screw in the retaining screw. Put the clutch field coil in place and slide on the snap ring, making sure the bevel side points outward and that both the compressor pin and the ends of the field coil face the eyes on the coiled snap ring. A snap ring that isn't in place can vibrate off and cause the clutch to wear out, possibly seriously damaging the compressor. Fasten the pulley assembly to the compressor and, if extra grip is required, block the rotation with a wooden block on the pulley friction surface. Gently tap the pulley with a hammer, trying not to harm the friction area. Apply the pulley assembly retaining snap ring using snap ring pliers, so that it sits properly in place. Should you choose to use the original clutch plate and pulley sets, just use the old shims; otherwise, put the same number of new shims on the shaft below the shoulder before putting in the new clutch plate assembly. Take the feeler gauges and check the air between the clutch plate and the pulley face, making sure it is between 0.35 and 0.65 millimeter (0.014 to 0.026 inch); add or remove shims as needed. You should now install the compressor shaft bolt and tighten it to 13 Nm (115 in. lbs.), inspect the air gap in different spots to ensure it didn't change during tightening and spin the pulley before testing the air gap for the last time.
Related 2001 Jeep Grand Cherokee Parts
 2001 Jeep Grand Cherokee Blend Door Actuator
 2001 Jeep Grand Cherokee Blower Motor
 2001 Jeep Grand Cherokee Blower Motor Resistor
 2001 Jeep Grand Cherokee Heater Core
 2001 Jeep Grand Cherokee Evaporator
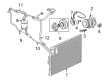
 2001 Jeep Grand Cherokee A/C Condenser
 2001 Jeep Grand Cherokee A/C Accumulator
 2001 Jeep Grand Cherokee A/C Compressor
 2001 Jeep Grand Cherokee A/C Compressor Cut-Out Switches
 2001 Jeep Grand Cherokee A/C Hose
 2001 Jeep Grand Cherokee A/C System Valve Core
 2001 Jeep Grand Cherokee HVAC Pressure Switch