JeepParts
My Garage
My Account
Cart
OEM 2002 Chrysler PT Cruiser Heater Core
HVAC Heater Core- Select Vehicle by Model
- Select Vehicle by VIN
Select Vehicle by Model
orMake
Model
Year
Select Vehicle by VIN
For the most accurate results, select vehicle by your VIN (Vehicle Identification Number).
1 Heater Core found


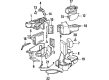
2002 Chrysler PT Cruiser Heater Core Part Number: 5174809AA
Product Specifications- Other Name: Core - Heater; HVAC Heater Core; Core Heater
- Replaces: 4734453
- Item Weight: 2.90 Pounds
- Item Dimensions: 14.2 x 11.2 x 7.7 inches
- Condition: New
- Fitment Type: Direct Replacement
- SKU: 5174809AA
- Warranty: This genuine part is guaranteed by Mopar's factory warranty.
2002 Chrysler PT Cruiser Heater Core Parts and Q&A
- Q: How to Replace a Heater Core on 2002 Chrysler PT Cruiser?A: Before you replace the heater core, unhook the negative cable from the battery and allow all the coolant to drain. Drain the refrigerant system before you remove the instrument panel. After that, unscrew the bolt holding the refrigerant line in place at the expansion valve and detach the refrigerant lines and electrical connector from the valve. Pull the bolts holding the expansion valve and get the valve out of the vehicle. Remove the heater core supply hoses from the heater core, undo the retaining clips of the A/C-Heater housing from the bulkhead and pull off the drain tube to release the hose from the housing nipple. Inside the vehicle, start by removing the link between A/C-Heater housing and each side of your car, then take out its bolts and any electricity connectors. Take the A/C-Heater housing out of the car and put it on a work table, then remove the cover on the heater core and the two coolant lines. You need to take apart the A/C-Heater housing to free the heater core. Install the new heater core in the housing, put everything back together and fix the housing in the vehicle with the retaining bolts at 20 Nm (177 in. lbs.). Once again connect the electrical cables, add the defroster duct and secure the drain tube with its clip. Bolts should be passed through the A/C-Heater housing and torqued to 20 Nm (177 in.lbs.) once the heater core coolant lines are attached. With a gasket and bolts torqued to 11 Nm (97 in. lbs.), you should install the expansion valve, connect the electrical connector at the valve's bottom and confirm that the sealing O-rings for the refrigerant lines are inside it and undamaged. Secure and torque the retaining bolt, with 23 Nm (203 in. lbs.) of torque. Connect the instrument panel back, suck out the refrigerant, fill the system with the correct refrigerant, refill the cooling system and finish by connecting the negative battery cable.
Related 2002 Chrysler PT Cruiser Parts
 2002 Chrysler PT Cruiser A/C Accumulator
 2002 Chrysler PT Cruiser A/C Clutch
 2002 Chrysler PT Cruiser A/C Compressor
 2002 Chrysler PT Cruiser A/C Compressor Cut-Out Switches
 2002 Chrysler PT Cruiser A/C Condenser
 2002 Chrysler PT Cruiser A/C Hose
 2002 Chrysler PT Cruiser A/C Switch
 2002 Chrysler PT Cruiser A/C System Valve Core
 2002 Chrysler PT Cruiser Blower Motor
 2002 Chrysler PT Cruiser Blower Motor Resistor
 2002 Chrysler PT Cruiser Evaporator
 2002 Chrysler PT Cruiser HVAC Pressure Switch