JeepParts
My Garage
My Account
Cart
OEM 2004 Chrysler Pacifica A/C Condenser
Air Conditioning Condenser- Select Vehicle by Model
- Select Vehicle by VIN
Select Vehicle by Model
orMake
Model
Year
Select Vehicle by VIN
For the most accurate results, select vehicle by your VIN (Vehicle Identification Number).
1 A/C Condenser found

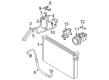
2004 Chrysler Pacifica Condenser Part Number: 5102434AC
Product Specifications- Other Name: Condenser - A/C; A/C Condenser; Condenser A/C
- Replaces: 5102434AA, 5102434AB
- Item Weight: 14.10 Pounds
- Item Dimensions: 35.1 x 20.2 x 2.2 inches
- Condition: New
- Fitment Type: Direct Replacement
- SKU: 5102434AC
- Warranty: This genuine part is guaranteed by Mopar's factory warranty.
2004 Chrysler Pacifica A/C Condenser Parts and Q&A
- Q: How to Remove and Install an A/C Condenser in a Refrigerant System on 2004 Chrysler Pacifica?A: The first step is to evacuate all of the refrigerant from the system and afterward, take apart the front fascia. After that, remove the four radiator sight shield retaining pins and the radiator sight shield and then the radiator air seal retaining pins and the air seals, marking their positions to put them back when you are done. first, put a mark at the spot for the hood latch on the radiator crossmember; then, take out the two bolts that hold it and set the hood latch aside. Loosen the four oil cooler mounting bolts and put the entire cooler aside. Take off the insulated housing, remove the nut holding the discharge line fitting to the condenser and throw out the seal. Do the above procedure also for the liquid line fitting at the condenser outlet port. Removing the two upper condenser bolts allows you to lift the condenser, remove it and separate it from the vehicle's lower brackets. If installing a new condenser, be sure to add 30 milliliters (1 fluid ounce) of recommended refrigerant oil to the system before putting all air seals back in place. Place the new condenser onto the car, fasten the lower mounts and hook up the upper mounting bolts, tightening them to 5 Nm (45 in. lbs.). Unplug and remove any tape blocking the condenser ports. Cover the rubber O-rings you have selected with a bit of clean refrigerant oil and attach the liquid line fitting to the same port before tightening the nut to the specified pressure. Carry on by doing this for the discharge line fitting at the top end of the condenser. Reattach the transmission oil cooler with the four bolts at 5 Nm (45 in. lbs.). Set the hood latch in place, add the bolts for now and then tighten them to 14 Nm (123 in. lbs.). Lastly, set in place the front fascia, along with the radiator and sight shield air seals, radiator seals and retaining pins, then drain and recharge the system with refrigerant.
Related 2004 Chrysler Pacifica Parts
 2004 Chrysler Pacifica Cabin Air Filter
 2004 Chrysler Pacifica Blend Door Actuator
 2004 Chrysler Pacifica Blower Motor
 2004 Chrysler Pacifica Blower Motor Resistor
 2004 Chrysler Pacifica A/C Accumulator
 2004 Chrysler Pacifica A/C Compressor
 2004 Chrysler Pacifica A/C Expansion Valve
 2004 Chrysler Pacifica A/C Hose
 2004 Chrysler Pacifica Ambient Temperature Sensor
 2004 Chrysler Pacifica Evaporator
 2004 Chrysler Pacifica Heater Core
 2004 Chrysler Pacifica HVAC Pressure Switch