JeepParts
My Garage
My Account
Cart
OEM 2004 Chrysler Pacifica Blower Motor
A/C Heater Blower Motor- Select Vehicle by Model
- Select Vehicle by VIN
Select Vehicle by Model
orMake
Model
Year
Select Vehicle by VIN
For the most accurate results, select vehicle by your VIN (Vehicle Identification Number).
1 Blower Motor found


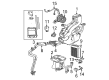
2004 Chrysler Pacifica Blower Motor, Front Part Number: 4885475AC
$139.38 MSRP: $211.00You Save: $71.62 (34%)Ships in 1-2 Business DaysProduct Specifications- Other Name: Motor - Blower With Wheel; HVAC Blower Motor Assembly, Front & Rear; Blower Assembly; Motor Blower With Wheel
- Position: Front
- Replaces: 4885475AB
- Item Weight: 4.60 Pounds
- Item Dimensions: 10.0 x 11.5 x 11.7 inches
- Condition: New
- Fitment Type: Direct Replacement
- SKU: 4885475AC
- Warranty: This genuine part is guaranteed by Mopar's factory warranty.
2004 Chrysler Pacifica Blower Motor Parts and Q&A
- Q: How to Maintain a Blower Motor in the Rear on 2004 Chrysler Pacifica?A: Before servicing the rear blower motor, take the front center floor console off and disconnect the negatively charged battery cable. Next, cut the body harness cables out of the connector sockets at the rear blower motor and the rear mode door actuator. After that, take out the body harness bracket from the console support bracket. Unfasten eight screws and both console support brackets from the floor console base and duct assembly and then remove the four screws that connect the rear blower motor housing to the assembly. Take off the rear blower motor housing and put it on a bench and next disconnect the rear blower motor wires from the power module. Remove each of the eleven clips and the three screws holding the housing. After that, carefully pry apart the two halves of the housing. Undo the blower motor wire harness and grommet from the housing and after that, pull the rear blower motor and its wheel assembly out. Afterward, put the rear blower motor and wheel assembly into the housing and then the blower motor wire harness and grommet. Attach the two half-pieces of the motor housing together and add eleven clips to hold them in place, tightening all three screws to 2 Nm (17 in. lbs.). Attach the rear blower motor wire harness connector to the power module, put the blower motor housing onto the floor console base and duct assembly and secure it using four screws tightened to 2 Nm (17 in. lbs.). Connect the console support brackets, secure with screws and tighten them each to 2 Nm (17 in. lbs.). Insert the body wire harness bracket into the console rear support bracket, join the rear blower motor power module wires and the rear mode door actuator wires into the body wire harness and secure your negative battery cable. After everything is in place, install the front center floor console, start the Heater-A/C Calibration and check the HVAC Control Cool Down.
Related 2004 Chrysler Pacifica Parts
 2004 Chrysler Pacifica Cabin Air Filter
 2004 Chrysler Pacifica Blower Motor Resistor
 2004 Chrysler Pacifica A/C Accumulator
 2004 Chrysler Pacifica A/C Compressor
 2004 Chrysler Pacifica A/C Expansion Valve
 2004 Chrysler Pacifica A/C Hose
 2004 Chrysler Pacifica A/C Switch
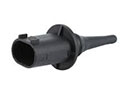 2004 Chrysler Pacifica Ambient Temperature Sensor
 2004 Chrysler Pacifica Blower Control Switches
 2004 Chrysler Pacifica Evaporator
 2004 Chrysler Pacifica Heater Core
 2004 Chrysler Pacifica HVAC Pressure Switch