JeepParts
My Garage
My Account
Cart
OEM 2004 Dodge Durango Oil Pan
Oil Drain Pan- Select Vehicle by Model
- Select Vehicle by VIN
Select Vehicle by Model
orMake
Model
Year
Select Vehicle by VIN
For the most accurate results, select vehicle by your VIN (Vehicle Identification Number).
3 Oil Pans found

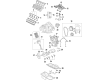
2004 Dodge Durango Oil Pan Part Number: 53021687AD
$255.26 MSRP: $389.00You Save: $133.74 (35%)Ships in 1-2 Business DaysProduct Specifications- Other Name: Pan - Engine Oil; Engine Oil Pan
- Replaces: 53021687AC
- Item Weight: 7.80 Pounds
- Item Dimensions: 25.0 x 10.3 x 2.0 inches
- Condition: New
- Fitment Type: Direct Replacement
- SKU: 53021687AD
- Warranty: This genuine part is guaranteed by Mopar's factory warranty.

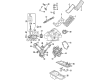
2004 Dodge Durango Oil Pan Part Number: 53021693AC
$296.53 MSRP: $376.00You Save: $79.47 (22%)Ships in 1-2 Business DaysProduct Specifications- Other Name: Pan - Engine Oil; Engine Oil Pan
- Replaces: 53021693AA, 53021693AB
- Item Weight: 7.00 Pounds
- Item Dimensions: 22.4 x 10.7 x 8.2 inches
- Condition: New
- Fitment Type: Direct Replacement
- SKU: 53021693AC
- Warranty: This genuine part is guaranteed by Mopar's factory warranty.

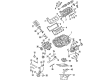
2004 Dodge Durango Oil Pan Part Number: 53021696AB
Product Specifications- Other Name: Pan - Engine Oil; Engine Oil Pan
- Replaces: 53021696AA
- Item Weight: 5.70 Pounds
- Item Dimensions: 18.5 x 10.8 x 8.4 inches
- Condition: New
- Fitment Type: Direct Replacement
- SKU: 53021696AB
- Warranty: This genuine part is guaranteed by Mopar's factory warranty.
2004 Dodge Durango Oil Pan Parts and Q&A
- Q: How to Service and Repair an Oil Pan on 2004 Dodge Durango?A: Before working on the oil pan, take out the battery's negative cable and empty the cooling system. Remove the radiator fan and the intake manifold before putting in Tool 8534 without lifting the engine. Place the car up on a hoist and detach the exhaust pipe at the manifolds. Take off the structural cover following the instructions, empty the engine oil and get rid of the oil filter. Place a jack under the engine and unscrew both engine mount through bolts: (1) for the left side and (3) for the right side. Lift the engine so it won't fall during removal and support the block of wood on the engine brackets and lower mounts. Avoid trying to figure out the oil pan or gasket by yourself, as the gasket is attached to your engine. Pull the oil pan mounts and the oil pan free, then take off the pickup tube and gasket with the bolts. Soak the oil pan in solvent and dry it afterward with a clean towel, ensuring the surface of the pan gasket you will attach to stays spotless and unharmed. Clean all over the oil screen and tube with fresh solvent. Examine the threads on both the plug and plug hole and also check the oil pan mounting flange for any bends; make any necessary repairs and straighten the flange. Before you install anything, clean both surfaces where the gasket will fit, inspect the existing gasket and change it if it is damaged or worn. Put the integrated gasket/windage tray together and connect the oil pickup tube. Remove unit from panel if it is in your way and put the stud in position No. 9. Install the mounting bolt and nuts, tightening them to 28 Nm (20 ft. lbs.) when they are in place. Place the oil pan in position and insert the mounting bolts, tightening them in order to 15 Nm (11 ft. lbs.). If you have the structural dust cover, install it, then lower the engine into place with Special Tool 8534 and install both the left and right engine mount through bolts, tightening them to 68 Nm (50 ft. lbs.). Open the engine compartment, remove Special Tool 8534, set the intake manifold in place, top off the engine with lubricant, attach the negative battery cable and operate the engine to look for any leaks.
Related 2004 Dodge Durango Parts
 2004 Dodge Durango Timing Chain
 2004 Dodge Durango Cam Gear
 2004 Dodge Durango Crankshaft Pulley
 2004 Dodge Durango Crankshaft Seal
 2004 Dodge Durango Crankshaft Timing Gear
 2004 Dodge Durango Dipstick
 2004 Dodge Durango Dipstick Tube
 2004 Dodge Durango Engine Mount
 2004 Dodge Durango Piston
 2004 Dodge Durango Rocker Arm
 2004 Dodge Durango Timing Cover Gasket
 2004 Dodge Durango Valve Stem Seal