JeepParts
My Garage
My Account
Cart
OEM 2004 Dodge Ram 2500 A/C Condenser
Air Conditioning Condenser- Select Vehicle by Model
- Select Vehicle by VIN
Select Vehicle by Model
orMake
Model
Year
Select Vehicle by VIN
For the most accurate results, select vehicle by your VIN (Vehicle Identification Number).
2 A/C Condensers found


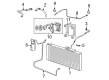
2004 Dodge Ram 2500 Condenser Part Number: 68240781AA
$352.66 MSRP: $515.00You Save: $162.34 (32%)Ships in 1-2 Business DaysProduct Specifications- Other Name: Condenser - A/C; A/C Condenser
- Replaces: 55056594AA, 55056012AC
- Item Weight: 15.80 Pounds
- Item Dimensions: 41.2 x 26.5 x 8.3 inches
- Condition: New
- Fitment Type: Direct Replacement
- SKU: 68240781AA
- Warranty: This genuine part is guaranteed by Mopar's factory warranty.
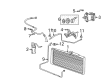
2004 Dodge Ram 2500 Fan Assembly Part Number: 5072993AB
Product Specifications- Other Name: Condenser - A/C; A/C Condenser; Radiator Fan Assembly; Condenser; Condenser A/C
- Item Weight: 6.30 Pounds
- Item Dimensions: 22.7 x 19.6 x 9.7 inches
- Condition: New
- Fitment Type: Direct Replacement
- SKU: 5072993AB
- Warranty: This genuine part is guaranteed by Mopar's factory warranty.
2004 Dodge Ram 2500 A/C Condenser Parts and Q&A
- Q: How to Remove and Install an A/C Condenser in an HVAC System on 2004 Dodge Ram 2500?A: The first step is to disconnect and isolate the battery's negative cable and then you remove the refrigerant from the system. Lift off the plastic cover at the condenser inlet stud and detach the nut from the discharge line keeping it in place, before unfastening the discharge line. Separate the seal from the discharge line fitting then place plugs or tape over both the discharge line fitting and the condenser inlet port. Then, open up the plastic cover over the condenser outlet stud, remove the hold-down nut on the liquid line fitting and separate the liquid line, disposing the seal on the receiving end of the liquid line. Also, cover up the liquid line fitting and condenser inlet port with plugs or tape. Take out the four warding screws holding together the condensator and the air cooler and stand the condenser out of the engine compartment. When replacing the condenser, add 30 milliliters (1 fluid ounce) of refrigerant oil to the refrigerant system, choosing only the oil referred to by the manufacturer for the vehicle's compressor. Hold the condenser in place and attach the four bolts to connect it to the charge air cooler, using 10.5 Nm (95 in. lbs.) of force. Lift out the old tape or plugs from the liquid line fitting and condenser outlet port, then splash some clean refrigerant oil onto the new rubber O-ring seal and place it on the liquid line fitting so it is the O-ring you are supposed to use for the R-134a system. Fit the liquid line to the condenser outlet port, connect it and use a wrench to tighten the nut to 20 Nm (180 in. lbs.). After the above installation, lift off any tape or plugs from the discharge line fitting and condenser inlet port. Apply some clean refrigerant oil to a fresh rubber O-ring seal and place it over the discharge line fitting, ensuring you use the same O-ring for the R-134a system. Thread the discharge line into the condenser inlet port and fasten it with a nut secured to 20 N (180 in. lbs.) of torque. Afterwards, attach the plastic cover to the inlet stud of the condenser, link the negative battery cable again, remove any excess refrigerant and charge the system.
Related 2004 Dodge Ram 2500 Parts
 2004 Dodge Ram 2500 Heater Core
 2004 Dodge Ram 2500 Blend Door Actuator
 2004 Dodge Ram 2500 Blower Motor Resistor
 2004 Dodge Ram 2500 A/C Accumulator
 2004 Dodge Ram 2500 A/C Clutch
 2004 Dodge Ram 2500 A/C Compressor
 2004 Dodge Ram 2500 A/C Hose
 2004 Dodge Ram 2500 A/C Switch
 2004 Dodge Ram 2500 A/C System Valve Core
 2004 Dodge Ram 2500 Blower Motor
 2004 Dodge Ram 2500 Evaporator
 2004 Dodge Ram 2500 HVAC Pressure Switch