JeepParts
My Garage
My Account
Cart
OEM 2004 Jeep Liberty Clock Spring
Spiral Cable Clock Spring- Select Vehicle by Model
- Select Vehicle by VIN
Select Vehicle by Model
orMake
Model
Year
Select Vehicle by VIN
For the most accurate results, select vehicle by your VIN (Vehicle Identification Number).
1 Clock Spring found


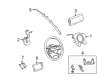
2004 Jeep Liberty Clockspring Part Number: 56010688AA
$372.13 MSRP: $543.00You Save: $170.87 (32%)Ships in 1-3 Business DaysProduct Specifications- Other Name: Air Bag Clockspring
- Replaces: 56010146AF, 56010187AE, 56010187AF, 56010146AD, 56010146AE, 56010187AG
- Item Weight: 0.80 Pounds
- Item Dimensions: 5.1 x 4.8 x 2.6 inches
- Condition: New
- Fitment Type: Direct Replacement
- SKU: 56010688AA
- Warranty: This genuine part is guaranteed by Mopar's factory warranty.
2004 Jeep Liberty Clock Spring Parts and Q&A
- Q: How to Safely Replace a Clock Spring and Disable the Supplemental Restraint System on 2004 Jeep Liberty?A: Since an accident could result in harm or death, make sure you turn off the supplemental restraint system on vehicles with air bags before starting any maintenance on the steering wheel, steering column, air bag, occupant classification system, seat belt tensioner, impact sensor or instrument panel. After removing the battery's negative cable, wait for the system capacitor to discharge for two minutes. Should the Clock Spring fail, be damaged or the air bag has deployed, it has to be changed since it cannot be fixed. Before you begin, make sure the steering wheel is turned until the front wheels point straight forward. Take out the driver air bag, separate the steering wheel wire harness connector from the upper Clock Spring receptacle and remove the steering wheel from its place in the column. If your vehicle has a tilt steering column, push it to its lowest point and let the tilt release lever point upwards. Down at the steering column, unscrew the two screws fastening the lower shroud to the upper shroud and then gently press toward the center of the vehicle while pushing inward on each side of the upper shroud to detach the snap features. Get rid of both shrouds and loosen the two connectors from the Clock Spring at the bottom of the steering column. Place a small thin-bladed screwdriver in each of the two plastic latches that attach the Clock Spring housing to the steering column lock housing, remove them and pull off the Clock Spring. Should the Clock Spring be re-used, it's important to set the release button on the Clock Spring rotor so it stays centered until installed again. During installation, place the Clock Spring so it is in the middle between the steering wheel, steering shaft and steering gear. Shipped service replacement Clock Springs include the release button engaged and a molded shield already mounted. Slide the centered Clock Spring down over the upper shaft of the steering column until the latches click, then reattach the instrument panel wiring connectors, set the upper and lower shrouds in place, line up the snap features and press them together by hand. Apply 2 Nm (18 in. lbs.) of tightness to the two screws holding the lower shroud to the upper shroud. If your car has a tilt steering column, pull it upward to the highest point and lock the release lever. Remove the plastic cover from around the release button if you've installed a new Clock Spring. Mount the steering wheel firmly and check that the screw meets the specified torque requirement, attach the steering wheel harness connector and put back the driver air bag onto the steering wheel.
Related 2004 Jeep Liberty Parts
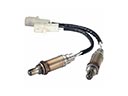 2004 Jeep Liberty Oxygen Sensor
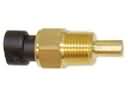 2004 Jeep Liberty Coolant Temperature Sensor
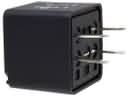 2004 Jeep Liberty Relay
 2004 Jeep Liberty Antenna Mast
 2004 Jeep Liberty Ignition Lock Cylinder
 2004 Jeep Liberty Air Bag
 2004 Jeep Liberty Air Bag Control Module
 2004 Jeep Liberty Air Bag Sensor
 2004 Jeep Liberty Car Key
 2004 Jeep Liberty Horn
 2004 Jeep Liberty Knock Sensor
 2004 Jeep Liberty Oil Pressure Switch