JeepParts
My Garage
My Account
Cart
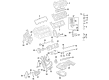
OEM 2005 Chrysler Crossfire Oil Pan
Oil Drain Pan- Select Vehicle by Model
- Select Vehicle by VIN
Select Vehicle by Model
orMake
Model
Year
Select Vehicle by VIN
For the most accurate results, select vehicle by your VIN (Vehicle Identification Number).
2 Oil Pans found

2005 Chrysler Crossfire Drive Chain, Lower Part Number: 5101189AA
Product Specifications- Other Name: Pan - Oil; Engine Oil Pan, Lower; Lower Oil Pan; Lower Pan; Pan Oil; Oil Pan
- Position: Lower
- Item Weight: 3.80 Pounds
- Item Dimensions: 16.5 x 10.8 x 2.8 inches
- Condition: New
- Fitment Type: Direct Replacement
- SKU: 5101189AA
- Warranty: This genuine part is guaranteed by Mopar's factory warranty.

2005 Chrysler Crossfire Upper Oil Pan Part Number: 5097784AA
Product Specifications- Other Name: Pan - Oil; Engine Oil Pan, Upper; Upper Pan; Pan Oil; Oil Pan
- Position: Upper
- Item Weight: 10.10 Pounds
- Item Dimensions: 23.9 x 16.2 x 3.8 inches
- Condition: New
- Fitment Type: Direct Replacement
- SKU: 5097784AA
- Warranty: This genuine part is guaranteed by Mopar's factory warranty.
2005 Chrysler Crossfire Oil Pan Parts and Q&A
- Q: How to Service and Repair an Oil Pan on 2005 Chrysler Crossfire?A: Before servicing or repairing the oil pan, drain the engine oil and take out the splash shield's screws and the shield itself. Subsequently, take out the transmission oil cooler line bolts and move the cooler lines around, then remove the bolts securing the oil pan and take out the lower oil pan. For the upper oil pan, detach the negative battery terminal, hoist the vehicle, remove the screws from the lower splash shield and take out the splash shield. Afterward, take out the lower oil pan, the front exhaust pipes and unplug the oil level/temperature sensor harness connector. With the engine mounted bolts removed, lower the car and next, pull out the engine cover and the dipstick tube. Attach an engine support bracket, being sure not to raise the engine too much to prevent coolant hoses, power steering lines and A/C lines from getting damaged. Put the support bracket in place and then pick up the vehicle while we remove the 24 upper oil pan bolts. While installing, make sure the surfaces around the lower oil pan and under the lower upper oil pan gasket are spotless, then treat the lower oil pan area with a thin layer of Loctite 5900 sealant. Secure the lower oil pan in place and bolt it down so that torque is set at 14 Nm. Attach the transmission cooler lines and their retainers, tightening them to the proper torque and add the oil pan drain plug at the correct torque. Attach the lower splash shield and screws with the torque wrench, tightening each to 5 Nm and drop the car down. Next, fill the crankcase to the marked level, start up the engine and check for leaks. While installing the upper oil pan, first make sure the gasket areas are clean and put a bead of Loctite 5900 on the sealing area on the pan. Place the upper oil pan onto the engine, then install the bolts with sufficient tightness in their holes: M6 X 20, M6 X 40, M6 X 90 and M8 X 30. With the right tightening sequence, use an M6 torque wrench set to 10 Nm and an M8 set to 20 Nm. Install the lower oil pan back into place, lower the vehicle and place the engine into position with the support bracket before removing it. Place the dipstick tube, lift the vehicle and secure the front mount bolts, tightening them to 35 Nm. Attach the sensor harness connector and secure the front exhaust pipes, replace the lower splash shield and tighten all its retaining screws using 5 Nm. After that, drop the vehicle, fasten the engine cover, put engine oil to the proper level and link the negative battery cable.
Related 2005 Chrysler Crossfire Parts
 2005 Chrysler Crossfire Cam Gear
 2005 Chrysler Crossfire Camshaft
 2005 Chrysler Crossfire Crankshaft Seal
 2005 Chrysler Crossfire Dipstick
 2005 Chrysler Crossfire Dipstick Tube
 2005 Chrysler Crossfire Engine Mount
 2005 Chrysler Crossfire Harmonic Balancer
 2005 Chrysler Crossfire Oil Filler Cap
 2005 Chrysler Crossfire Rocker Arm
 2005 Chrysler Crossfire Rocker Arm Pivot
 2005 Chrysler Crossfire Timing Chain Tensioner
 2005 Chrysler Crossfire Valve Stem Seal