JeepParts
My Garage
My Account
Cart
OEM 2005 Dodge Dakota Exhaust Pipe
Exhaust Tail Pipe- Select Vehicle by Model
- Select Vehicle by VIN
Select Vehicle by Model
orMake
Model
Year
Select Vehicle by VIN
For the most accurate results, select vehicle by your VIN (Vehicle Identification Number).
7 Exhaust Pipes found


2005 Dodge Dakota Tail Pipe Part Number: 52855886AA
$388.96 MSRP: $592.00You Save: $203.04 (35%)Ships in 1-2 Business DaysProduct Specifications- Other Name: Tailpipe - Exhaust; Direct-Fit Exhaust System Kit; Resonator and Pipe Assembly; Tailpipe; Resonator And Tailpipe Exhaust; Tailpipe And Resonator Exhaust
- Replaces: 52013258AE, 52013258AF
- Item Weight: 25.50 Pounds
- Item Dimensions: 42.2 x 15.9 x 23.9 inches
- Condition: New
- Fitment Type: Direct Replacement
- SKU: 52855886AA
- Warranty: This genuine part is guaranteed by Mopar's factory warranty.
2005 Dodge Dakota Catalytic Converter Part Number: 52013550AB
Product Specifications- Other Name: Converter - Exhaust; Exhaust Tail Pipe; Converter; Tailpipe
- Item Weight: 22.00 Pounds
- Item Dimensions: 30.4 x 23.0 x 12.1 inches
- Condition: New
- Fitment Type: Direct Replacement
- SKU: 52013550AB
- Warranty: This genuine part is guaranteed by Mopar's factory warranty.

2005 Dodge Dakota Muffler Part Number: 52013651AB
Product Specifications- Other Name: Muffler - Exhaust; Exhaust Muffler; Resonator; Muffler Exhaust
- Replaces: 52013651AA
- Item Weight: 9.70 Pounds
- Item Dimensions: 40.4 x 15.3 x 11.1 inches
- Condition: New
- Fitment Type: Direct Replacement
- SKU: 52013651AB
- Warranty: This genuine part is guaranteed by Mopar's factory warranty.

2005 Dodge Dakota Resonator & Pipe Part Number: 52013650AB
Product Specifications- Other Name: Resonator - Exhaust; Exhaust Pipe; Front Pipe; Extension Pipe; Pipe And Resonator Exhaust; Resonator And Pipe Exhaust; Resonator
- Replaces: 52013650AA
- Item Weight: 9.70 Pounds
- Item Dimensions: 57.7 x 5.3 x 2.0 inches
- Condition: New
- Fitment Type: Direct Replacement
- SKU: 52013650AB
- Warranty: This genuine part is guaranteed by Mopar's factory warranty.
2005 Dodge Dakota Muffler Part Number: 52103677AD
Product Specifications- Other Name: Muffler - Exhaust; Exhaust Muffler; Muffler Exhaust
- Item Weight: 25.20 Pounds
- Item Dimensions: 37.3 x 10.2 x 8.4 inches
- Condition: New
- Fitment Type: Direct Replacement
- SKU: 52103677AD
- Warranty: This genuine part is guaranteed by Mopar's factory warranty.
2005 Dodge Dakota Muffler Part Number: 52103676AD
Product Specifications- Other Name: Muffler - Exhaust; Exhaust Muffler; Resonator; Muffler Exhaust
- Condition: New
- Fitment Type: Direct Replacement
- SKU: 52103676AD
- Warranty: This genuine part is guaranteed by Mopar's factory warranty.
2005 Dodge Dakota Front Pipe Part Number: 52013634AA
Product Specifications- Other Name: Resonator - Exhaust; Exhaust Pipe; Extension Pipe; Pipe And Resonator Exhaust
- Item Weight: 18.90 Pounds
- Item Dimensions: 58.2 x 10.4 x 8.4 inches
- Condition: New
- Fitment Type: Direct Replacement
- SKU: 52013634AA
- Warranty: This genuine part is guaranteed by Mopar's factory warranty.
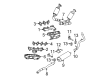
2005 Dodge Dakota Exhaust Pipe Parts and Q&A
- Q: How to Maintain and Fix an Exhaust Pipe on 2005 Dodge Dakota?A: When working on the exhaust pipe, first support and raise the vehicle. Coat all the bolts and nuts with Mopar(R) Rust Penetrant, letting the product work for 5 minutes. Release the clamp securing the exhaust pipe to the muffler (3) and mark and break up any tack welds that might be there. Unless specified by the service manual, remove the back muffler insulators (5) and all the exhaust pipe insulators (1). Should the connection be stubborn, heat it with a torch and twist to get the tailpipe out. Take the exhaust pipe out (2) of the muffler (4). Throw away clamps and supports that are rusty, cracked or worn and attach new (or similar) ones to guarantee your exhaust is fixed right and sounds right. Before putting the exhaust pipe on the replacement muffler, ensure you take out any burrs and place the alignment tang into its slot. Before tightening it, install the clamp between the muffler and exhaust, then reinstall the rear muffler insulators (5) if you took them out and finally fasten the tailpipe insulators (1). Examine the area where the exhaust system touches the body panels and take care of any needed adjustments. Now, give the muffler-to-exhaust pipe clamp a torque setting of 61 Nm (45 ft. lbs.), lift the vehicle, start the engine, check for any exhaust leaks and take care of any leaks if you find them.
Related 2005 Dodge Dakota Parts
 2005 Dodge Dakota PCV Valve
 2005 Dodge Dakota Catalytic Converter
 2005 Dodge Dakota EGR Valve
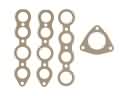 2005 Dodge Dakota Exhaust Manifold
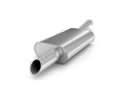 2005 Dodge Dakota Muffler
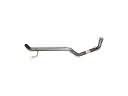 2005 Dodge Dakota Tail Pipe
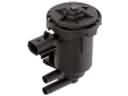 2005 Dodge Dakota Canister Purge Valve
 2005 Dodge Dakota Exhaust Hanger
 2005 Dodge Dakota Exhaust Heat Shield
 2005 Dodge Dakota Exhaust Manifold Gasket