JeepParts
My Garage
My Account
Cart
OEM 2005 Dodge Neon Brake Caliper
Caliper- Select Vehicle by Model
- Select Vehicle by VIN
Select Vehicle by Model
orMake
Model
Year
Select Vehicle by VIN
For the most accurate results, select vehicle by your VIN (Vehicle Identification Number).
8 Brake Calipers found

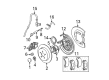 Product Specifications
- Other Name: Caliper - Disc Brake; Disc Brake Caliper, Rear Left; Brake Caliper; Caliper
- Position: Rear Driver Side
- Replaces: 5014785AA
- Item Weight: 4.20 Pounds
- Condition: New
- Fitment Type: Direct Replacement
- SKU: 5014785AB
- Warranty: This genuine part is guaranteed by Mopar's factory warranty.
- Product Specifications
- Other Name: Caliper - Disc Brake; Disc Brake Caliper, Rear Right; Caliper
- Position: Rear Passenger Side
- Replaces: 5014784AA
- Item Weight: 4.00 Pounds
- Item Dimensions: 8.2 x 6.3 x 3.4 inches
- Condition: New
- Fitment Type: Direct Replacement
- SKU: 5014784AB
- Warranty: This genuine part is guaranteed by Mopar's factory warranty.
 Product Specifications
- Other Name: Caliper - Disc Brake; Disc Brake Caliper, Rear Right; Brake Caliper
- Position: Rear Passenger Side
- Item Weight: 4.00 Pounds
- Condition: New
- Fitment Type: Direct Replacement
- SKU: 5114210AB
- Warranty: This genuine part is guaranteed by Mopar's factory warranty.
- Product Specifications
- Other Name: Caliper - Disc Brake; Disc Brake Caliper, Rear Left; Brake Caliper
- Position: Rear Driver Side
- Item Weight: 4.10 Pounds
- Condition: New
- Fitment Type: Direct Replacement
- SKU: 5114211AB
- Warranty: This genuine part is guaranteed by Mopar's factory warranty.

 Product Specifications
- Other Name: Caliper - Disc Brake; Disc Brake Caliper, Front Left; Caliper; Caliper Disc Brake; Brake Caliper
- Position: Front Driver Side
- Replaces: 5072545AA, 5019521AA
- Item Weight: 7.10 Pounds
- Condition: New
- Fitment Type: Direct Replacement
- SKU: 5083791AA
- Warranty: This genuine part is guaranteed by Mopar's factory warranty.
- Product Specifications
- Other Name: Caliper - Disc Brake; Disc Brake Caliper, Front Right; Caliper Assembly; Caliper; Caliper Disc Brake
- Position: Front Passenger Side
- Replaces: 5072544AA, 5019520AA
- Item Weight: 7.20 Pounds
- Condition: New
- Fitment Type: Direct Replacement
- SKU: 5083790AA
- Warranty: This genuine part is guaranteed by Mopar's factory warranty.
2005 Dodge Neon Caliper, Front Driver Side Part Number: 5104761AA
Product Specifications- Other Name: Caliper - Disc Brake; Disc Brake Caliper, Front Left; Caliper Disc Brake; Brake Caliper
- Position: Front Driver Side
- Item Weight: 7.80 Pounds
- Condition: New
- Fitment Type: Direct Replacement
- SKU: 5104761AA
- Warranty: This genuine part is guaranteed by Mopar's factory warranty.
2005 Dodge Neon Caliper, Front Passenger Side Part Number: 5104760AA
Product Specifications- Other Name: Caliper - Disc Brake; Disc Brake Caliper, Front Right; Caliper Disc Brake; Brake Caliper
- Position: Front Passenger Side
- Condition: New
- Fitment Type: Direct Replacement
- SKU: 5104760AA
- Warranty: This genuine part is guaranteed by Mopar's factory warranty.
2005 Dodge Neon Brake Caliper Parts and Q&A
- Q: How to Maintain a Brake Caliper for Optimal Performance on 2005 Dodge Neon?A: Begin the front disc brake caliper service by using a holding tool to compress the brake pedal beyond its very first inch, preventing the master cylinder from activating the brakes. Lift up the vehicle and take off the front wheel and tire from it. Unbolt the banjo bolt from the brake line to the brake caliper, throwing away the old washers and installing brand new ones. If required, allow some space by pulling back the caliper piston so the calipers can be removed. Pull out the two bolts securing the caliper to the steering knuckle and then tilt the caliper away so you can take it off the caliper slide abutment. Look at the caliper and clean it before you take it apart. Move the guide pin bushing sleeve to the caliper's back and disconnect it and then fold one end of the rubber guide pin bushing to remove it from the caliper mounting boss. Piston removal requires you to hang the caliper assembly so it's not touching the rotor or body, insert a wooden block between the piston and the caliper fingers and gently step on the brake. Press down on the brake pedal so that fluid doesn't leak, then separate the brake fluid flex hose. Open the vise, use protective jaws and place the caliper inside. After that, remove the piston boot and use a gentle tool to take out the seal. Make sure to clean the piston bore and watch out for any damage and if it's needed, use Caliper Hone, Special Tool C-4095, not allowing it to measure beyond 0.0254 mm (0.001 inch). Check the caliper piston carefully and change it if it shows damage. While cleaning caliper parts, be sure not to use methods that might cause asbestos to be released. While assembling, bend the guide pin bushing and push it into the caliper mounting boss, coat the inside with lube and fit the guide pin sleeve accordingly. Dip a new piston seal in clean brake fluid and place it in the caliper bore. Then, put the new piston boot in brake fluid, wipe it off and set the piston into the bore. Rotate the counterbore with Special Tool C-4689 and Handle, Special Tool C-4171 and then set the brake shoes and caliper back into the vehicle. Grease the abutment points where the steering knuckles slide into each caliper, set the caliper in place and secure it with guide pin bolts tightened to 22 Nm (192 inch lbs.). Reattach the banjo bolt with fresh washers, tighten it to 24 Nm (210 inch lbs.) and then fit the tire and wheel back, making sure you tighten the wheel nuts to 135 Nm (100 ft. lbs.). Lower the vehicle, take out the brake pedal holding tool, bleed the caliper as needed and check on the road that your brakes are functioning correctly.
Related 2005 Dodge Neon Parts
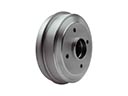 2005 Dodge Neon Brake Drum
 2005 Dodge Neon Speed Sensor
 2005 Dodge Neon Wheel Cylinder
 2005 Dodge Neon ABS Control Module
 2005 Dodge Neon Brake Caliper Bolt
 2005 Dodge Neon Brake Caliper Bracket
 2005 Dodge Neon Brake Caliper Piston
 2005 Dodge Neon Brake Disc
 2005 Dodge Neon Brake Line
 2005 Dodge Neon Brake Pad
 2005 Dodge Neon Hydraulic Hose
 2005 Dodge Neon Wheel Stud