JeepParts
My Garage
My Account
Cart
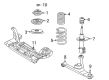
OEM 2006 Chrysler PT Cruiser Axle Beam
Rigid Axle- Select Vehicle by Model
- Select Vehicle by VIN
Select Vehicle by Model
orMake
Model
Year
Select Vehicle by VIN
For the most accurate results, select vehicle by your VIN (Vehicle Identification Number).
5 Axle Beams found


2006 Chrysler PT Cruiser Engine Cradle, Front Part Number: 5272962AE
Product Specifications- Other Name: Crossmember - Front Suspension; Engine Cradle, Front; Crossmember Front Suspension
- Position: Front
- Replaces: 5272962AD, 5272962AB, 5272962AC
- Item Weight: 34.20 Pounds
- Item Dimensions: 39.1 x 23.9 x 10.8 inches
- Condition: New
- Fitment Type: Direct Replacement
- SKU: 5272962AE
- Warranty: This genuine part is guaranteed by Mopar's factory warranty.

 Product Specifications
- Other Name: Crossmember - Rear Floor; Front Reinforcement; Crossmember Rear Floor
- Position: Rear
- Replaces: 5027377AC
- Item Weight: 9.10 Pounds
- Condition: New
- Fitment Type: Direct Replacement
- SKU: 5027377AD
- Warranty: This genuine part is guaranteed by Mopar's factory warranty.
2006 Chrysler PT Cruiser Engine Cradle, Front Part Number: 5272970AH
Product Specifications- Other Name: Crossmember - Front Suspension; Engine Cradle, Front; Crossmember Front Suspension
- Position: Front
- Replaces: 5272970AE, 5272970AD
- Item Weight: 39.40 Pounds
- Item Dimensions: 39.9 x 23.2 x 11.8 inches
- Condition: New
- Fitment Type: Direct Replacement
- SKU: 5272970AH
- Warranty: This genuine part is guaranteed by Mopar's factory warranty.

2006 Chrysler PT Cruiser Crossmember, Rear Part Number: 4724856AA
Product Specifications- Other Name: Crossmember - Rear Floor; Floor Pan Reinforcement, Rear; Crossmember Rear Floor
- Position: Rear
- Item Weight: 16.60 Pounds
- Item Dimensions: 42.4 x 17.3 x 3.6 inches
- Condition: New
- Fitment Type: Direct Replacement
- SKU: 4724856AA
- Warranty: This genuine part is guaranteed by Mopar's factory warranty.

2006 Chrysler PT Cruiser Crossmember, Rear Part Number: 4724591AD
Product Specifications- Other Name: Crossmember - Rear Floor; Floor Pan Reinforcement, Rear; Crossmember Rear Floor
- Position: Rear
- Item Weight: 2.00 Pounds
- Item Dimensions: 23.5 x 20.1 x 2.5 inches
- Condition: New
- Fitment Type: Direct Replacement
- SKU: 4724591AD
- Warranty: This genuine part is guaranteed by Mopar's factory warranty.
2006 Chrysler PT Cruiser Axle Beam Parts and Q&A
- Q: How to Service and Repair an Axle Beam on Rear Drum Brake on 2006 Chrysler PT Cruiser?A: When servicing and repairing the axle beam in rear drum brake vehicles, always start by ensuring safety and disconnecting the battery negative cable while the air bag system capacitor discharges. Open the case of the battery by unfixing the air cleaner cover and detach the negative cable from the battery. Prevent the vehicle from moving by blocking the tires, remove the center console and tug up on the parking brake lever's cable to keep the automatic adjustment in place. Raise the vehicle with support, release the equalizer-to-rear parking brake cables, take off the wheel nuts and remove the rear tire and its assembly. Pull the flex hose away from the axle-trailing arm, remove the holding clips on the brake drum and take out the drum. Unscrew the dust cap, hub nut and pull the hub and bearing off the spindle. Disconnect the parking brake cable from the actuating lever, press the locking fingers on the cable retainer and remove the wheel speed sensor routing clips and sensor if your car has antilock brakes. Remove the parking brake cable routing brackets from the axle trailing arm, slip the cable through and then take out the bolts that hold the brake shoe support plate and spindle to the axle. Taking out the support plate and spindle, separate the watts link bell crank from the axle. Put a transmission jack under the axle, then take off the shock absorbers' mounting hardware and slowly lower the jack to remove the coil springs and rubber isolators. Put a mark where the trailing arm brackets connect to the vehicle, take out the bolts and remove the axle. Check the axle for harm, tighten all tiny screws and change parts that are damaged. To set up the trailing arm front bracket, fix it to the end of the axle, tightening the nuts from the outside while applying force until no movement is possible. Set the axle beam on a transmission jack, move the trailing arms to match the marks and attach the axle bracket-to-body mounting bolts while they're still loose. Secure the bolts to 54 Nm, place the rubber isolators on the springs and put the springs on their perches so they are oriented correctly. Place jack below the vehicle, raise it to permit the coil springs into the mounting brackets, fit the lower shock absorber bolts and screw them tightly at 88 Nm. If there is a rear stabilizer bar, fix the cushion retainers into place and tighten the bolts that hold them. Following this, screw the watts link bell crank to the axle and fit the spindle, seal and support plate onto the axle. Clean and put adhesive on the threads of the mounting bolts, attach them to the brackets and tighten by 95 Nm. Mount the wheel speed sensor and routing brackets if necessary, direct the parking brake cable through the trailing arm and secure the cable holder brackets. Open the back of the disc brake, guide the parking brake cable up from the brake shoe support plate, fit it to the parking brake lever and secure the hub and bearing on the spindle with a new hub nut turned to 217 Nm. After fitting the dust cap, maneuver the rear brakes and then install the brake drum. Attach the flex hose to the axle, put the tire back onto the wheel and tighten the wheel mounting nuts to 135 Nm. After you lower the vehicle, join the rear parking brake cables to the equalizer, check that everything is installed correctly and then remove the pin punch from the automatic adjustment mechanism. Crank the parking brake lever to check its function, test the rear wheels for free rotation and finish installation by turning on the battery, placing the air cleaner cover and tightening trailing arm to mounting bracket pivot thru-bolts to 122 Nm. Arrange a last rear wheel alignment and ensure to align the thrust angle if necessary.
Related 2006 Chrysler PT Cruiser Parts
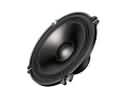 2006 Chrysler PT Cruiser Car Speakers
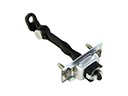 2006 Chrysler PT Cruiser Door Check
 2006 Chrysler PT Cruiser Floor Pan
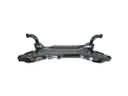 2006 Chrysler PT Cruiser Front Cross-Member
 2006 Chrysler PT Cruiser Grille
 2006 Chrysler PT Cruiser Hood Latch
 2006 Chrysler PT Cruiser Rear Crossmember
 2006 Chrysler PT Cruiser Seat Heater
 2006 Chrysler PT Cruiser Shift Knob
 2006 Chrysler PT Cruiser Spoiler
 2006 Chrysler PT Cruiser Sunroof
 2006 Chrysler PT Cruiser Windshield Washer Nozzle