JeepParts
My Garage
My Account
Cart
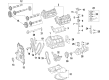
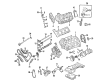
OEM 2007 Dodge Sprinter 3500 Camshaft
Cam- Select Vehicle by Model
- Select Vehicle by VIN
Select Vehicle by Model
orMake
Model
Year
Select Vehicle by VIN
For the most accurate results, select vehicle by your VIN (Vehicle Identification Number).
8 Camshafts found


2007 Dodge Sprinter 3500 Camshaft Part Number: 5175452AA
Product Specifications- Other Name: Camshaft - Intake; Camshaft Intake
- Item Weight: 3.20 Pounds
- Item Dimensions: 19.8 x 5.3 x 5.2 inches
- Condition: New
- Fitment Type: Direct Replacement
- SKU: 5175452AA
- Warranty: This genuine part is guaranteed by Mopar's factory warranty.

2007 Dodge Sprinter 3500 Camshaft Part Number: 68017930AA
Product Specifications- Other Name: Camshaft - Exhaust; Camshaft Exhaust
- Item Weight: 3.20 Pounds
- Item Dimensions: 18.0 x 9.2 x 4.3 inches
- Condition: New
- Fitment Type: Direct Replacement
- SKU: 68017930AA
- Warranty: This genuine part is guaranteed by Mopar's factory warranty.

2007 Dodge Sprinter 3500 Camshaft Part Number: 68005650AA
Product Specifications- Other Name: Camshaft - Intake; Camshaft Intake
- Item Weight: 3.80 Pounds
- Item Dimensions: 29.0 x 15.9 x 3.5 inches
- Condition: New
- Fitment Type: Direct Replacement
- SKU: 68005650AA
- Warranty: This genuine part is guaranteed by Mopar's factory warranty.

2007 Dodge Sprinter 3500 Camshaft Part Number: 5175451AA
Product Specifications- Other Name: Camshaft - Intake; Camshaft Intake
- Item Weight: 4.30 Pounds
- Item Dimensions: 11.1 x 4.1 x 4.0 inches
- Condition: New
- Fitment Type: Direct Replacement
- SKU: 5175451AA
- Warranty: This genuine part is guaranteed by Mopar's factory warranty.

2007 Dodge Sprinter 3500 Camshaft Part Number: 5175454AA
Product Specifications- Other Name: Camshaft - Exhaust; Camshaft Exhaust
- Item Weight: 3.70 Pounds
- Item Dimensions: 19.4 x 5.0 x 5.1 inches
- Condition: New
- Fitment Type: Direct Replacement
- SKU: 5175454AA
- Warranty: This genuine part is guaranteed by Mopar's factory warranty.

2007 Dodge Sprinter 3500 Camshaft Part Number: 68005685AA
Product Specifications- Other Name: Camshaft - Exhaust; Camshaft Exhaust
- Item Weight: 5.80 Pounds
- Item Dimensions: 27.4 x 15.3 x 3.0 inches
- Condition: New
- Fitment Type: Direct Replacement
- SKU: 68005685AA
- Warranty: This genuine part is guaranteed by Mopar's factory warranty.
2007 Dodge Sprinter 3500 Camshaft Part Number: 68005652AA
Product Specifications- Other Name: Camshaft - Exhaust; Camshaft Exhaust
- Item Weight: 3.60 Pounds
- Item Dimensions: 3.1 x 15.9 x 3.2 inches
- Condition: New
- Fitment Type: Direct Replacement
- SKU: 68005652AA
- Warranty: This genuine part is guaranteed by Mopar's factory warranty.
2007 Dodge Sprinter 3500 Camshaft Part Number: 68005683AA
Product Specifications- Other Name: Camshaft - Intake; Camshaft Intake
- Item Weight: 3.80 Pounds
- Item Dimensions: 25.1 x 2.7 x 2.7 inches
- Condition: New
- Fitment Type: Direct Replacement
- SKU: 68005683AA
- Warranty: This genuine part is guaranteed by Mopar's factory warranty.
2007 Dodge Sprinter 3500 Camshaft Parts and Q&A
- Q: How to Service and Repair a Camshaft for Right on 2007 Dodge Sprinter 3500?A: The first step in repairing a camshaft is to scrub any surfaces that come together and to coat the camshafts with Mopar® Engine Oil Supplement. Insert the camshafts inside the cylinder head journals and organize them so their timing marks are lined up. Install each camshaft retainer and tighten its retaining bolt finger-tight before using a 9 Nm (80 in. lbs.) torque wrench to fasten all bolts. If the camshaft endplay is off, you should replace the cylinder head and its cover. After setting up the transmission correctly, check the amount of remaining movement or end play, in the camshafts with a dial indicator. You should find these marks on the camshaft gears: the right exhaust camshaft gear is in the tooth valley and the right intake camshaft gear on the outside of the tooth. These marks should connect and the alignment pin for the exhaust camshaft drive gear should be at about 12 o'clock when you view the front camshaft seal from in front of the engine. Put the camshaft gear onto its correct side and slide it onto the exhaust camshaft alignment dowel and then fasten it with the bolt. Insert and tighten the two drive gear bolts so that the torque measures 18 Nm (13 ft. lbs.). Check that the timing chain is holding the drive gear where the paint or scribe marks show and remove the tie strap. Using a vibration damper bolt, rotate the engine so you can set in the third camshaft drive gear bolt and tighten it down with 18 Nm (13 ft. lbs.) of torque. Put the engine back at TDC and inspect the position of the camshaft gear. Put in the timing chain tensioner, but make sure that none of the engine sealer gets on the camshaft journals. Wipe clean all of the surfaces that will touch when you seal and then spread a 1.5 mm line of Mopar® Engine RTV Sealant on the cylinder head cover. Put the camshaft seal in place and fit the cylinder head, tightening the bolts in three steps: at first to 4 Nm (35 in. lbs.), then to 6 Nm (53 in. lbs.) and then finally to 8.4 Nm (75 in. lbs.). Install the oil separator housing adaptor, putting on a new camshaft seal and tighten all its fasteners to 9 Nm (7 ft. lbs.). After that, set in the oil separator, tightening all its fasteners to 9 Nm (7 ft. lbs.). Join the transmission tube fastener to the engine cover bracket, the heater hose bracket to the cylinder head cover and the vacuum pump hose pipe to the cylinder head cover. Attach the car's fuel injectors and tighten the hold down fasteners by 7 Nm plus 180° (62 in. lbs., plus 180°). Secure both camshaft position sensor and fuel injector wiring harness moments and then connect the return fuel hose to every injector. Put in the fuel rail, high pressure fuel lines and injector cover, securing the oil dipstick tube to the cylinder head by tightening the fastener to 11 Nm (8 in. lbs.). Assemble the vacuum pump, the air control valve resonator and then the air cleaner outlet tube to the turbocharger, after which attach the air cleaner housing cover. Afterward, attach the engine cover, secure the negative battery cable, fire up the engine, let it heat up, turn it off and carefully check for leaks.
Related 2007 Dodge Sprinter 3500 Parts
 2007 Dodge Sprinter 3500 Crankshaft
 2007 Dodge Sprinter 3500 Crankshaft Pulley
 2007 Dodge Sprinter 3500 Dipstick
 2007 Dodge Sprinter 3500 Engine Mount
 2007 Dodge Sprinter 3500 Exhaust Valve
 2007 Dodge Sprinter 3500 Harmonic Balancer
 2007 Dodge Sprinter 3500 Intake Valve
 2007 Dodge Sprinter 3500 Oil Filler Cap
 2007 Dodge Sprinter 3500 Oil Filter
 2007 Dodge Sprinter 3500 Oil Pan
 2007 Dodge Sprinter 3500 Timing Chain
 2007 Dodge Sprinter 3500 Valve Stem Seal