JeepParts
My Garage
My Account
Cart
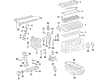
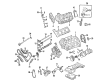
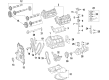
OEM Dodge Sprinter 3500 Camshaft
Cam- Select Vehicle by Model
- Select Vehicle by VIN
Select Vehicle by Model
orMake
Model
Year
Select Vehicle by VIN
For the most accurate results, select vehicle by your VIN (Vehicle Identification Number).
10 Camshafts found

Dodge Sprinter 3500 Camshaft Part Number: 68000660AA
$527.85 MSRP: $769.00You Save: $241.15 (32%)Ships in 1-2 Business Days
Dodge Sprinter 3500 Camshaft Part Number: 68000661AA
$538.15 MSRP: $786.00You Save: $247.85 (32%)Ships in 1-2 Business Days


Dodge Sprinter 3500 Camshaft Part Number: 5175452AA

Dodge Sprinter 3500 Camshaft Part Number: 68005683AA

Dodge Sprinter 3500 Camshaft Part Number: 68005685AA
Dodge Sprinter 3500 Camshaft Part Number: 68005652AA

Dodge Sprinter 3500 Camshaft Part Number: 5175451AA

Dodge Sprinter 3500 Camshaft Part Number: 5175454AA
Dodge Sprinter 3500 Camshaft Part Number: 68005650AA

Dodge Sprinter 3500 Camshaft Part Number: 68017930AA
Dodge Sprinter 3500 Camshaft
Choose OEM Camshaft that meet Dodge factory standards. Dodge designs and tests every component for precision and durability. Each Camshaft follows strict manufacturing steps to lock in quality and fit. If your Dodge Sprinter 3500 matters to you, OEM parts make the smart choice. You'll get the exact look, feel, and performance you expect. Shop genuine Sprinter 3500 parts at the highly competitive prices online. Enjoy a manufacturer's warranty, a hassle-free return policy, and rapid delivery. No more guesswork with off brands. Get genuine parts with exact fit and true factory performance. Shop with confidence today at JeepPartsDeal.com.
The Camshaft is one of the most important and valuable parts that greatly improve the efficiency and durability of the Dodge Sprinter 3500 cars. Another exceptional element, which is used here is camshaft - the detail responsible for the regulation of the intake and exhaust valves, allowing for proper combustion and maximum performance. This camshaft specifically refers to a Dodge camshaft applicable in several Sprinter 3500 types including the types that have a 2.7L I5 and 3.0L V6 engines making it an excellent product for owners with Sprinter 3500 intending to either maintain or enhance the vehicle's performance. The Camshaft comes with a specific and particular phase, which has to be in line with the crankshaft in order to correctly time the valves as well as increase the effectiveness of the engine. It includes aspects that make it rigid increasing the vehicle reliability and other aspects that ensures the engine to runs smoothly under all circumstances. Furthermore, in the automotive market, one has the Camshaft that enhances the torque and RPM range that indicates better acceleration and towing capability. Thus, the fuel efficiency is about 25 mpg; hence, the Dodge Sprinter 3500 with this camshaft is not only functional for commercial purposes, but it is also economical. All in all, the Camshaft is definitely a great product that will prove the brand's goal of providing a vehicle that would capture power and reliability; thus, it is instrumental for one who owns a Dodge Sprinter 3500.
Dodge Sprinter 3500 Camshaft Parts and Q&A
- Q: How to Maintain the Left Camshaft on Dodge Sprinter 3500?A:First, remove the negative Battery Cable and then take off the engine cover to service the left camshaft. First, locate TDC using the vibration damper bolt, then pull away the main engine harness retainers at the rear of the cylinder head and later remove the EGR Valve and charge air inlet tube. Take advantage of the 9539 Pliers to separate the fuel line hoses from the Fuel Rail and high-pressure pump. Then, separate the fuel hoses at the left cylinder head and set the fuel pipe bundle aside. After that, get rid of the oil filter housing support bracket and also the cylinder head cover. When looked at from the front camshaft seal, the left exhaust camshaft gear alignment mark should be at the bottom of its valley, the left intake camshaft gear mark on the outside of the tooth and the camshaft pin should be at about 12 o'clock. Spin the engine past TDC using the vibration damper bolt, then get to the lower camshaft drive gear bolt and take it out. After that, turn the engine back to TDC to verify that the camshaft gears are in place. After taking out the Timing Chain Tensioner, mark the chain close to where it touches the gear and then strap it to the drive gear. After that, take away the last few camshaft drive gear bolts to disconnect the drive gear from the camshaft gear, followed by loosening both camshaft retainers and pulling out the left cylinder head camshafts.
- Q: How to Service and Repair a Camshaft for Left on Dodge Sprinter 3500?A:To work on the left camshaft, you have to clean all the mating faces and lubricate the camshafts with Mopar Engine Oil Supplement or its alternative. Install the camshafts very carefully onto the cylinder head journals, ensure that camshaft gear timing marks align. Put the camshaft retainers in place and torque all the retaining bolts to 9 Nm (80 in. lbs.). Once installed, inspect end play of camshafts using dial indicator and left exhaust camshaft gear alignment mark is in the gear tooth valley and left intake camshaft gear mark is on the outside of the tooth, alignment marks will be touching and exhaust camshaft drive gear alignment pin should be at about 12 o'clock when viewed in front of camshaft seal. Ensure that gears alignment marks on the camshaft are properly aligned and supercede the camshaft driven gear on the exhaust camshaft alignment dowel and then two bolts on the drive gears should be tightened to 18 Nm (13 ft. lbs.). Bear in mind that the Timing Chain has to be squared up to the paint or scribe marks on the drive gear prior to parting with the tie strap. Install the third camshaft drive gear bolt by turning the engine by the vibration damper bolt, tighten to 18 Nm (13 ft.lbs.) and turned the engine back to TDC, and check the position of the camshaft gears. Replacement of cylinder head and the cylinder head cover should be done in case of the camshaft endplay is not within specification. Install the Timing Chain Tensioner, the left-front and rear camshaft oil seals with all sealing surfaces clean and inspected, not smearing engine sealant on camshaft journals. Coat the underside of the cylinder head cover with 1/8 in bead of Mopar engine RTV Gen II sealant, carefully place the cover in position and put the bolts back in original position with a hint that the cylinder head cover bolts are of different sizes to prevent damaging the engine. Cranking in order torque the cylinder head cover down to 4 Nm (35 in. lbs.) in jump, and then 8.4 Nm (75 in. lbs.). Fit the EGR Valve replacing the sealing washers on the Fuel Injectors then do not put on any lubricant on the nozzles of the fuel injectors. Fit the fuel injectors, to a torque of 7 Nm (5 ft. lbs.) on the injector retaining claw holding bolt, and further 180 o. Relocate/hookup the engine harness, and bolt in the left Fuel Rail (to 11 Nm (8 in. lbs.) on the fuel rail bolts. Manual and tie the fuel lines back to the injectors, plug the fuel injector electrical connectors and fit the left rear engine cover bracket. Install the high- pressure fuel lines on the fuel rail to the injectors and tighten the line ends to 27 Nm (20 ft. lbs.) and also install the fuel line on the high- pressure pump to the left fuel rail and tighten the retaining bolt to 30 Nm (22 ft. lbs.). Both fuel lines are connected at the high-pressure pump, the air filter housing and tube are installed and negative Battery Cable is attached. Crank over, warm up, shut off engine, and check for leaks then place the engine cover and reconnect the negative battery cable. Lastly, turn the engine on, warm it up, turn it off, and check to find out the presence of leaks.


Related Dodge Sprinter 3500 Parts
 Dodge Sprinter 3500 Crankshaft
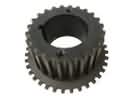 Dodge Sprinter 3500 Crankshaft Gear
 Dodge Sprinter 3500 Cylinder Head
 Dodge Sprinter 3500 Harmonic Balancer
 Dodge Sprinter 3500 Motor And Transmission Mount
 Dodge Sprinter 3500 Oil Pan
 Dodge Sprinter 3500 Oil Pump
 Dodge Sprinter 3500 Piston
 Dodge Sprinter 3500 Timing Chain Tensioner
 Dodge Sprinter 3500 Timing Cover
 Dodge Sprinter 3500 Transmission Mount
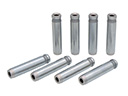 Dodge Sprinter 3500 Valve Guide