JeepParts
My Garage
My Account
Cart
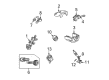
OEM 2008 Chrysler PT Cruiser Rack And Pinion
Steering Rack And Pinion- Select Vehicle by Model
- Select Vehicle by VIN
Select Vehicle by Model
orMake
Model
Year
Select Vehicle by VIN
For the most accurate results, select vehicle by your VIN (Vehicle Identification Number).
5 Rack And Pinions found

2008 Chrysler PT Cruiser Steering Gear Part Number: 5272722AJ
$668.90 MSRP: $898.00You Save: $229.10 (26%)Ships in 1-2 Business DaysProduct Specifications- Other Name: Gear - Rack And Pinion; Rack and Pinion Assembly; Steering Gearbox; Gear Assembly
- Replaces: 5272722AI, 5272722AG
- Condition: New
- Fitment Type: Direct Replacement
- SKU: 5272722AJ
- Warranty: This genuine part is guaranteed by Mopar's factory warranty.

2008 Chrysler PT Cruiser Steering Gear Part Number: 5272289AF
Product Specifications- Other Name: Gear - Rack And Pinion; Steering Gearbox; Gear Assembly
- Replaces: 5272289AE
- Item Weight: 20.70 Pounds
- Item Dimensions: 58.9 x 12.2 x 6.6 inches
- Condition: New
- Fitment Type: Direct Replacement
- SKU: 5272289AF
- Warranty: This genuine part is guaranteed by Mopar's factory warranty.
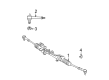
2008 Chrysler PT Cruiser Steering Gear Part Number: 4656747AH
Product Specifications- Other Name: Gear - Rack And Pinion; Rack and Pinion Assembly; Steering Gearbox; Gear Assembly; Gear Rack And Pinion
- Replaces: 4656747AF
- Item Weight: 19.60 Pounds
- Item Dimensions: 57.2 x 11.0 x 8.2 inches
- Condition: New
- Fitment Type: Direct Replacement
- SKU: 4656747AH
- Warranty: This genuine part is guaranteed by Mopar's factory warranty.
2008 Chrysler PT Cruiser Gear Assembly Part Number: 4656456AJ
Product Specifications- Other Name: Gear - Rack And Pinion; Rack and Pinion Assembly; Steering Gearbox; Gear Rack And Pinion
- Replaces: 4656456AI
- Item Weight: 20.40 Pounds
- Item Dimensions: 57.7 x 11.3 x 7.9 inches
- Condition: New
- Fitment Type: Direct Replacement
- SKU: 4656456AJ
- Warranty: This genuine part is guaranteed by Mopar's factory warranty.
2008 Chrysler PT Cruiser Steering Gear Part Number: 5085520AB
Product Specifications- Other Name: Gear - Rack And Pinion; Rack and Pinion Assembly; Steering Gearbox; Gear Assembly; Gear Rack And Pinion
- Replaces: 5085520AA
- Item Weight: 18.00 Pounds
- Item Dimensions: 57.1 x 10.6 x 8.7 inches
- Condition: New
- Fitment Type: Direct Replacement
- SKU: 5085520AB
- Warranty: This genuine part is guaranteed by Mopar's factory warranty.
2008 Chrysler PT Cruiser Rack And Pinion Parts and Q&A
- Q: How to Remove a Rack and Pinion Steering Gear on 2008 Chrysler PT Cruiser?A: Before you remove the rack and pinion, move the steering wheel straight, secure it with a holder to keep the Clock Spring aligned and then move on to the rest of the procedure. First, at the bottom of the steering column, press the retainer clip out (4), then back off the pinch bolt nut and remove the steering column coupling pinch bolt (1), so that the upper (2) and lower (3) steering column couplings can be pulled apart. Support the vehicle and raise it more and after that, get rid of the wheel mounting nuts (3). On the left and right sides, uncouple the nut (2) fronting the outer tie rod (1) at the knuckle (3) by holding the tip of the outer tie rod stud with a wrench while loosening the nut. To begin, take off the tie rod end (1) from inside the knuckle (2) using Remover (3) (Special Tool MB991113) and then pull out the outer tie rod (1) and heat shield (4) from the same knuckle (3). If your car is equipped with this switch, lift the locking tab on the wiring harness connector and pull it out. If your vehicle does not have a turbo engine, detach the power steering fluid pressure hose (4) at the back of the rack and pinion, remove the hose clamp and take out the passive cooler (2) hose connected at the rack and pinion outlet port. On turbo engine vehicles, unscrew the tube nut (3) from the pressure hose, open the routing clip (2) to release the pressure hose and release the return hose clamp (4) before the return hose can be removed at the power steering rack and pinion. If your steering coolers are attached to the crossmember, undo the routing clip on the rack and pinion and the two screws that fix the cooler to the crossmember from the right so it is out of the way. Take out the mounting nuts (1, 3), the pencil strut (2) and the washer (4) behind the strut from the torque strut (5) bolt from the right front corner of the crossmember and the body. Unfasten the screws holding the wheel house splash shield (1) to the drive belt splash shield (3) and the drive belt splash shield (3) to the front suspension crossmember (6). Detach the fasteners (4) keeping the drive belt splash shield (3) attached to the body (2) and then take out splash shield (3). Take out bolt (5) holding the torque strut (2) to the crossmember. Make a mark on the vehicle body showing where the front suspension crossmember was removed (3). Support the crossmember with a transmission jack, then tie down the frame rails while keeping the two isolator and control arm bushing bolts fastened. Lower the front suspension crossmember just far enough that you can access the steering column lower coupling, but do not let it dangle from the lower control arms. Use a roll pin punch (4) to remove roll pin (3), connect the steering column to the power steering rack and pinion pinion shaft (2). Once removed, push the lower steering column coupling off the shaft. Finally, separate the pinion shaft dash cover seal (1) from the power steering rack and pinion housing (4) tabs (3), remove the seal and remove the four bolts joining the power steering rack and pinion (3) to the front suspension crossmember (4). After that, take out the power steering rack and pinion.
Related 2008 Chrysler PT Cruiser Parts
 2008 Chrysler PT Cruiser Power Steering Pump
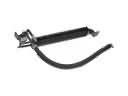 2008 Chrysler PT Cruiser Power Steering Cooler
 2008 Chrysler PT Cruiser Power Steering Hose
 2008 Chrysler PT Cruiser Power Steering Reservoir
 2008 Chrysler PT Cruiser Steering Column
 2008 Chrysler PT Cruiser Steering Column Cover
 2008 Chrysler PT Cruiser Steering Gear Box
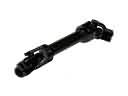 2008 Chrysler PT Cruiser Steering Shaft
 2008 Chrysler PT Cruiser Steering Wheel
 2008 Chrysler PT Cruiser Tie Rod End