JeepParts
My Garage
My Account
Cart
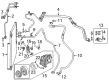
OEM 2009 Chrysler PT Cruiser A/C Clutch
Air Conditioning Clutch- Select Vehicle by Model
- Select Vehicle by VIN
Select Vehicle by Model
orMake
Model
Year
Select Vehicle by VIN
For the most accurate results, select vehicle by your VIN (Vehicle Identification Number).
3 A/C Clutches found


2009 Chrysler PT Cruiser Clutch Coil Part Number: 5003681AA
$186.95 MSRP: $279.00You Save: $92.05 (33%)Ships in 1-2 Business DaysProduct Specifications- Other Name: Coil - A/C Clutch; A/C Compressor Clutch Coil; Clutch; Coil; Coil A/C Clutch; A/C Compressor Clutch
- Replaces: 5072863AA
- Item Weight: 2.10 Pounds
- Item Dimensions: 5.1 x 4.7 x 2.3 inches
- Condition: New
- Fitment Type: Direct Replacement
- SKU: 5003681AA
- Warranty: This genuine part is guaranteed by Mopar's factory warranty.

2009 Chrysler PT Cruiser Repair Kit Part Number: 5014572AA
$21.09 MSRP: $32.95You Save: $11.86 (36%)Ships in 1-2 Business DaysProduct Specifications- Other Name: Clutch - A/C Compressor; Shaft Seals; Overhaul Kit; Clutch Overhaul Kit A/C Compressor
- Item Weight: 1.30 Pounds
- Item Dimensions: 2.9 x 2.6 x 0.6 inches
- Condition: New
- Fitment Type: Direct Replacement
- SKU: 5014572AA
- Warranty: This genuine part is guaranteed by Mopar's factory warranty.

2009 Chrysler PT Cruiser Clutch & Pulley Part Number: 5014573AA
Product Specifications- Other Name: Pulley Kit - A/C Compressor; A/C Compressor Clutch; Clutch; Pulley; Pulley Hub Kit A/C Compressor
- Item Weight: 3.80 Pounds
- Item Dimensions: 7.7 x 6.6 x 3.5 inches
- Condition: New
- Fitment Type: Direct Replacement
- SKU: 5014573AA
- Warranty: This genuine part is guaranteed by Mopar's factory warranty.
2009 Chrysler PT Cruiser A/C Clutch Parts and Q&A
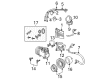
- Q: How to Install an A/C Clutch on 2009 Chrysler PT Cruiser?A: While placing the A/C clutch coil onto the front of the compressor, bring the dowel pin on its back into contact with the corresponding hole in the compressor. Ensure the wire lead is not compressed. The A/C clutch coil should be held in place with a fresh snap ring, with the bevel facing away from the motor and the eyelets either side of the dowel pin. Install the snap ring for the clutch coil by hand or using pliers 9764 or an equivalent tool, so that the ring is flush with the groove. Take care not to harm the clutch's friction surfaces when installing the pulley assembly to avoid prompt clutch failure. Slide the pulley and bearing over the front of the A/C compressor and, if it's tight, you may gently tap with a wooden block to seat it into place. A fresh snap ring must hold the pulley and bearing in place and its bevel or flattened side should point outward. After that, fit the Snap Ring Pliers 9764 and other alternatives to secure in place the complete pulley and bearing assembly. Should you use the original clutch, pulley and bearing assembly, attach the old shim(s) back to the compressor shaft; for new components, start with a stack of 2.54 mm trial shims on the compressor shaft. Attach the clutch plate to the front of the A/C compressor, then secure the compressor shaft bolt until you get 19 Nm of pressure. Make sure the air gap is correct in various spots; turn the pulley while doing this last check. For models that have the clutch plate set back, measure with a 90° gap gauge; but for those without a recess, check and tighten the shims until the air gap is between 0.35 - 0.60 mm with a blade-type feeler gauge. Place the A/C clutch coil wire lead below the connector bracket, hook the connector onto the bracket and fasten the engine wire harness. Set up the accessory drive belt and belly pan, put the suspension on the ground and attach the negative battery cable last.
Related 2009 Chrysler PT Cruiser Parts
 2009 Chrysler PT Cruiser Heater Core
 2009 Chrysler PT Cruiser A/C Accumulator
 2009 Chrysler PT Cruiser A/C Compressor
 2009 Chrysler PT Cruiser A/C Compressor Cut-Out Switches
 2009 Chrysler PT Cruiser A/C Condenser
 2009 Chrysler PT Cruiser A/C Hose
 2009 Chrysler PT Cruiser A/C Service Cap
 2009 Chrysler PT Cruiser A/C System Valve Core
 2009 Chrysler PT Cruiser Blower Motor
 2009 Chrysler PT Cruiser Blower Motor Resistor
 2009 Chrysler PT Cruiser Evaporator
 2009 Chrysler PT Cruiser HVAC Pressure Switch