JeepParts
My Garage
My Account
Cart
OEM 2009 Dodge Viper Steering Column
Steering Column Tilt- Select Vehicle by Model
- Select Vehicle by VIN
Select Vehicle by Model
orMake
Model
Year
Select Vehicle by VIN
For the most accurate results, select vehicle by your VIN (Vehicle Identification Number).
1 Steering Column found

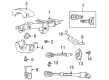
2009 Dodge Viper Steering Column Part Number: 4865679AC
$415.81 MSRP: $499.00You Save: $83.19 (17%)Ships in 1-3 Business DaysProduct Specifications- Other Name: Column - Steering; Column Steering Tilt
- Item Weight: 11.00 Pounds
- Item Dimensions: 27.9 x 10.3 x 9.0 inches
- Condition: New
- Fitment Type: Direct Replacement
- SKU: 4865679AC
- Warranty: This genuine part is guaranteed by Mopar's factory warranty.
2009 Dodge Viper Steering Column Parts and Q&A
- Q: How is the Steering Column Installed on 2009 Dodge Viper?A: You must have the ignition switch on and the key removed when installing the steering column. Drop the ignition switch onto the shaft so the tapered end fits first and then use screw (1) to hold the switch in place. Join the halo lamp to its connector points under the ignition cylinder housing. Set the multi-function/windshield wiper switch (2) above the column and hold it in place with two screws (1). Put the Clock Spring (1) on the end of the column, so that the latch hooks (2) on the Clock Spring lock into column (3). Place the ignition key cylinder in the ON position and push it into the ignition cylinder housing so the retaining tab (2) locks. Secure one end of the steering column to the bolts in the lower instrument panel by loosely tightening two nuts at the bottom. Link all three connectors of the wiring harness (1, 2, 3) to the multi-function switch, windshield wiper switch and ignition switch and link connector (3) to the Clock Spring (2). Put the column into place, then fix two upper mounting nuts and tighten all four to 17 Nm (150 in. lbs.). Place the front wheels straight in front, then turn the steering column rod until the lost spline is facing the top. Slide the extension coupling (5) onto the steering shaft (3), add and tighten the coupling pinch bolt to a torque of 49 Nm or 36 ft. lbs. Put the upper shroud (4) and lower shroud (8) onto the steering column, snap the lower shroud onto the upper and secure them with two screws. When you're installing the steering wheel, make sure the Clock Spring is centered, so the steering wheel does not cause damage; remember to perform the Clock Spring centering procedure if in doubt. Direct the Clock Spring wiring leads via the steering wheel hole, line up the large spline area of the steering wheel with the missing spot and push the Clock Spring up the shaft. Screw in the steering wheel retaining bolt with a torque setting of 54 Nm (40 ft. lbs.). Join the two horn switch wiring connector (2) to the driver air bag (1) and connect squib wires (6) to their matching colors, then seat the wires by pressing them. Attach the routing clips (3, 4) from the squib wires to the steering wheel (5), install the driver air bag and screw the three mountings into the air bag, tightening each to 12 Nm (105 in. lbs.). Place the lower instrument panel steering column cover following the instructions provided. Make sure not to reconnect the battery ground terminal until the air bag System Test is done to keep yourself safe. Try all the instruments attached to the steering column, reset the radio and clock as needed, confirm the tilting motion works properly and take the car out to confirm steering is working fine.
Related 2009 Dodge Viper Parts
 2009 Dodge Viper Steering Wheel
 2009 Dodge Viper Power Steering Pump
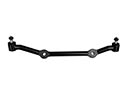 2009 Dodge Viper Center Link
 2009 Dodge Viper Power Steering Hose
 2009 Dodge Viper Power Steering Reservoir
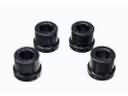 2009 Dodge Viper Rack & Pinion Bushing
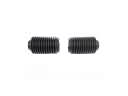 2009 Dodge Viper Rack And Pinion
 2009 Dodge Viper Steering Column Cover
 2009 Dodge Viper Steering Gear Box
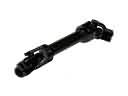 2009 Dodge Viper Steering Shaft
 2009 Dodge Viper Tie Rod Bushing
 2009 Dodge Viper Tie Rod End