JeepParts
My Garage
My Account
Cart
OEM 2009 Jeep Commander ABS Control Module
Anti Lock Brake Control Module- Select Vehicle by Model
- Select Vehicle by VIN
Select Vehicle by Model
orMake
Model
Year
Select Vehicle by VIN
For the most accurate results, select vehicle by your VIN (Vehicle Identification Number).
3 ABS Control Modules found


2009 Jeep Commander Control Module Part Number: 68046388AA
$1701.70 MSRP: $2570.00You Save: $868.30 (34%)Ships in 1-2 Business DaysProduct Specifications- Other Name: Control - Anti-Lock Brake; ABS Hydraulic Assembly; ABS Control Module; Modulator Valve; ABS Control Unit; Modulator; Control Unit Anti-Lock Brake
- Item Weight: 6.10 Pounds
- Item Dimensions: 9.2 x 7.6 x 6.8 inches
- Condition: New
- Fitment Type: Direct Replacement
- SKU: 68046388AA
- Warranty: This genuine part is guaranteed by Mopar's factory warranty.


2009 Jeep Commander Modulator Valve Part Number: 5179771AA
Product Specifications- Other Name: Control - Anti-Lock Brake; ABS Hydraulic Assembly; ABS Control Module; ABS Control Unit; Hydraulic Unit; Modulator; Control Unit Anti-Lock Brake
- Item Weight: 5.00 Pounds
- Item Dimensions: 7.0 x 7.1 x 6.4 inches
- Condition: New
- Fitment Type: Direct Replacement
- SKU: 5179771AA
- Warranty: This genuine part is guaranteed by Mopar's factory warranty.


2009 Jeep Commander Control Module Part Number: 68037915AB
Product Specifications- Other Name: Control - Anti-Lock Brake; Electronic Stability System Control Module; ABS Hydraulic Assembly; ABS Control Module; ABS Control Unit; Stab Control Module; Control Unit Anti-Lock Brake
- Replaces: 68037915AA
- Item Weight: 6.80 Pounds
- Item Dimensions: 7.2 x 7.1 x 6.3 inches
- Condition: New
- Fitment Type: Direct Replacement
- SKU: 68037915AB
- Warranty: This genuine part is guaranteed by Mopar's factory warranty.
2009 Jeep Commander ABS Control Module Parts and Q&A
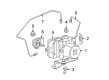
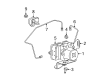
- Q: How to Service and Repair the ABS Control Module on 2009 Jeep Commander?A: Begin by removing the negative cable from your battery and add the brake pedal prop rod. Empty the master cylinder and next remove the electrical connections (5) from the HCU. Take out the main brake line from the master cylinder and from the HCU (4) and follow that by removing the second brake line at the master cylinder and the HCU (4). After that, remove the 4 chassis lines (3) attached to the HCU (4) and take out the single nut and bolt securing the HCU bracket to the vehicle underneath. Slowly take out the HCU (3) plus the bracket (5) from your vehicle. Once done, unscrew the three ABM bolts that join the ABM (1) to the HCU (2) and pull the two components apart, as separating them with about 38 mm (1.5 in.) of space will protect them from damage. Do not touch either the sensor terminals on the HCU or the contact pads on the ABM to ensure you do not spread contamination.
Related 2009 Jeep Commander Parts
 2009 Jeep Commander Brake Caliper
 2009 Jeep Commander Speed Sensor
 2009 Jeep Commander Brake Caliper Bolt
 2009 Jeep Commander Brake Caliper Bracket
 2009 Jeep Commander Brake Disc
 2009 Jeep Commander Brake Dust Shield
 2009 Jeep Commander Brake Line
 2009 Jeep Commander Brake Pad
 2009 Jeep Commander Hydraulic Hose
 2009 Jeep Commander Parking Brake Shoe
 2009 Jeep Commander Wheel Stud
 2009 Jeep Commander Yaw Sensor