JeepParts
My Garage
My Account
Cart
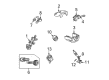
OEM 2010 Chrysler PT Cruiser Rack And Pinion
Steering Rack And Pinion- Select Vehicle by Model
- Select Vehicle by VIN
Select Vehicle by Model
orMake
Model
Year
Select Vehicle by VIN
For the most accurate results, select vehicle by your VIN (Vehicle Identification Number).
2 Rack And Pinions found

2010 Chrysler PT Cruiser Steering Gear Part Number: 5272722AJ
$668.90 MSRP: $898.00You Save: $229.10 (26%)Ships in 1-2 Business DaysProduct Specifications- Other Name: Gear - Rack And Pinion; Rack and Pinion Assembly; Steering Gearbox; Gear Assembly
- Replaces: 5272722AI, 5272722AG
- Condition: New
- Fitment Type: Direct Replacement
- SKU: 5272722AJ
- Warranty: This genuine part is guaranteed by Mopar's factory warranty.
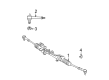
2010 Chrysler PT Cruiser Steering Gear Part Number: 4656747AH
Product Specifications- Other Name: Gear - Rack And Pinion; Rack and Pinion Assembly; Steering Gearbox; Gear Assembly; Gear Rack And Pinion
- Replaces: 4656747AF
- Item Weight: 19.60 Pounds
- Item Dimensions: 57.2 x 11.0 x 8.2 inches
- Condition: New
- Fitment Type: Direct Replacement
- SKU: 4656747AH
- Warranty: This genuine part is guaranteed by Mopar's factory warranty.
2010 Chrysler PT Cruiser Rack And Pinion Parts and Q&A
- Q: How to Install a Rack and Pinion on the Front Suspension Crossmember on 2010 Chrysler PT Cruiser?A: Attach the rack and pinion to the front suspension crossmember with four bolts, turning them tight until they read 61 Nm (45 ft. lbs.). Locate the rack and pinion at its center position and then fit the dash cover seal for the pinion shaft around the shaft, connecting the hole locations on the rack and pinion with the block tabs on the housing. Lower about halfway the column end part of the steering column through the dash panel, match the flat on the coupling with the flat on the pinion shaft and slide the coupling onto the shaft. Fit the roll pin in the notch in the pinion shaft and align its hole with the fitting in the coupling, then insert the roll pin until the notch is in the middle. Retrace the path for the power steering rack and pinion if it has shifted. With the transmission jack, lift the front suspension crossmember and power steering rack and pinion until the crossmember is sitting against its mounting area and steer the lower steering column coupling down to match the opening in the dash panel. Attach the two bolts in the lower control arm bushing to the tapping plates on the body, then install the other two within each front and rear suspension crossmember end, tightening all these six to about 2 Nm (20 in. lbs.). Be sure to use the same bolts and holes as when you took out the crossmember to ensure the car's wheel alignment stays as it was. Place a soft face hammer on the front suspension crossmember until it touches the marks used previously and tighten the two biggest mounting bolts through the rear isolator bushings on the lower control arm to 250 Nm (185 ft. lbs.). Use 153 Nm (113 ft. lbs.) of force to tighten the other crossmember mounting bolts. Place the engine torque strut on the crossmember, set the drive-belt splash shield and attach the fasteners to the body and the front suspension crossmember. When this was performed previously, reinstall the fasteners linking the front apron to the body lower reinforcement and the fastener attaching the wheel house splash shield with the drive belt splash shield. Fasten the washer to the top end of the stud protruding from the torque strut bolt, set the pencil strut on the crossmember and on the body's right front corner and tighten all the mounting nuts up to 52 Nm (38 ft. lbs.). Make sure to wash the power steering hose ends that are open and the ports on the rack and pinion with a lint-free towel. Then replace the O-ring on the pressure hose with a new, clean and lubricated ring. For these vehicles, fit the cooler into place, lock the tube of the cooler into its routing clip, then install and fasten the mounting screws on the front suspension crossmember to 10 Nm (90 in. lbs.). On non-turbo engine models, put the cooler hose over the rack and pinion outlet port and fasten the clamp near the bead of the port, making sure power steering fluid pressure hose sits between the crossmember and the driveshaft within 4-10 mm after you secure the hose. Put the pressure hose into the port on the power steering rack and pinion and have the technician twist the nut on the tube onto the rack and pinion, folding it until it reaches 31 Nm (23 ft. lbs.). For cars with turbochargers, secure the return hose to the fitting of the rack and pinion outlet port, place the pressure hose inside its port, then screw the pressure hose tube nut into the rack and pinion, just loosely at this stage. After putting the routing clip on, tighten the nut of the fluid pressure hose tube to 31 Nm (23 ft. lbs.). Secure the locking tab after connecting the wiring harness connector to a power steering fluid pressure switch. Attach the heat shield over the tie rod side on the lower knuckle arm and slide the nut for the outer tie rod ball stud over it. Tighten the stud nut to 55 Nm (40 ft. lbs.). On the wheel, fasten all its mounting nuts securely with 135 Nm force (about 100 ft. lbs.). Lay the seal for the oil seal below the collar of the lower coupling, with some grease on the seal's lip. Confirm that both front wheels are going straight ahead and if they're not, keep rotating the steering shaft until the top and bottom sections of the column are aligned. Attach the upper coupling to the bottom one and secure them with the pinch bolt, tightening it up to about 28 Nm (250 in. lbs.) and using the retainer clip once you've finished the pinch bolt. Take off the steering wheel holder and test each side of the steering wheel to confirm the coupling does not make a sound against the seal while you turn it. Fully fill the power steering, watch for leaks around the system and check the front wheel toe placement.
Related 2010 Chrysler PT Cruiser Parts
 2010 Chrysler PT Cruiser Power Steering Pump
 2010 Chrysler PT Cruiser Power Steering Cooler
 2010 Chrysler PT Cruiser Power Steering Hose
 2010 Chrysler PT Cruiser Power Steering Reservoir
 2010 Chrysler PT Cruiser Steering Column
 2010 Chrysler PT Cruiser Steering Column Cover
 2010 Chrysler PT Cruiser Steering Gear Box
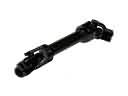 2010 Chrysler PT Cruiser Steering Shaft
 2010 Chrysler PT Cruiser Steering Wheel
 2010 Chrysler PT Cruiser Tie Rod End