JeepParts
My Garage
My Account
Cart
OEM Chrysler Aspen A/C Clutch
Air Conditioning Clutch- Select Vehicle by Model
- Select Vehicle by VIN
Select Vehicle by Model
orMake
Model
Year
Select Vehicle by VIN
For the most accurate results, select vehicle by your VIN (Vehicle Identification Number).
5 A/C Clutches found


Chrysler Aspen Clutch Coil Part Number: 5003681AA
$186.95 MSRP: $279.00You Save: $92.05 (33%)Ships in 1-2 Business Days
Chrysler Aspen Pulley Assembly Part Number: 5135993AA
$184.18 MSRP: $233.48You Save: $49.30 (22%)Ships in 1-2 Business Days
Chrysler Aspen Clutch Kit Part Number: 68032119AA
$41.78 MSRP: $61.40You Save: $19.62 (32%)Ships in 1-2 Business Days
Chrysler Aspen Clutch Coil Hardware Kit Part Number: 5135972AA
Chrysler Aspen Pulley Assembly Part Number: 5135971AA
Chrysler Aspen A/C Clutch
Choose OEM A/C Clutch that meet Chrysler factory standards. Chrysler designs and tests every component for precision and durability. Each A/C Clutch follows strict manufacturing steps to lock in quality and fit. If your Chrysler Aspen matters to you, OEM parts make the smart choice. You'll get the exact look, feel, and performance you expect. Shop genuine Aspen parts at the highly competitive prices online. Enjoy a manufacturer's warranty, a hassle-free return policy, and rapid delivery. No more guesswork with off brands. Get genuine parts with exact fit and true factory performance. Shop with confidence today at JeepPartsDeal.com.
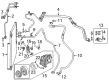
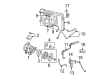
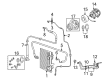
Chrysler Aspen A/C Clutch is a significant part of the car's air condition system which is recognized for its efficiency and durability. This A/C Clutch effectively transmits and switches engine power to the A/C compressor and turns on/off when the A/C is switched on. On the Chrysler Aspen A/C Clutch, the spinning components of the belt pulley are magnetized and locked by a drum for the key, pulled by the belt drive for optimal cooling without taxing the engine when deactivated. This feature also improves on the functionality of the Chrysler Aspen while at the same time improving on the safety aspect since if the clutch fails the compressor is likely to be damaged. This A/C Clutch fits model Chrysler Aspen cars of the years 2006 to 2008, guaranteeing reliability as a daily driver and longevity in performance. The Chrysler Aspen's towing capacity enhanced by a rather spacious interior similar to that of Grand Cherokee Laredo, the A/C Clutch improves comfort regardless the distance to be covered. Moreover, incorporation of the A/C Clutch design eliminates the problem of slippages and sticking which reduces the car refrigeration potentials, thus raising fuel demands. Being built in a sturdy design and having enhanced features for the Chrysler Aspen A/C Clutch is one extreme that sets it a cut above the rest in the automotive scene today, therefore ensuring that drivers do not have to endure discomfort in their car all because of the climates.
Chrysler Aspen A/C Clutch Parts and Q&A
- Q: How to Remove and Replace an A/C Clutch on Chrysler Aspen?A:For replacing the compressor clutch assembly, disconnect the vehicle's negative battery cable first. After that, pull out the air intake hose from both the air filter housing and the resonator. Nevertheless, you only need to totally drain the engine cooling system, disconnect the upper Radiator hose from the radiator and place the hose aside. Get rid of the radiator fan and shroud, then take out the accessory Drive Belt. Disconnect the engine wire harness from the compressor clutch field coil connector shown at the top of the A/C compressor. Remove the wire lead and connector from the clutch field coil and pull it away from the bracket. Hold the clutch plate in place with a band-type oil filter wrench or a strap wrench and remove the compressor shaft bolt. Do not force the clutch plate and pulley and bearing assembly apart as this may damage the clutch plate and could also cause a clutch shim to be lost. Lightly strike the clutch plate with a plastic mallet to get it off the compressor shaft and then take out both the clutch plate and shim(s). Remove the Snap Ring Pliers 9764 or an equivalent tool and free the snap ring securing the pulley and bearing assembly to the front of the A/C compressor. Then, you can take out the assembly. Remove the snap ring that keeps the compressor clutch on the front of the compressor and take out the field coil.
- Q: How to Install an A/C Clutch on Chrysler Aspen?A:Put the dowel pin from the rear of the field coil into the hole in the front of the A/C compressor and push the field coil onto it without crimping the wire lead. A new snap ring should be placed around the clutch coil to the A/C compressor, rotated so that the bevel faces out and the eyelets are placed on the side of the dowel pin. After using a Snap Ring Pliers 9764 (1), secure the field coil by installing the snap ring (4) all the way. Be sure not to damage the friction surfaces when you install the pulley and bearing assembly; if a force is needed, tap it with a block of wood. You should use a new snap ring on the pulley and bearing assembly, setting the bevel side outside. Again, fasten the A/C compressor to the assembly with the snap ring located in Snap Ring Pliers 9764 or an equal device. If you use the original clutch plate (2) and pulley and bearing assembly, replace the original shims (3) on the compressor shaft (1); if the new set of parts is used, fit stacked shims 2.54 mm (0.010 in.) in width onto the shaft. Attach the clutch plate (4) to the front of the A/C compressor (5) and join them by fastening the compressor shaft bolt (3), using 19 Nm (168 in. lbs.) of torque. Once you've finished tightening, look at the air gap in numerous spots to make sure it is correct and give the pulley a spin before moving on. When your clutch plate goes towards the inside of the crankshaft, measure the gap with a 90° wire gauge; but again, remember to use a blade feeler gauge with any other style. Shim the air gap to be between 0.35 and 0.60 mm or 0.014 and 0.024 inches (0.014 - 0.024 in.). First, bring the compressor clutch field coil wire behind the connector bracket (2), install the connector (1) there and then connect the engine wire harness. Install the accessory Drive Belt, radiator fan and shroud, attach the upper radiator hose correctly, add the air intake hose, fill the coolant system again and attach the negative battery cable.


Related Chrysler Aspen Parts
 Chrysler Aspen Blend Door Actuator
 Chrysler Aspen A/C Compressor
 Chrysler Aspen A/C Condenser
 Chrysler Aspen A/C Hose
 Chrysler Aspen A/C Service Cap
 Chrysler Aspen A/C Switch
 Chrysler Aspen A/C System Valve Core
 Chrysler Aspen Blower Motor
 Chrysler Aspen Blower Motor Resistor
 Chrysler Aspen Evaporator
 Chrysler Aspen Heater Core
 Chrysler Aspen HVAC Pressure Switch